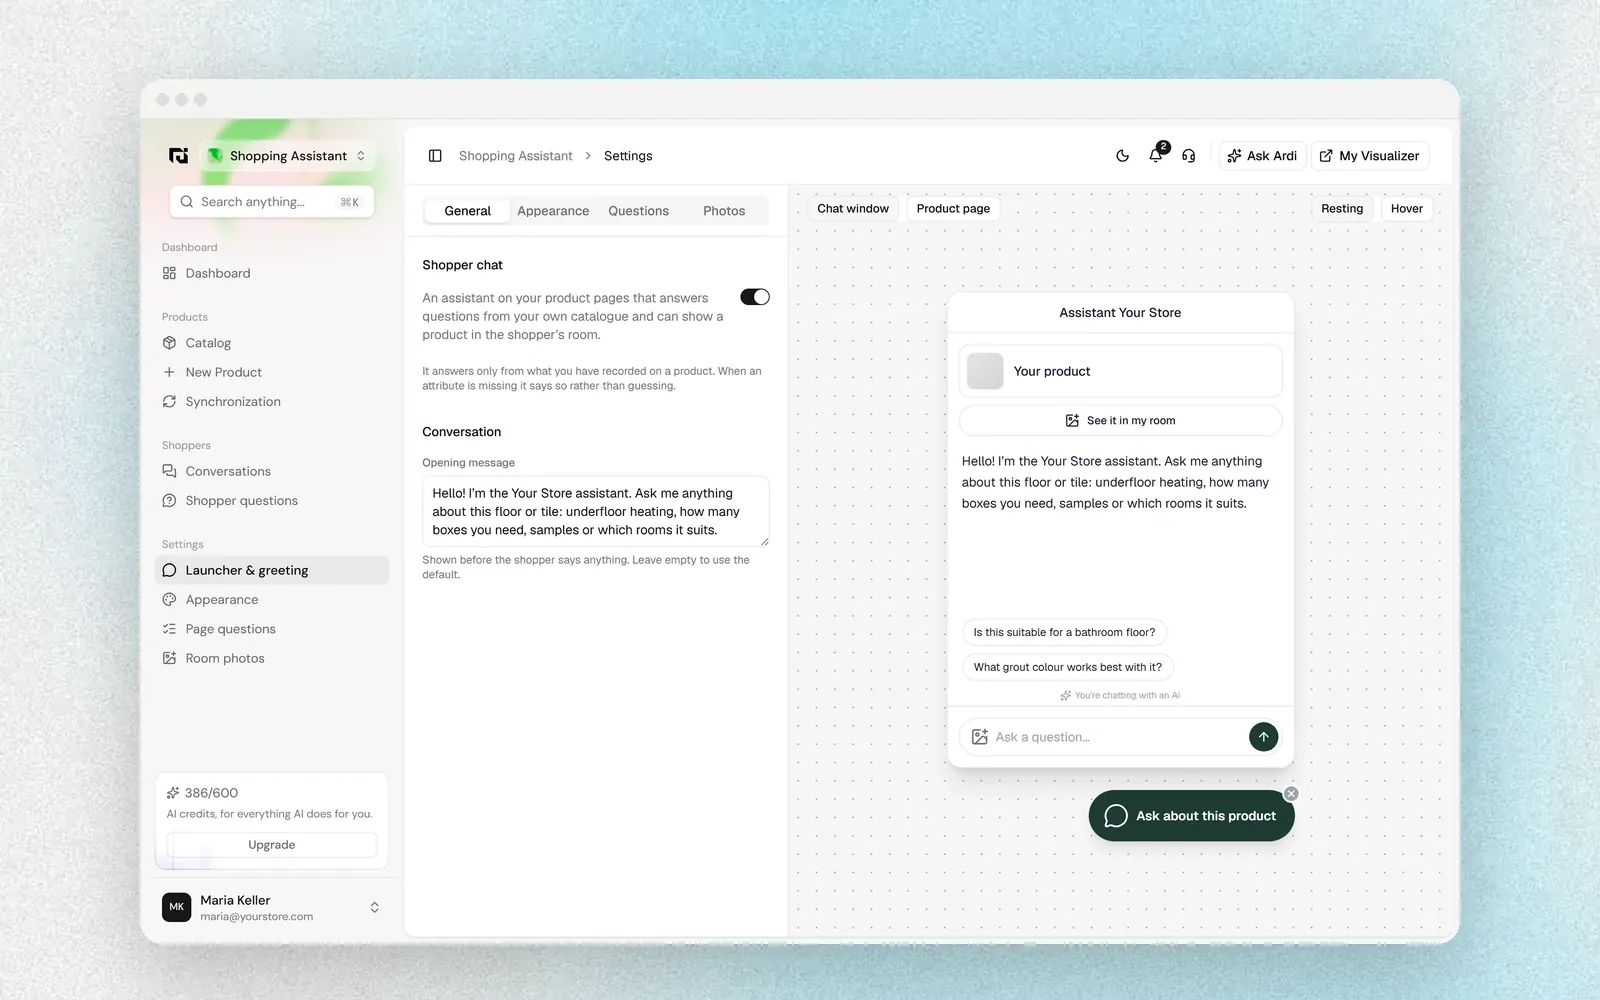
The Shopping Assistant answers shoppers' questions on your product pages, using only what you have recorded about each product. Whether a floor works with underfloor heating, how many boxes they need, whether they can order a sample. When an answer is not in your catalog, it says so rather than guessing, and you see that question in your reports.
What you will set up: the chat on your product pages, its greeting, the launcher button, and a short block of product questions on the page itself. Then you will learn where to read what shoppers ask.
How long it takes: about 10 minutes, if your website is already connected.
What you need before you start
- Your website connected. The Shopping Assistant runs from the same snippet as the visualizer. If you have not added it yet, follow our guide to installing the visualizer first, or go to Home › Setup › Website. If no site is connected, the settings page shows an alert with a link to Open integration settings.
- Products in your catalog with good details. The assistant answers from your product data, so sizes, finishes, applications and descriptions matter.
Step 1: Open the Shopping Assistant settings
Open the workspace switcher at the top of the sidebar and choose Shopping Assistant. The sidebar has three groups:
- Dashboard: Dashboard.
- Shoppers: Conversations and Shopper questions.
- Settings: Launcher & greeting, Appearance, Page questions and Room photos.
Each Settings item opens the same settings page on its own tab (General, Appearance, Questions, Photos). On the right is a live preview: switch between Chat window and Product page, and between Resting and Hover. There is no Save button. Changes save automatically.
Step 2: Switch on the chat and write the greeting
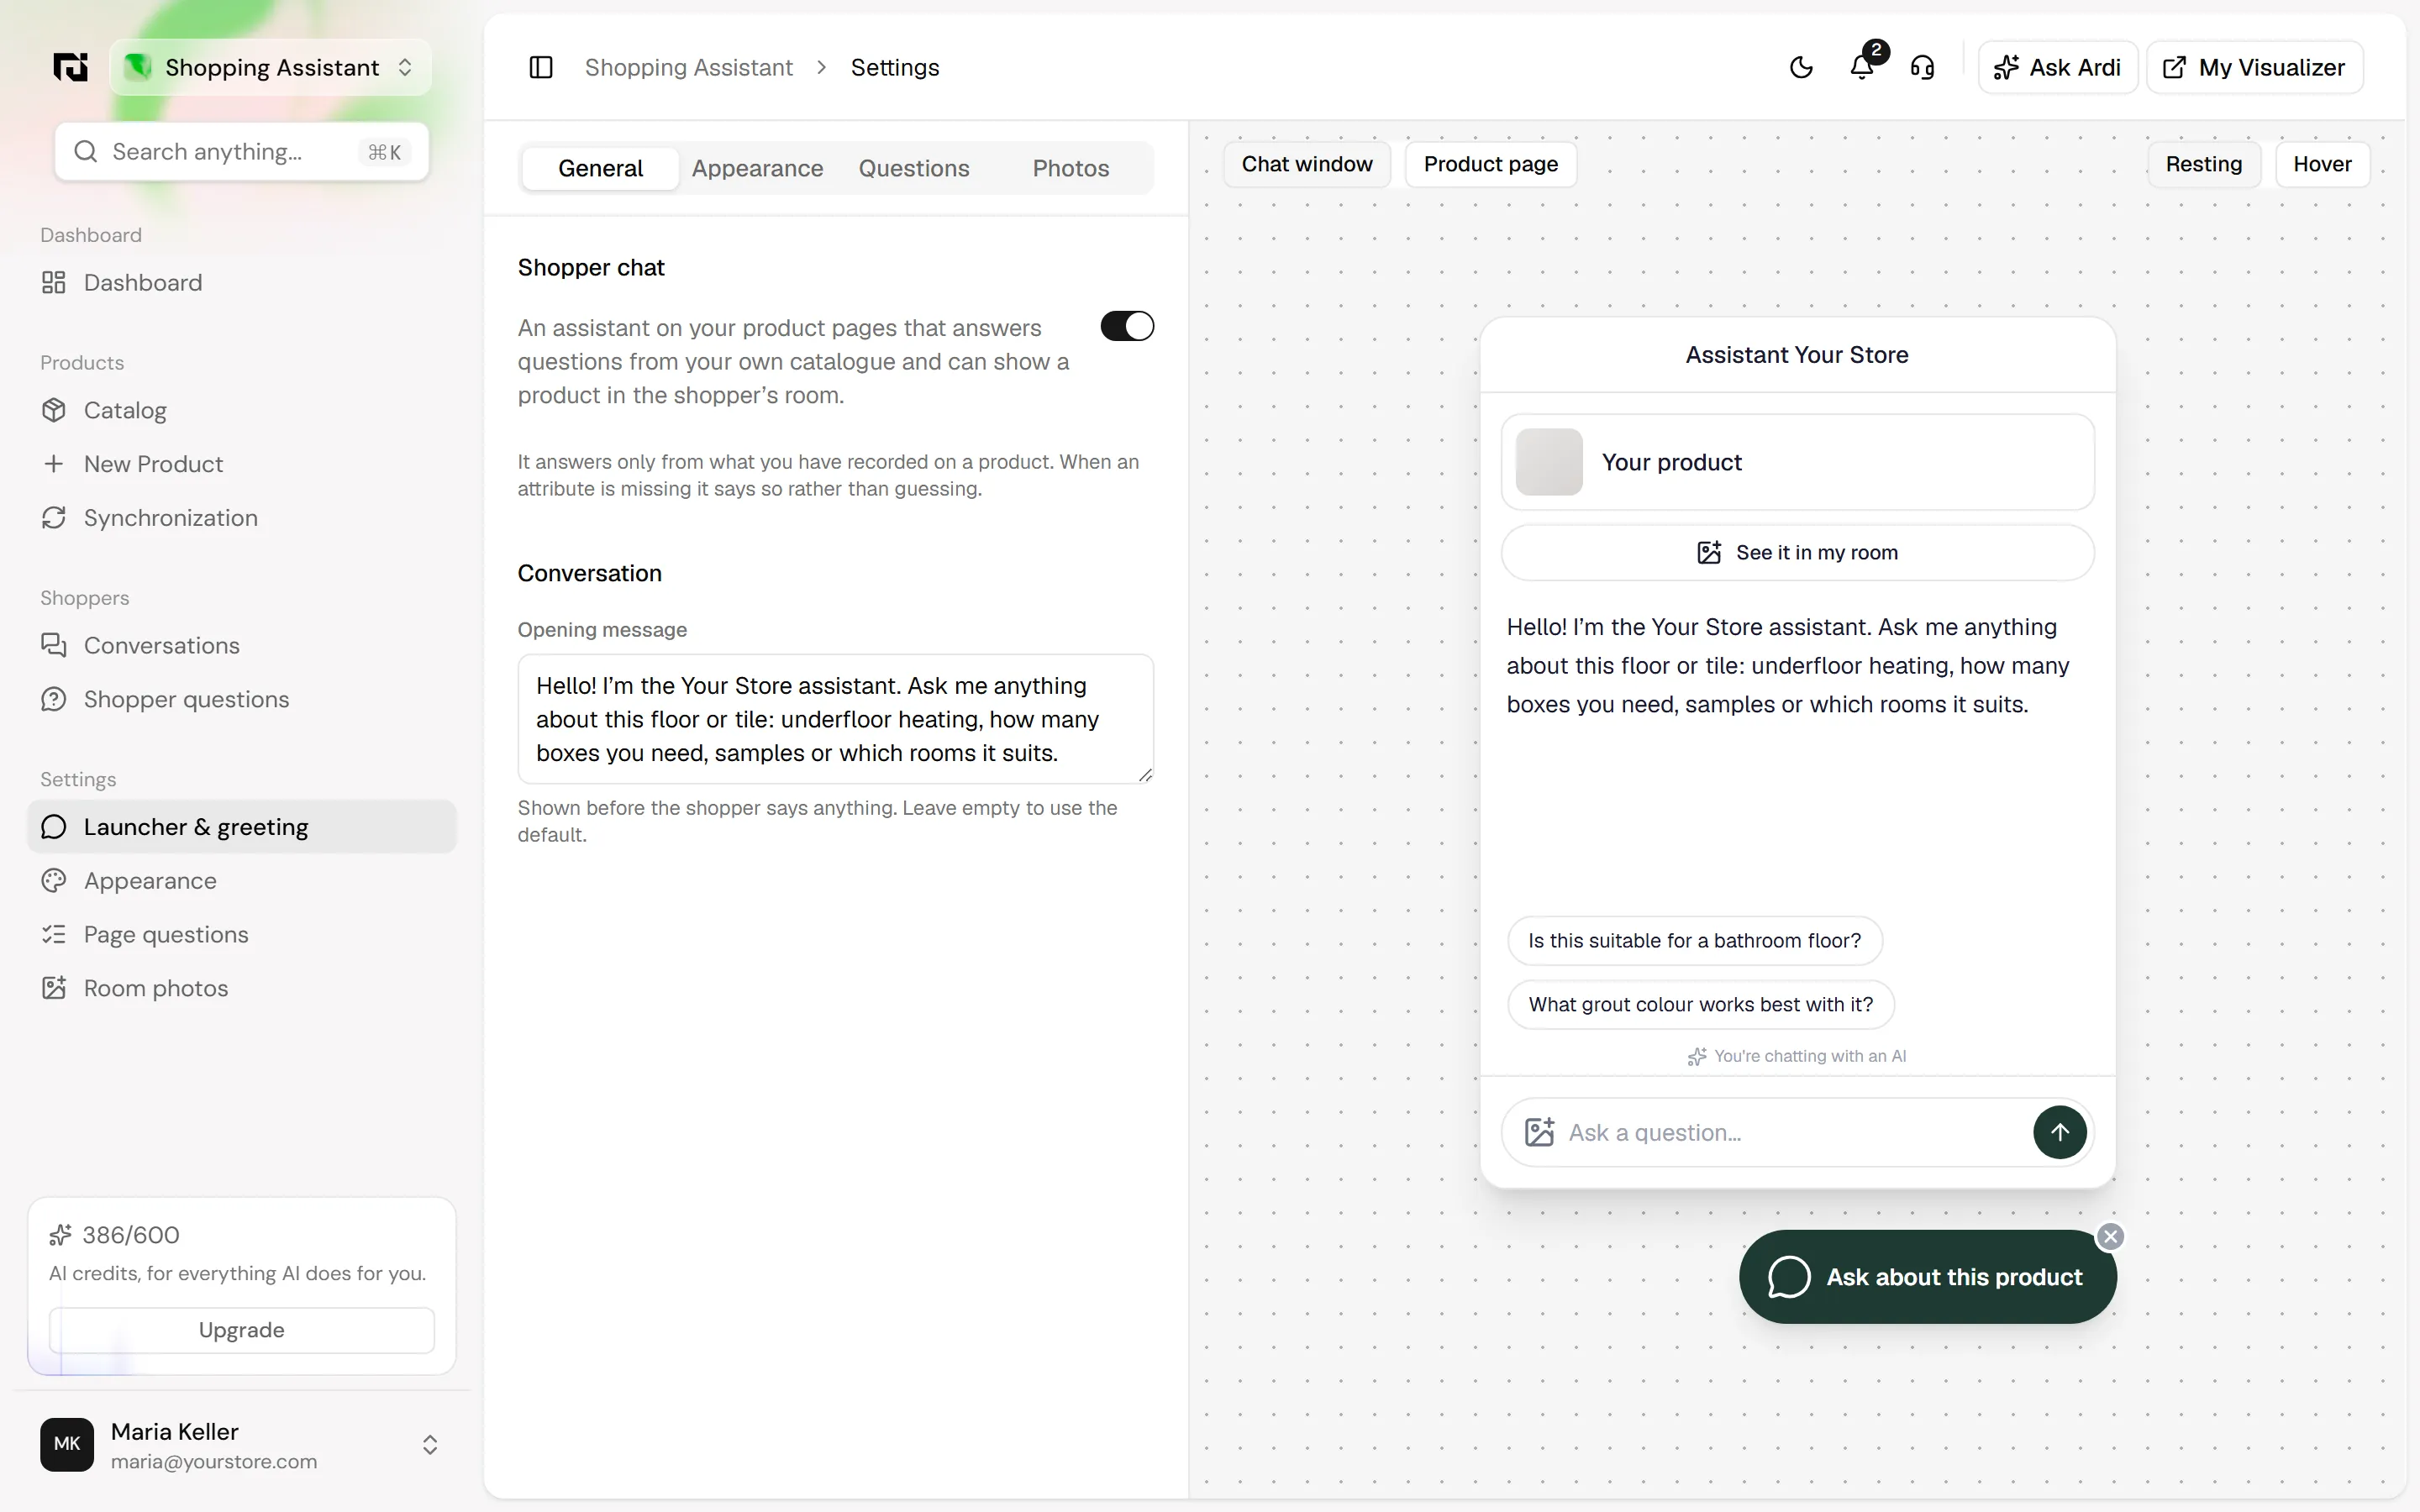
Choose Settings › Launcher & greeting. Turn on Shopper chat. This puts an assistant on your product pages that answers questions from your own catalog and can show a product in the shopper's room.
Under Conversation, write the Opening message. It is shown before the shopper says anything. Leave it empty to use the default.
Step 3: Style the launcher
Choose Settings › Appearance. Here you set:
- Corner: Left or Right, where the launcher sits on the page.
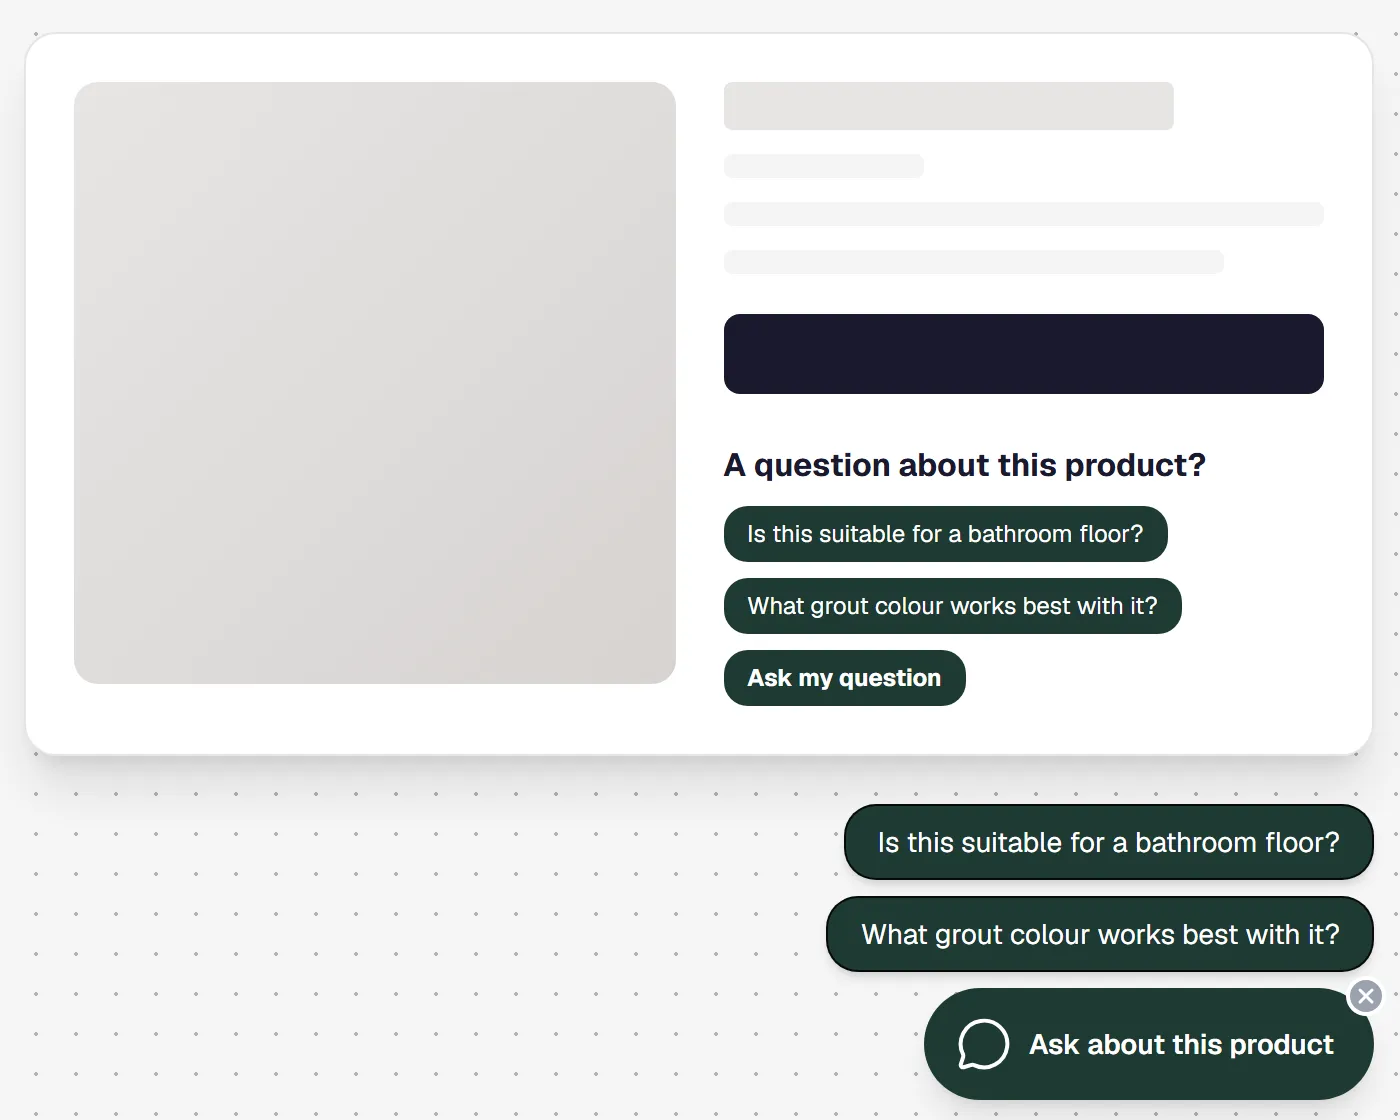
- Button label: the text on the launcher, for example "Ask about this product". Leave it empty to use "Shopping Assistant" in your site's language.
- Launcher colours: Background, Text, Background on hover and Text on hover. Background starts on your brand color and Background on hover on your secondary color. Leave a color on Auto to follow your brand.
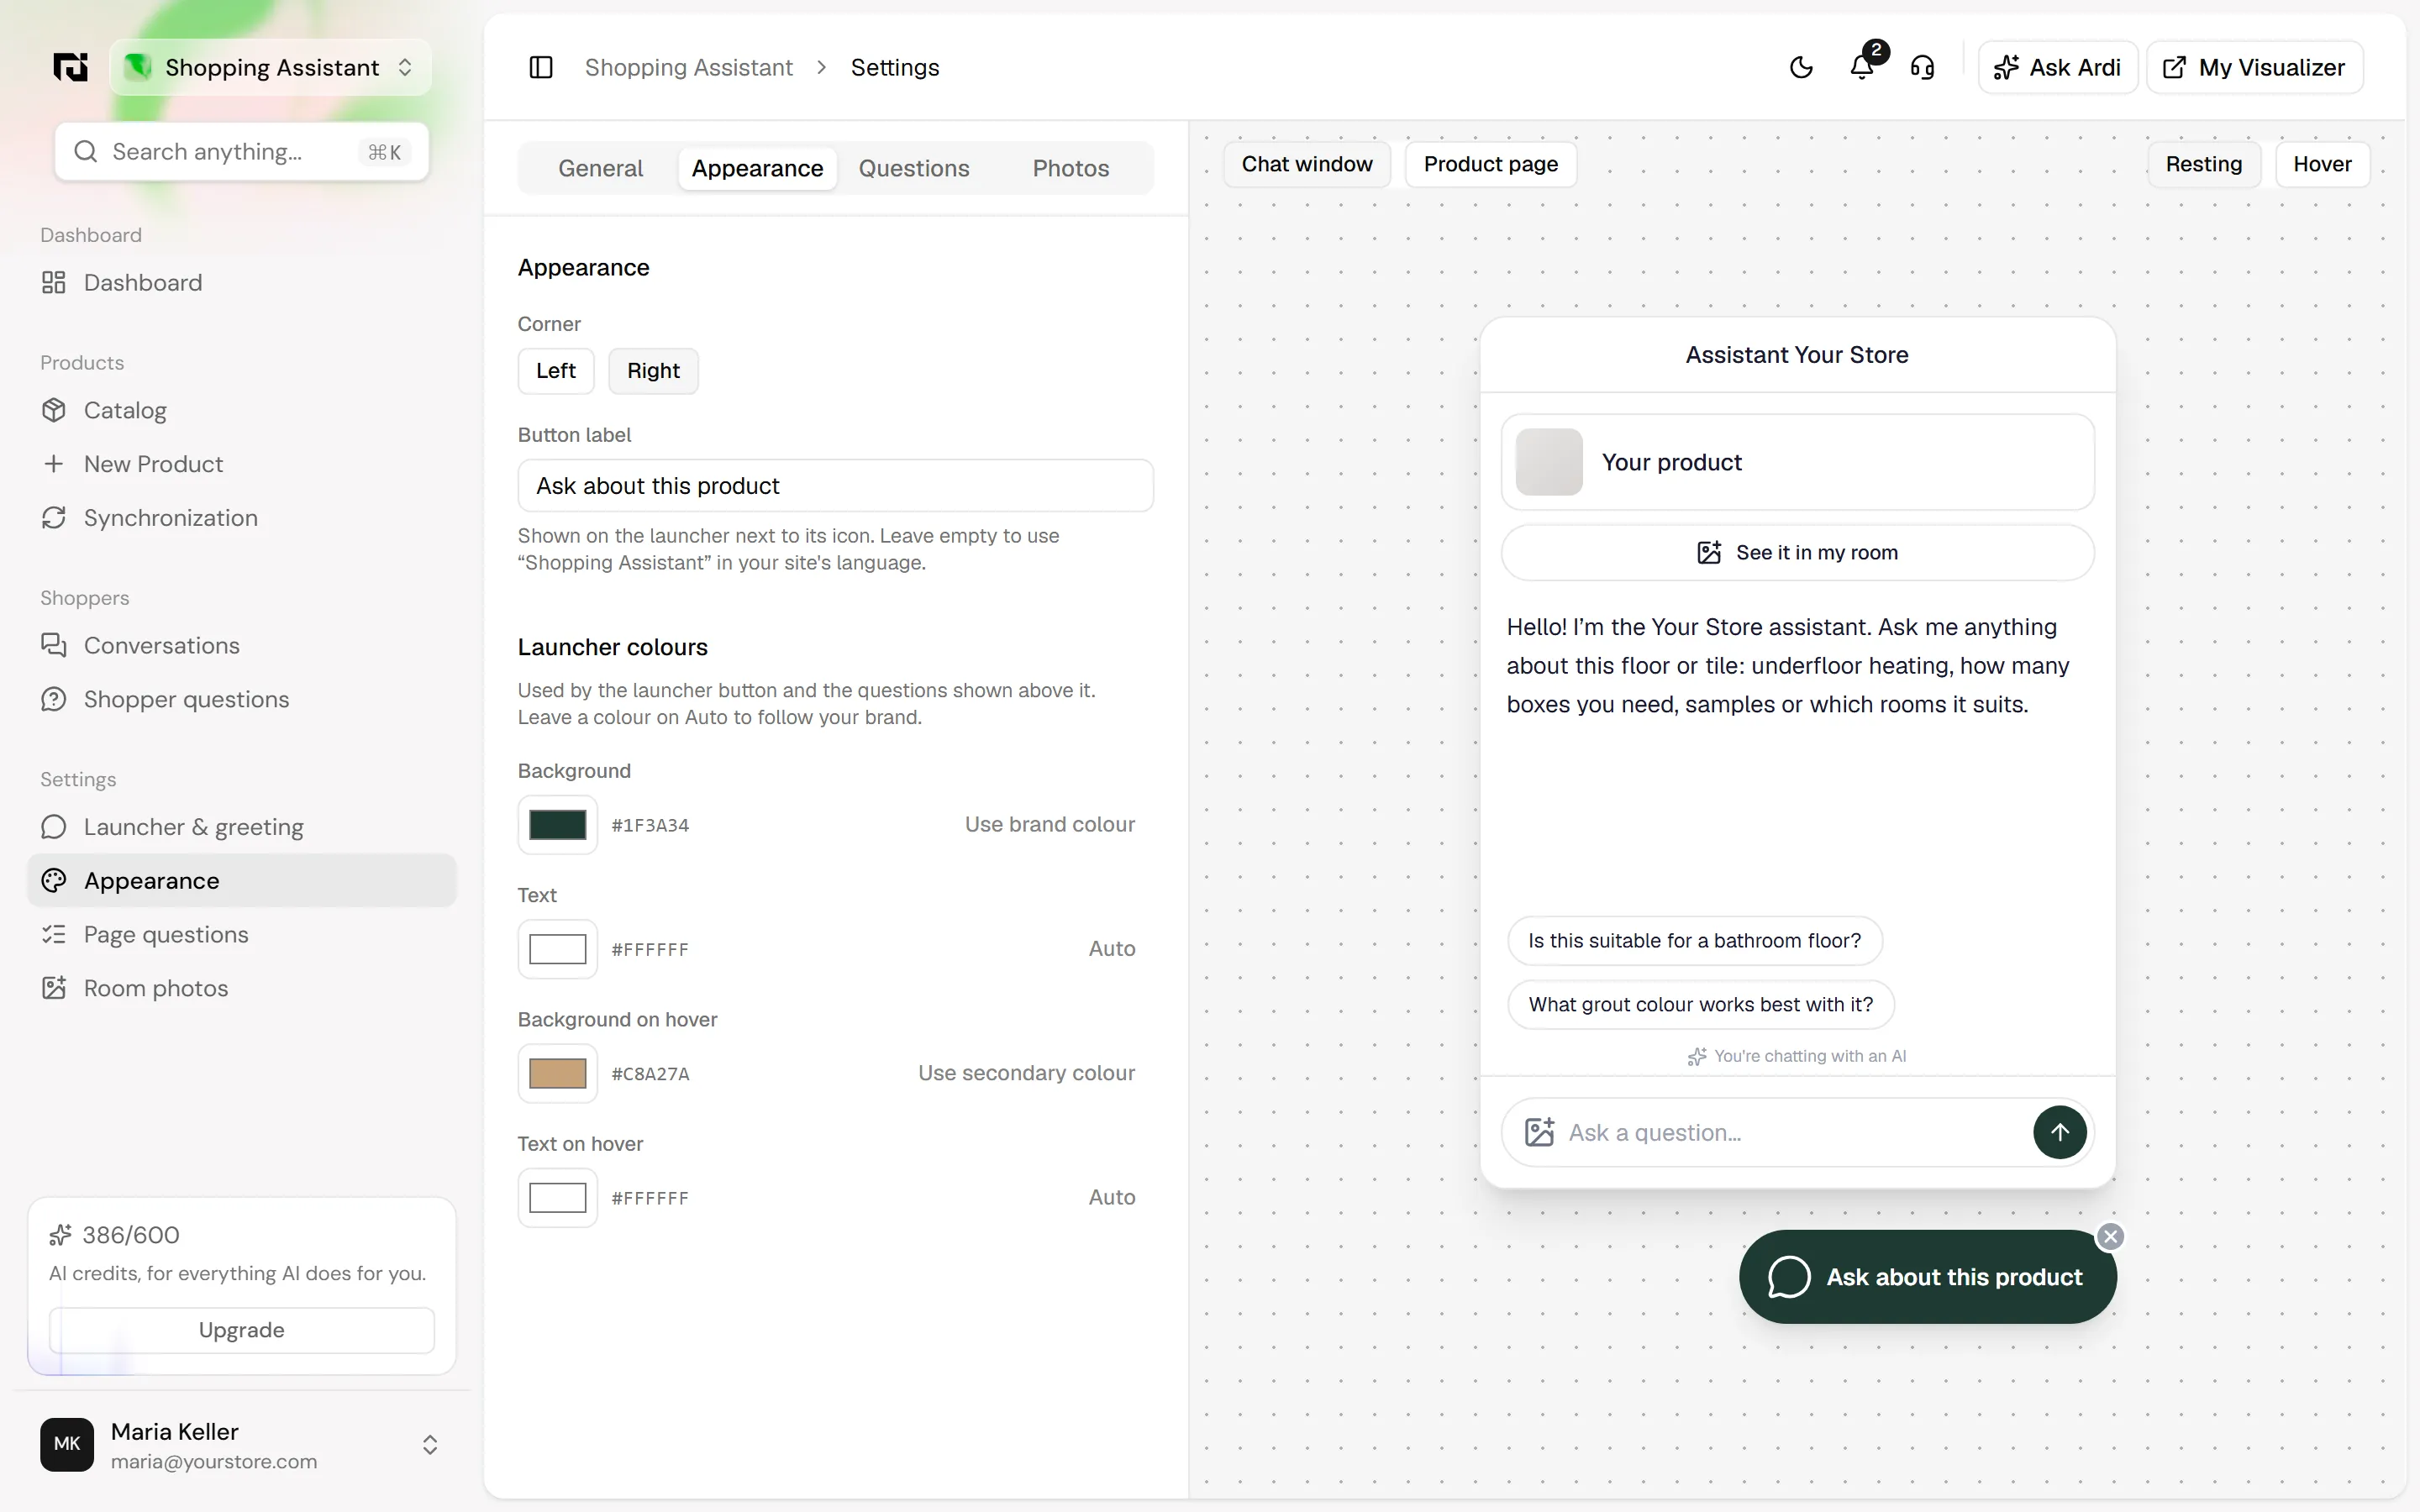
Switch the preview to Hover to check the hover colors before you leave the tab.
Step 4: Add questions to the product page
Choose Settings › Page questions. Turn on Show the questions block. This adds a short block of questions about the product to the page itself. The questions are written for each product from your own catalog data, so you do not type them. When a shopper clicks one, the chat opens with that question already asked.
Then tell it where to go:
- Where it goes: a CSS selector for the element on your product page to place the block against, usually the column holding the product title and Add to Cart. For example,
.product-info. - Placement: Inside, at the end; Inside, at the start; Just after it; or Just before it.
- Heading: the line above the questions, for example "A question about this product?"
- Button: the label of the button for the shopper's own question, for example "Ask my question".
- Button, mid-conversation: shown instead when the shopper already has a conversation open, for example "Resume the conversation".
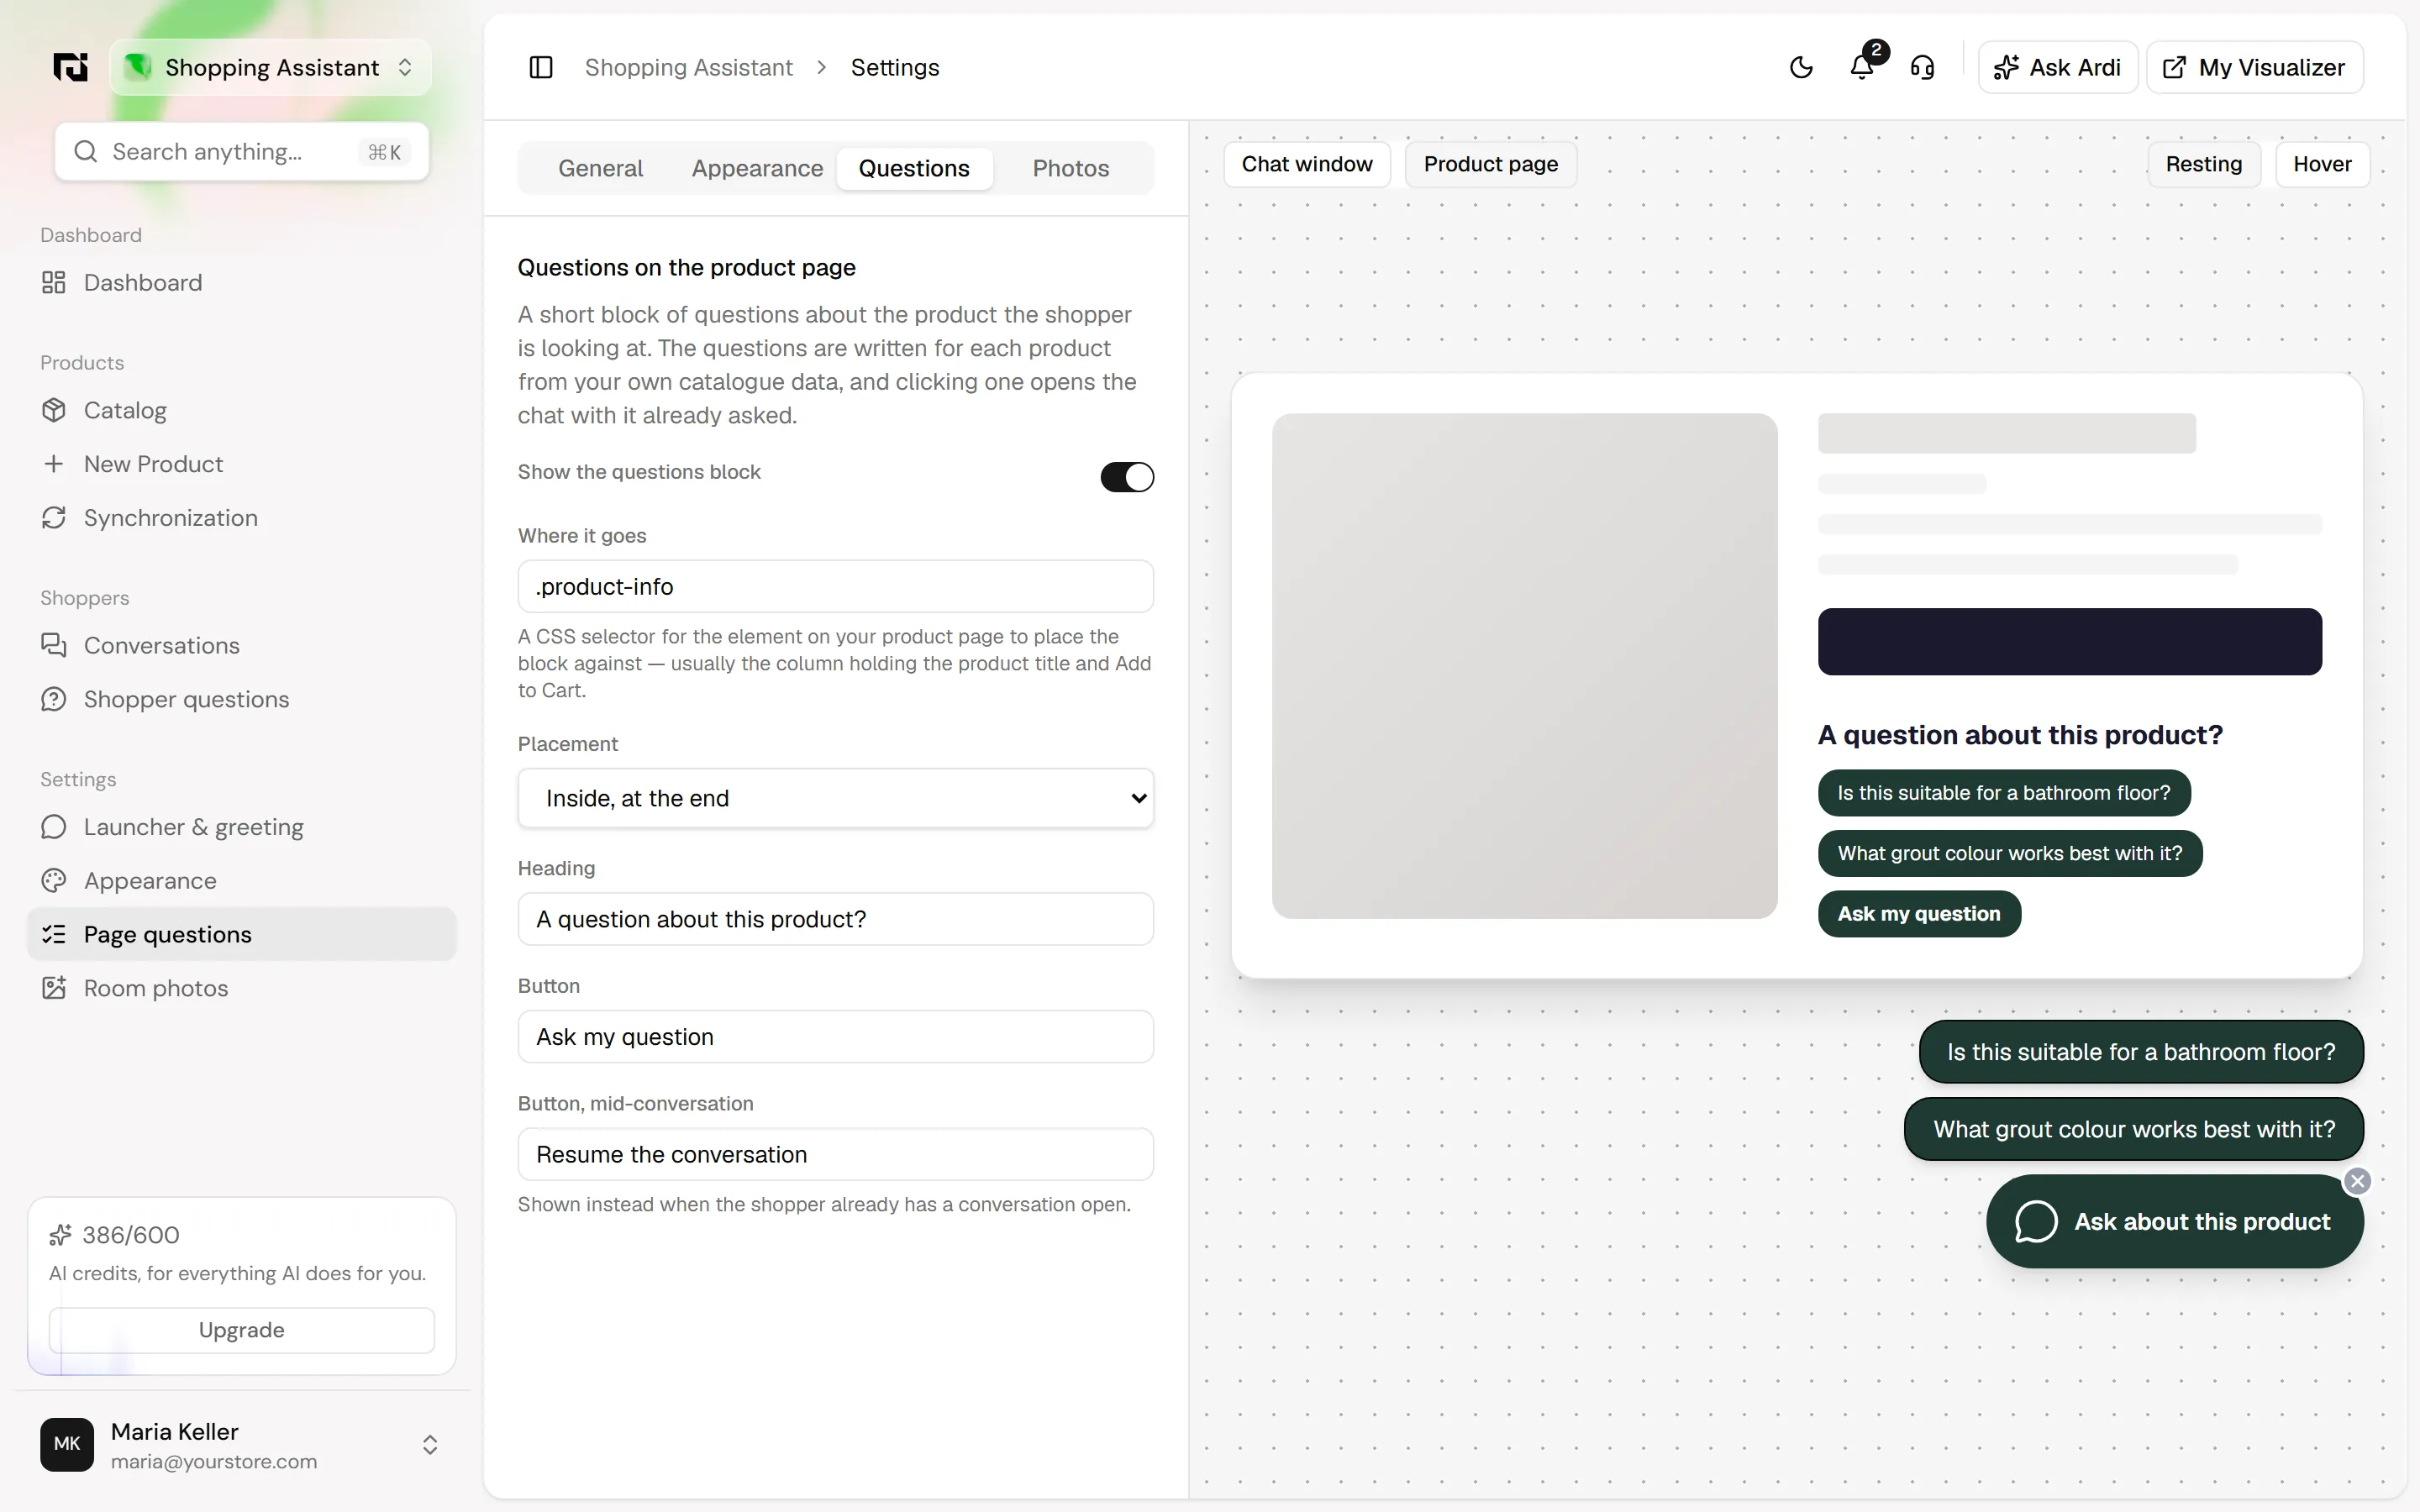
Switch the preview to Product page to see the block in place.
Step 5: Check it on your site
Open one of your product pages in a private browser window. You should see the launcher in the corner you chose and, if you turned it on, the questions block next to the product details. Ask a question you know the answer to, such as the size or finish, and check the reply against the product.
Step 6: Read the dashboard
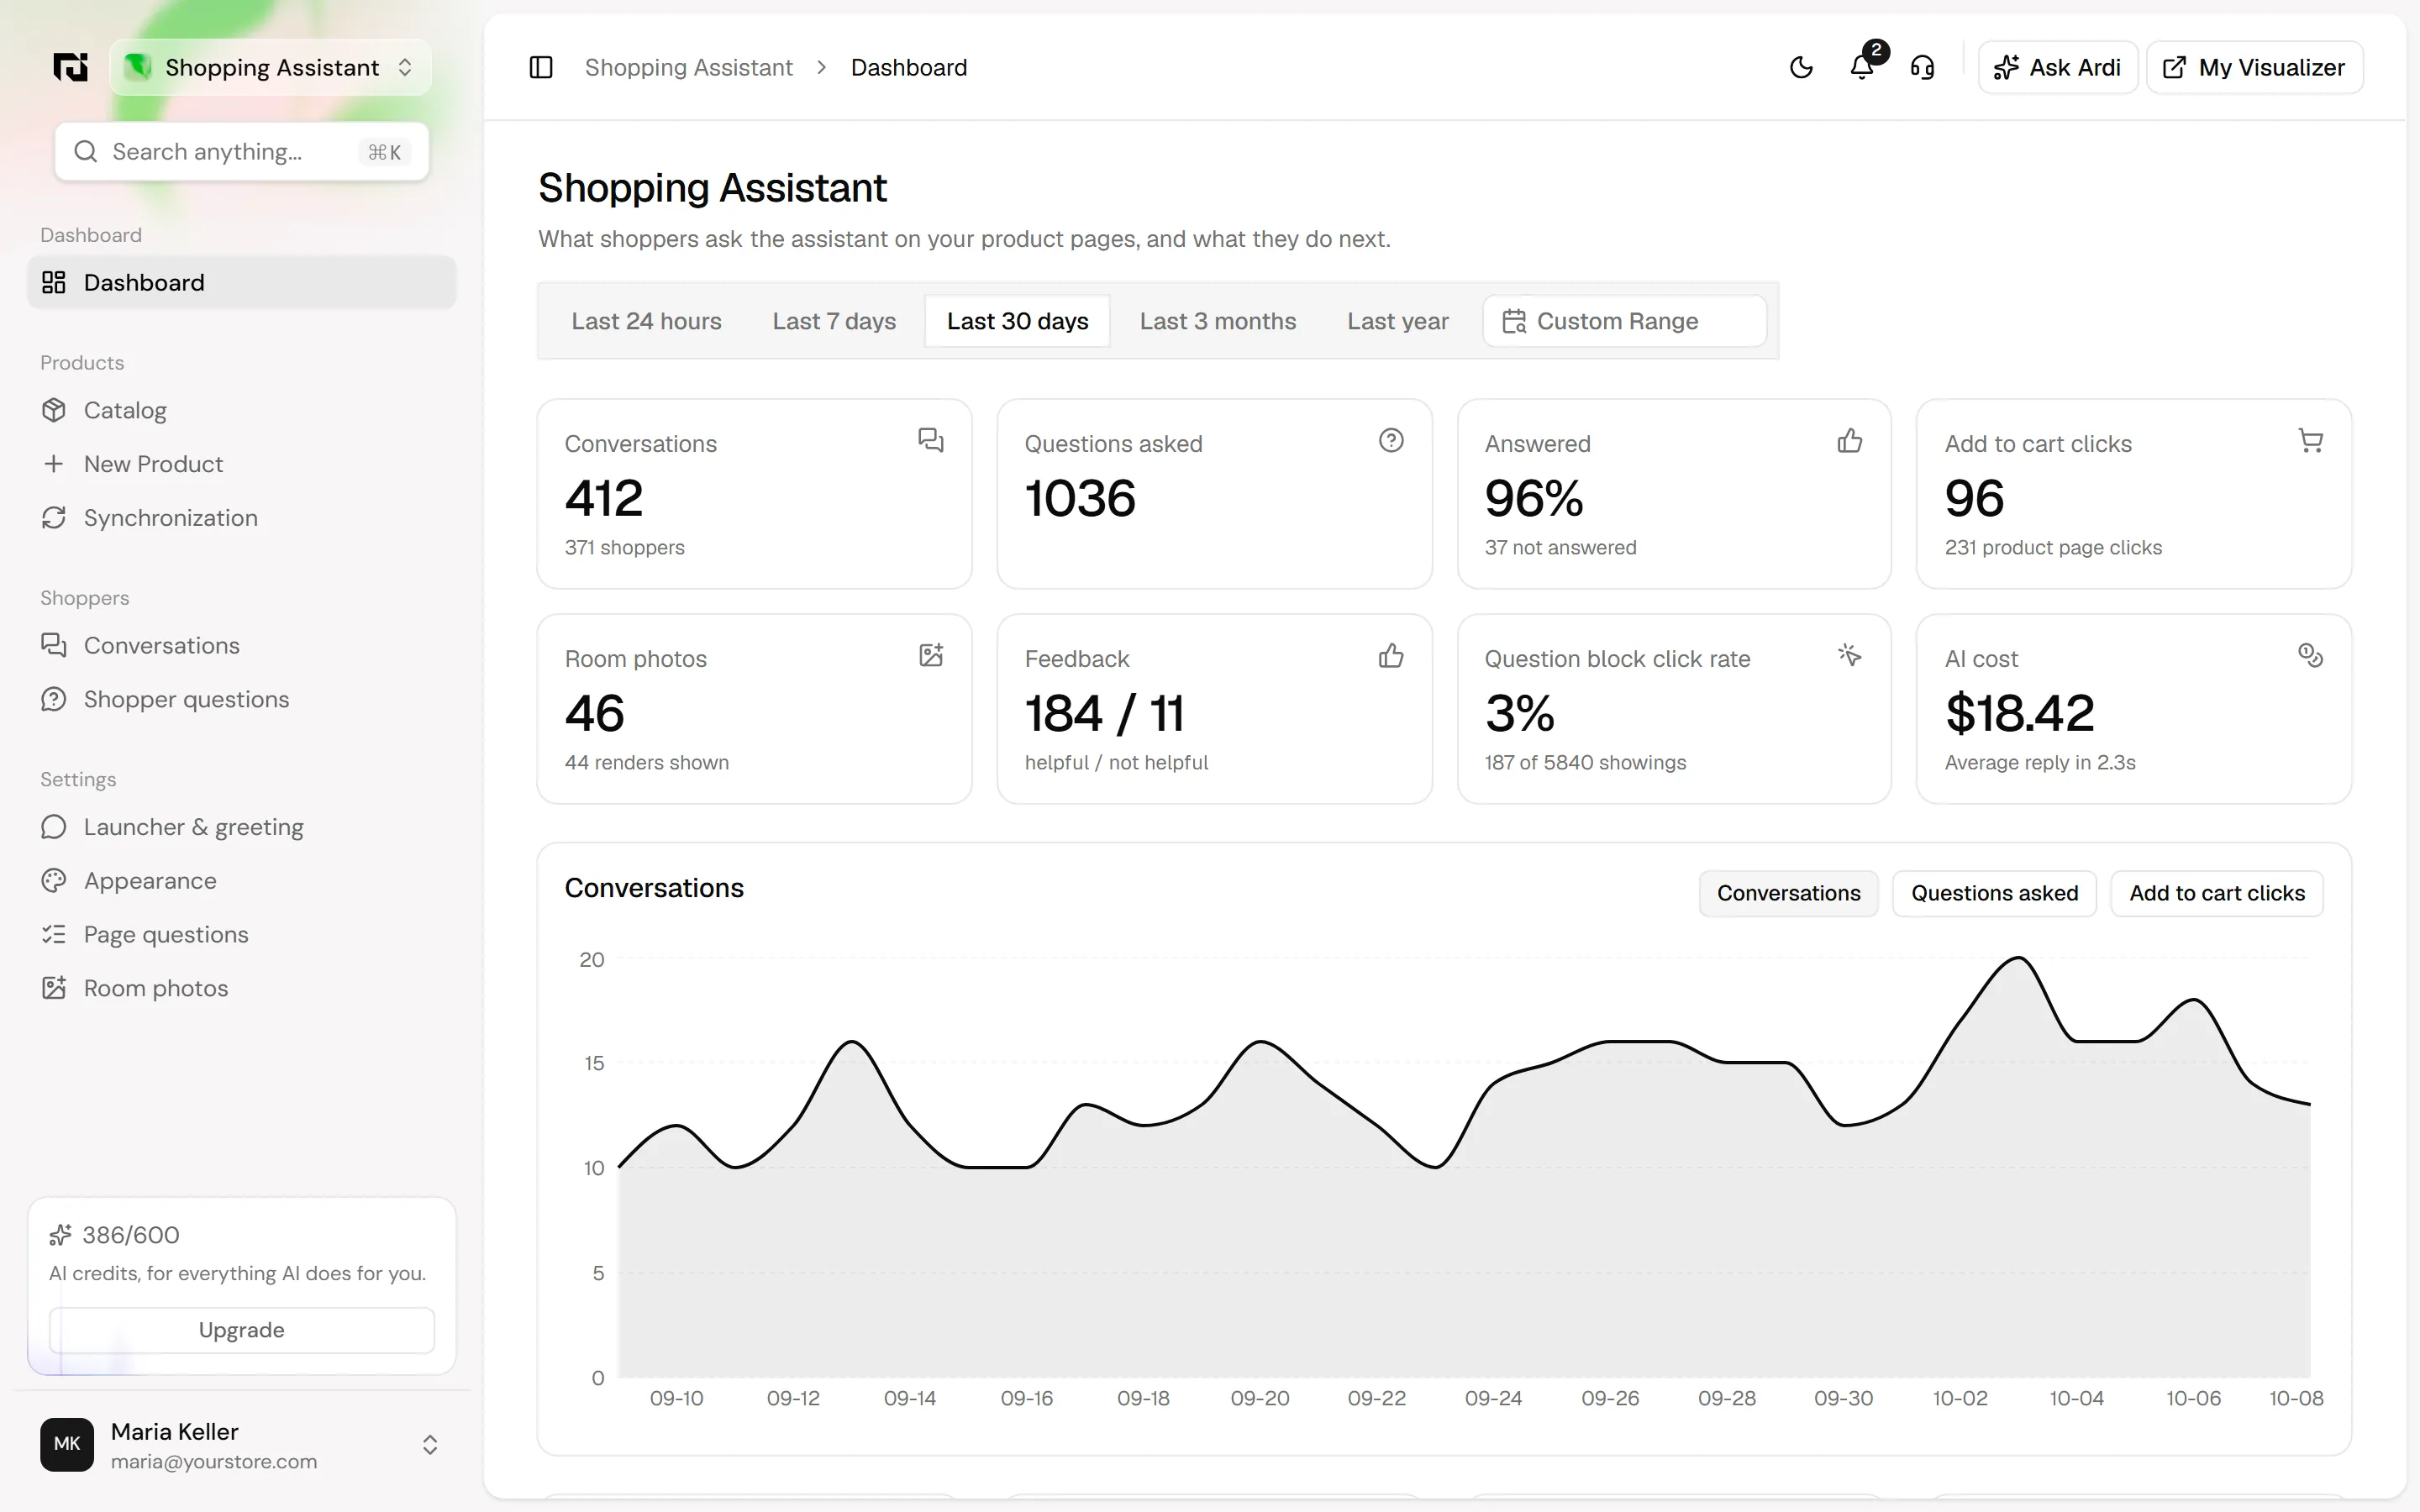
Choose Dashboard › Dashboard. For the period you pick (Last 24 hours to Last year, or a Custom Range) you see conversations and shoppers, questions asked, the share answered, add to cart clicks, room photos, feedback, the question block click rate and AI cost. The chart switches between Conversations, Questions asked and Add to cart clicks.
Step 7: Fix the gaps shoppers find
Choose Shoppers › Shopper questions. This page is the most useful one to come back to. Not answered lists the questions the assistant could not answer, with its reply, the date and the product SKU. These are usually missing product data: a slip rating, a plank length, a delivery area. Most asked ranks the questions shoppers ask most.
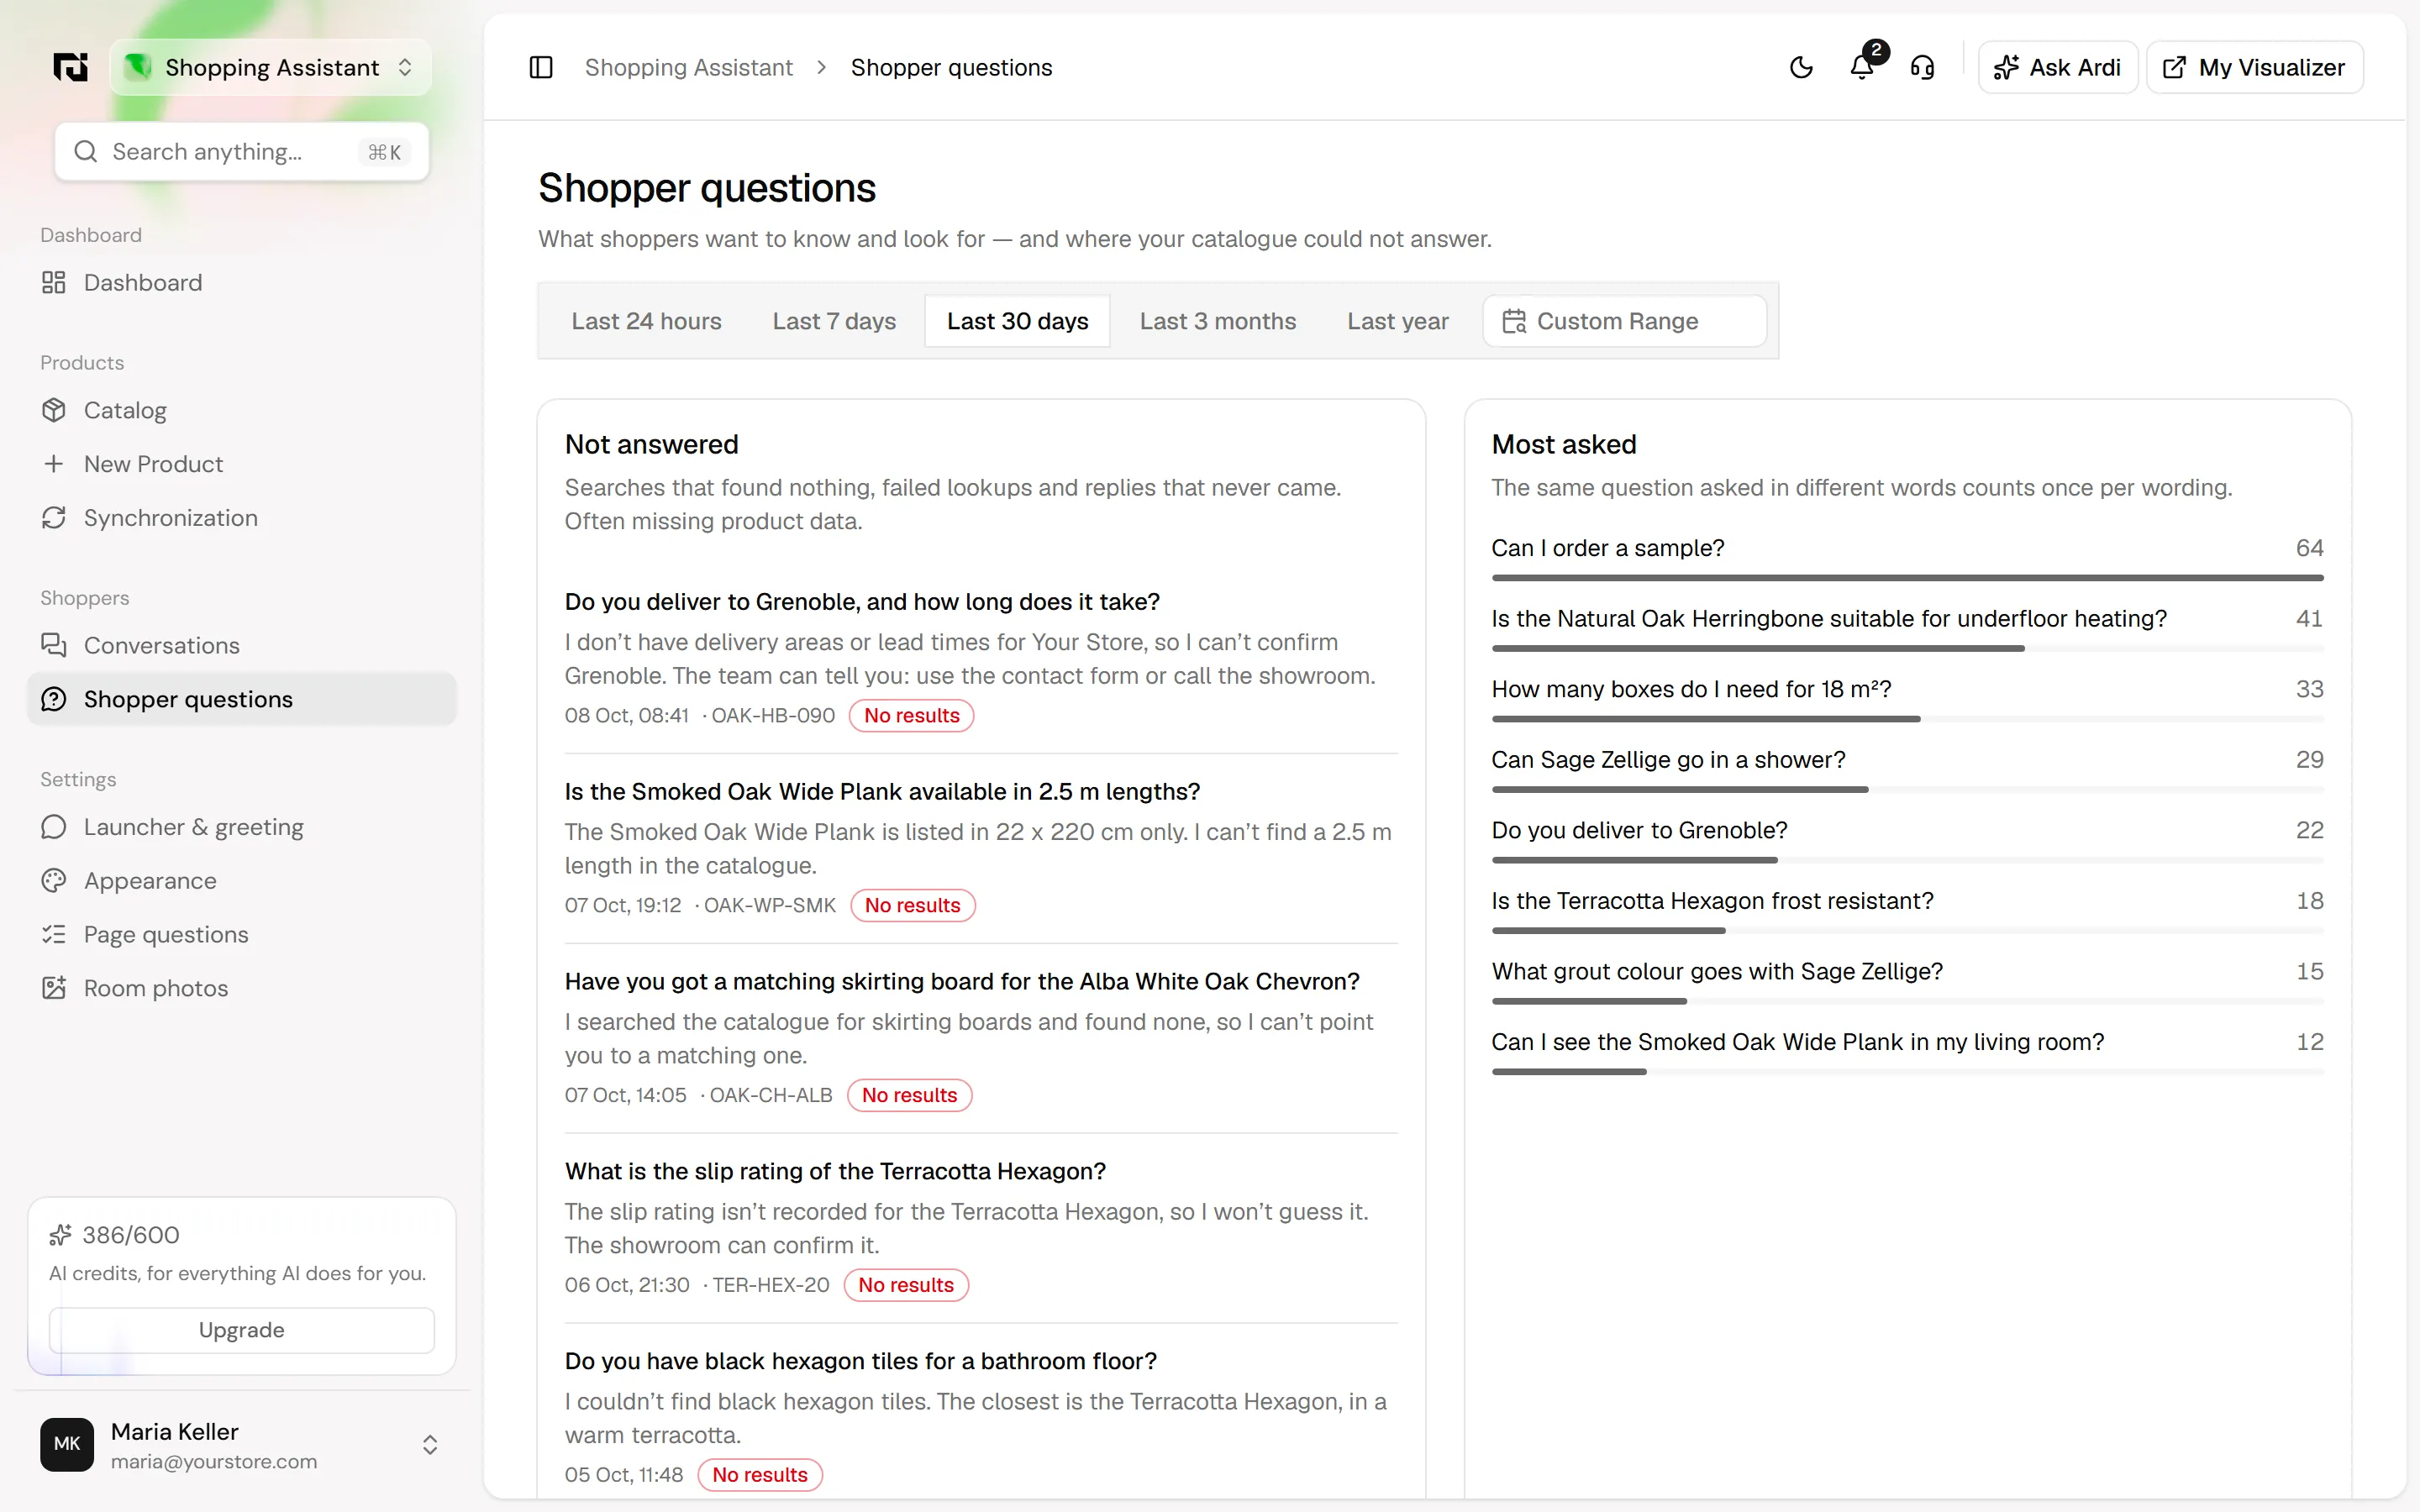
Further down the same page are What shoppers look for, Searches with no results, Products asked about, Most recommended and Rated not helpful. Click a question under Not answered to open that conversation.
For each unanswered question, add the missing detail to the product in your catalog. The assistant answers from your product data, so the next shopper who asks gets the answer.
Step 8: Read individual conversations
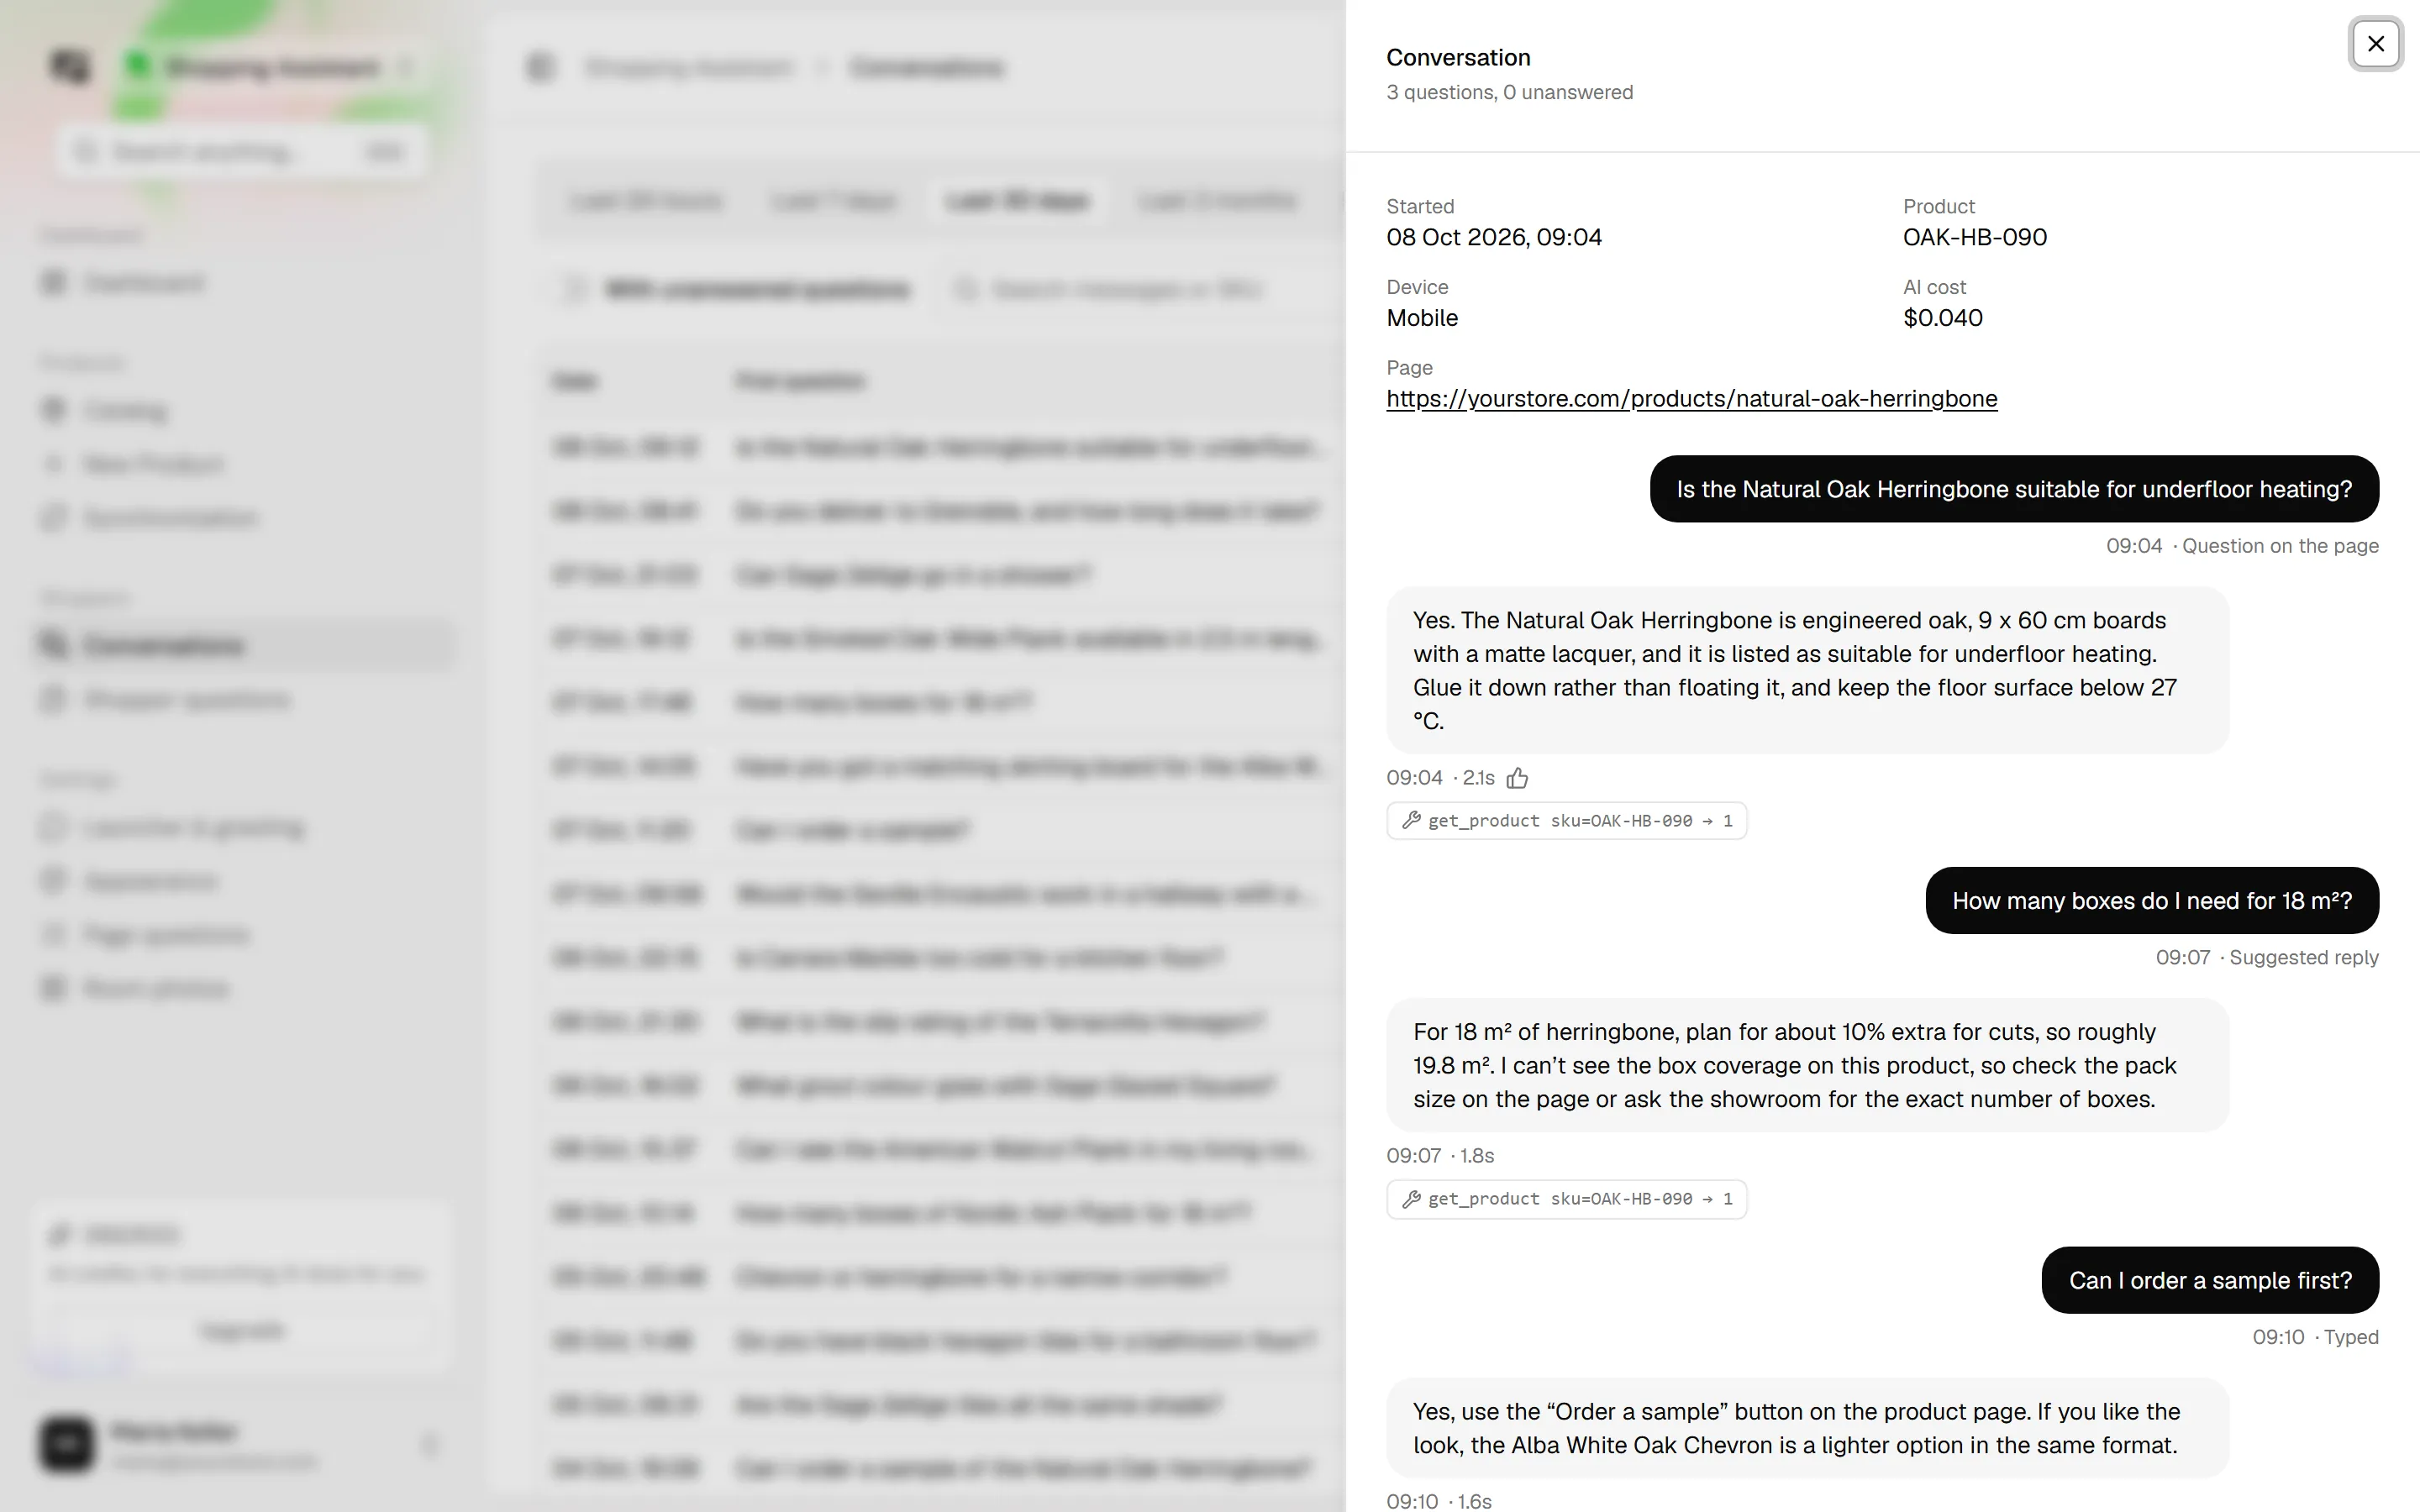
Choose Shoppers › Conversations for a list of every conversation, with its date, first question, product, number of questions, unanswered count, feedback and where it started. Turn on With unanswered questions to show only those, or search by message or SKU.
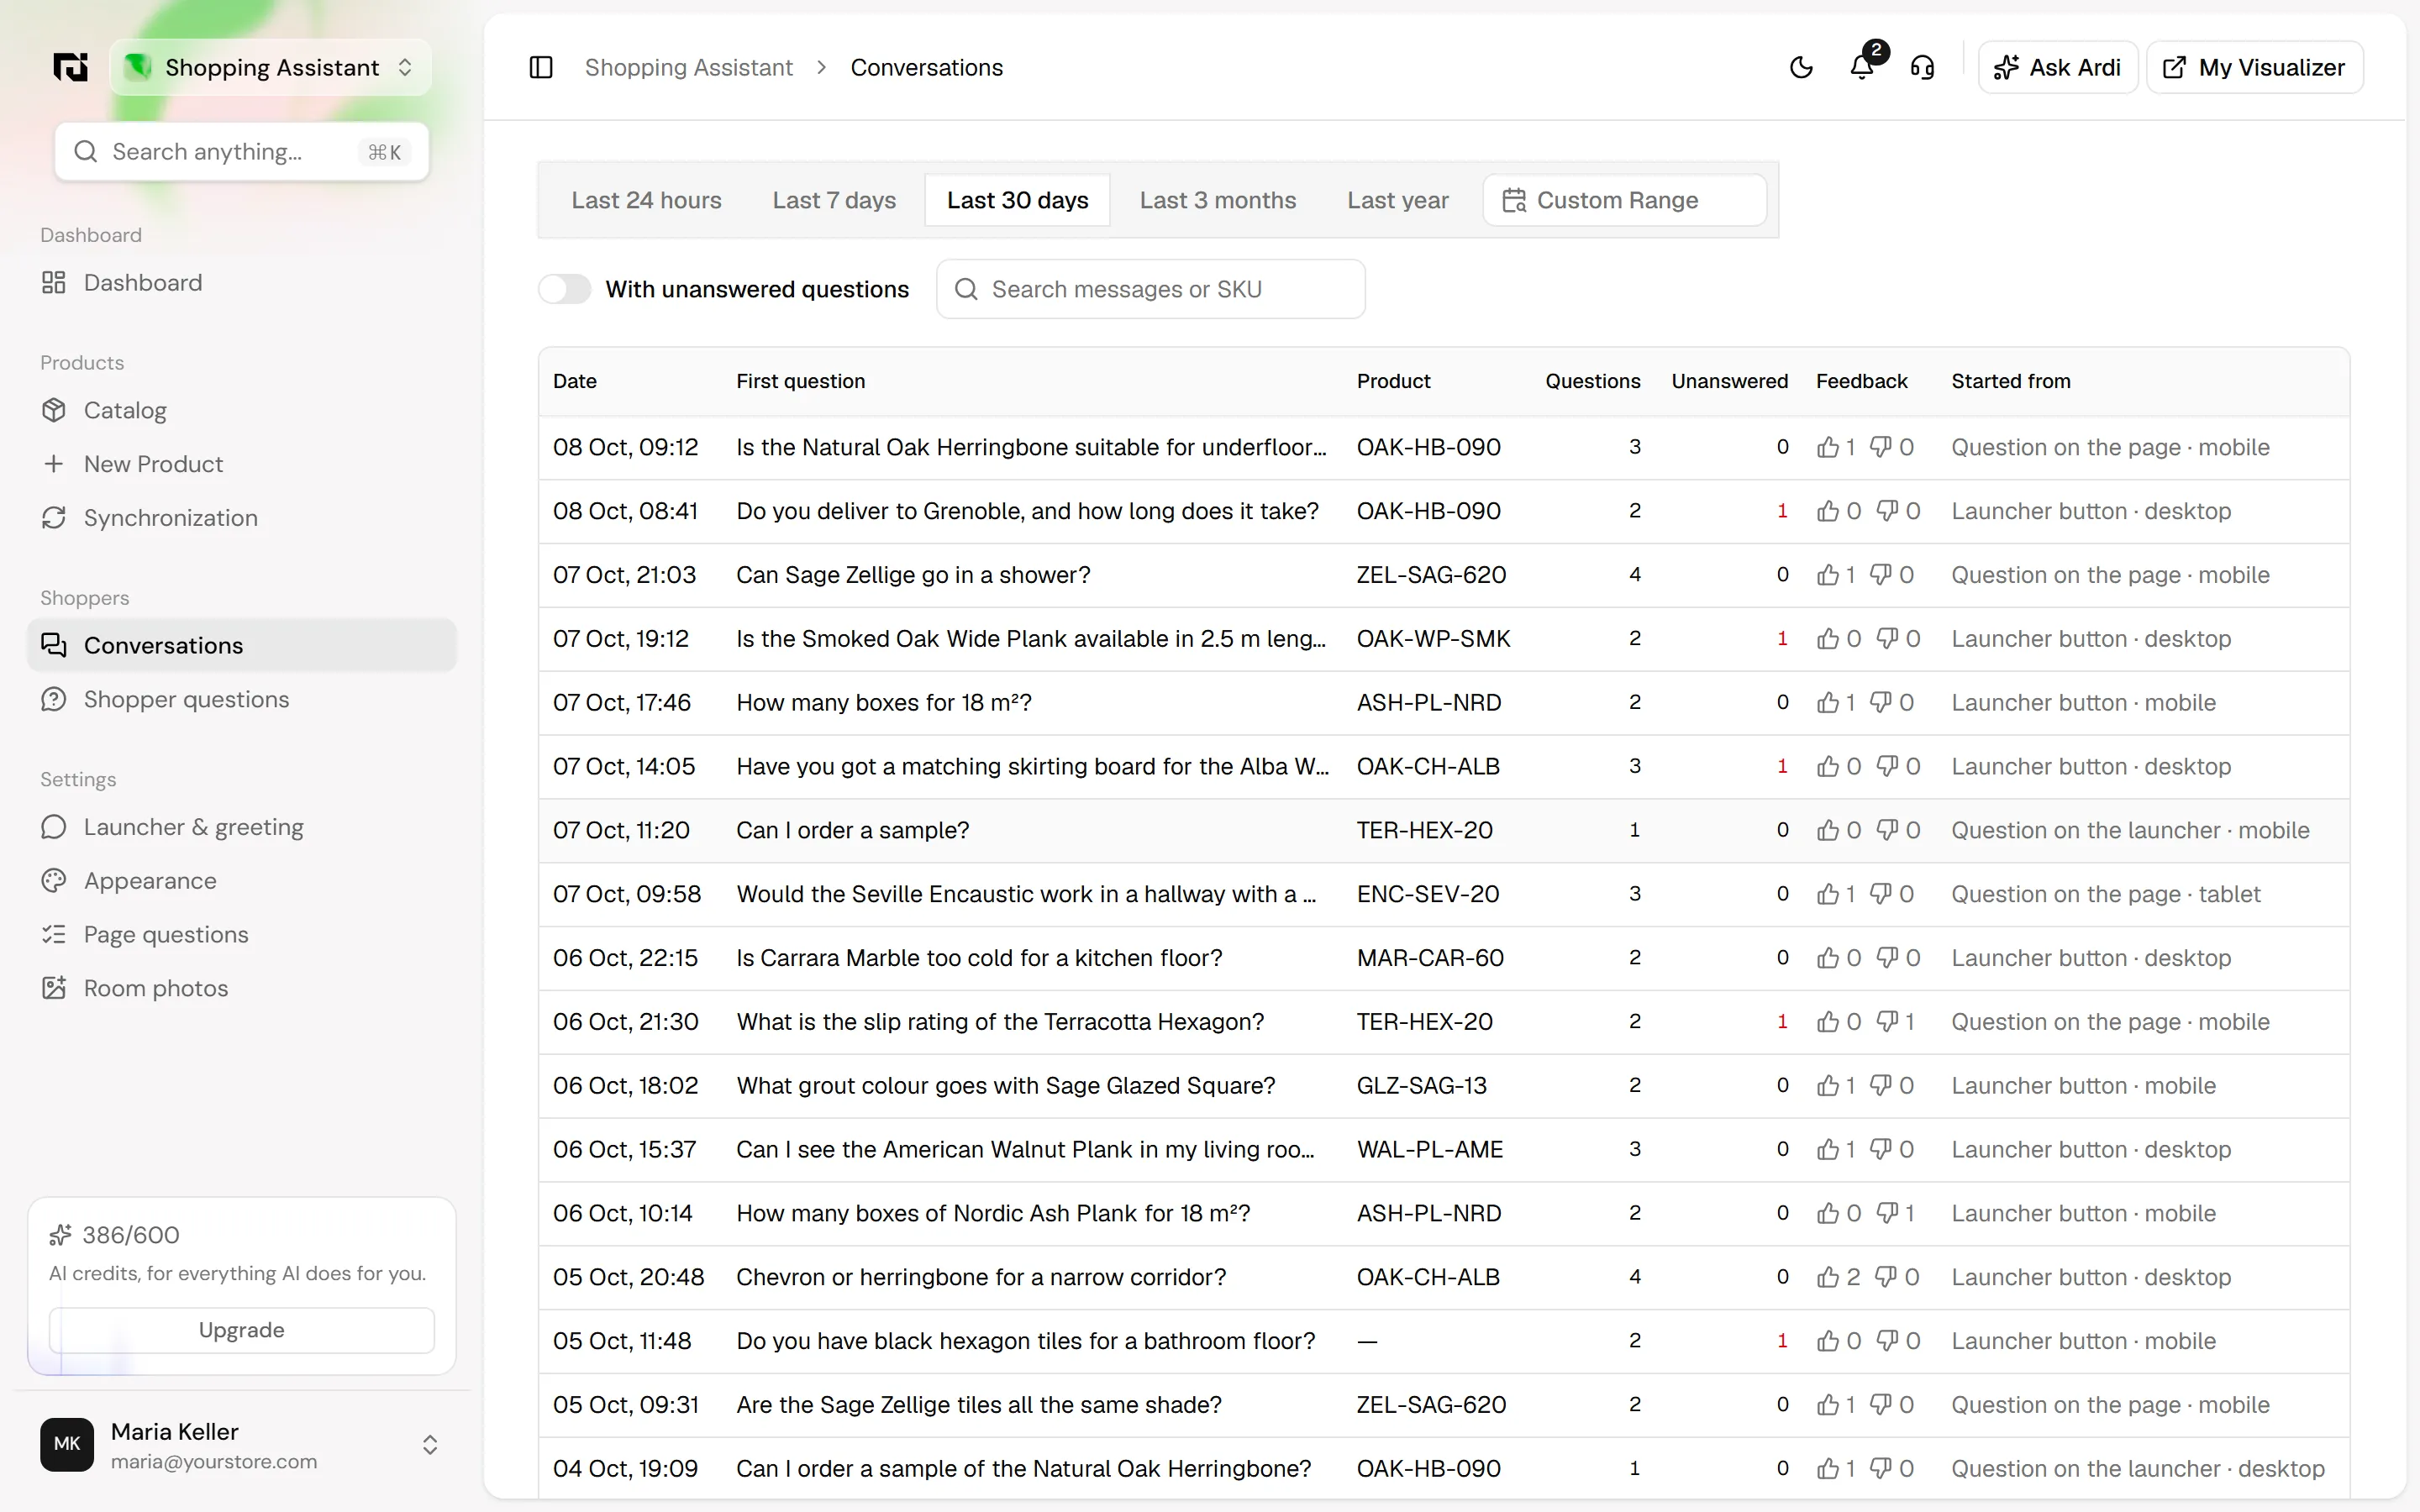
Click a row to open the conversation in a side panel: the page it started on, the device, every question and reply, and how each question was asked.
Common mistakes
- Thin product data. The assistant does not guess. If your products have no finish, size or application recorded, it will say it does not know.
- A selector that does not exist on the page. If the questions block does not appear, check the Where it goes selector against your page.
- Never opening Shopper questions. The Not answered list is a to-do list for your catalog. Check it every week or two.
FAQ
Does it make up answers? No. It answers only from what you have recorded on a product. When an attribute is missing, it says so rather than guessing.
Do I write the questions shown on the product page? No. They are written for each product from your catalog data. You only set the heading, the buttons and where the block goes.
Do I need a new snippet on my site? No. It runs from the same snippet as the visualizer, added once under Home › Setup › Website.
Can I see what it costs? Yes. The dashboard shows the AI cost for the period, and each conversation shows its own.
Next steps
Once the assistant is live, check Shopper questions regularly and fill the gaps in your catalog. To see how the assistant works alongside the visualizer on your product pages, visit the Shopping Assistant page, or compare plans on the pricing page. If you want help choosing where the questions block goes on your theme, contact us.