This guide walks you through putting the Ardealy visualizer on your own product pages. By the end, shoppers will see a button next to your Add to cart button that opens your product in a photo of their own room, and you will be able to see which products they try.
What you will set up: your website connection, the visualizer's look, how it finds the product on each page, and where its button goes.
How long it takes: about 15 to 30 minutes. Most of that is the one-time step of pasting the snippet into your site.
What you need before you start
- An Ardealy account with owner access to the workspace.
- At least a few products in your catalog. The visualizer can only show products it knows. If your catalog is empty, start with our guide to importing a catalog.
- Access to your website's code or theme editor (for example, Shopify's Edit Code, a WordPress plugin, or someone who manages your site).
- The address of one of your product pages, to test with.
Step 1: Open the Website page
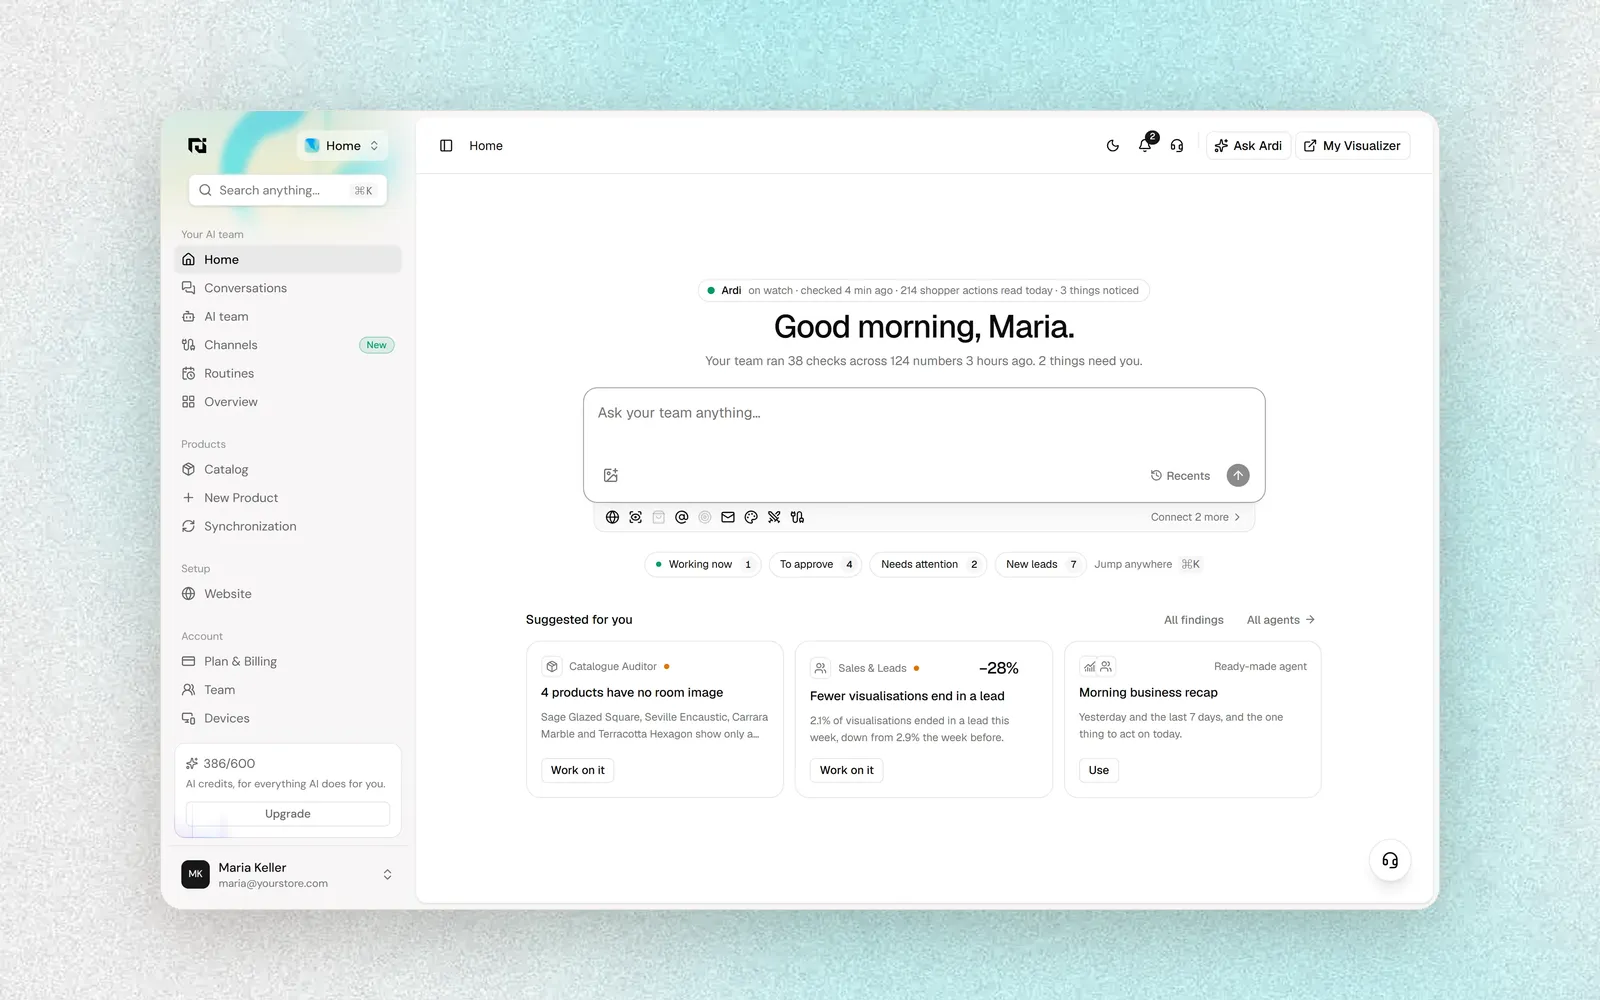
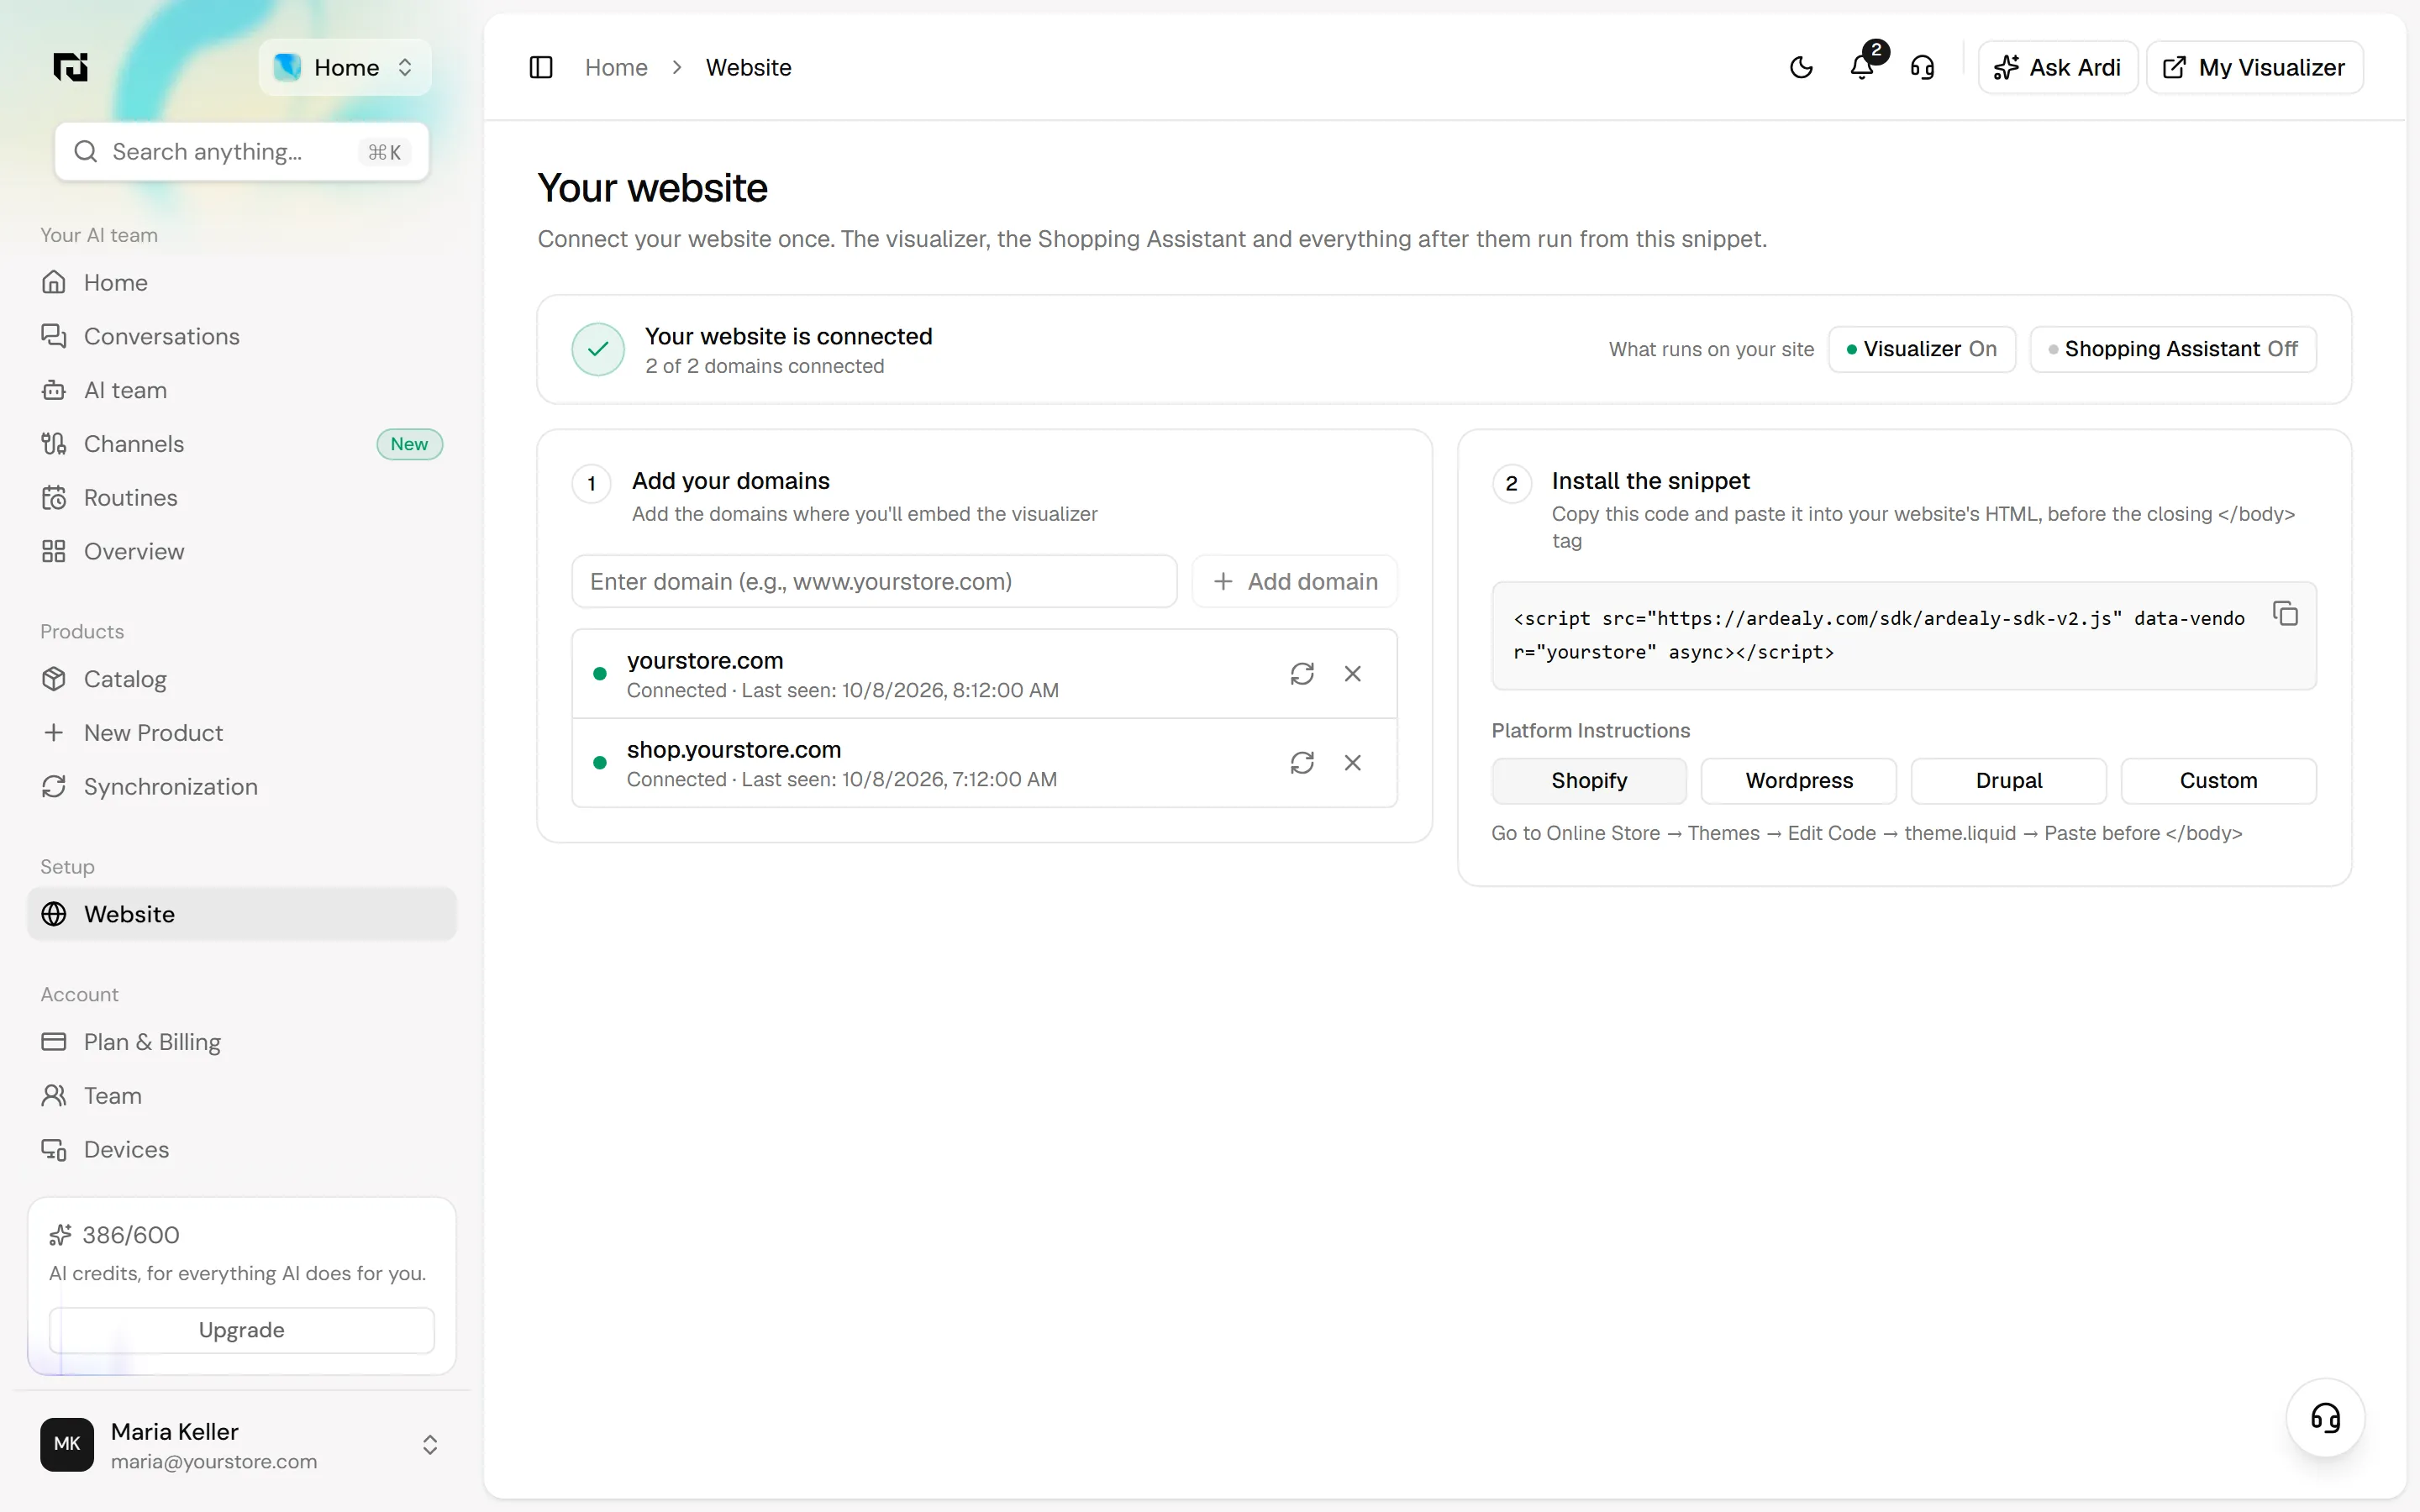
Everything that runs on your site, the visualizer and the Shopping Assistant included, is connected from one place. Open the workspace switcher at the top left, choose Home, then in the sidebar go to Setup › Website.
The page is called Your website. At the top, a status bar tells you whether your site is connected. Until the snippet has been seen on one of your domains, it reads "Not connected yet". On the right, under What runs on your site, you can see whether the Visualizer and the Shopping Assistant are on or off.
Step 2: Add your domains
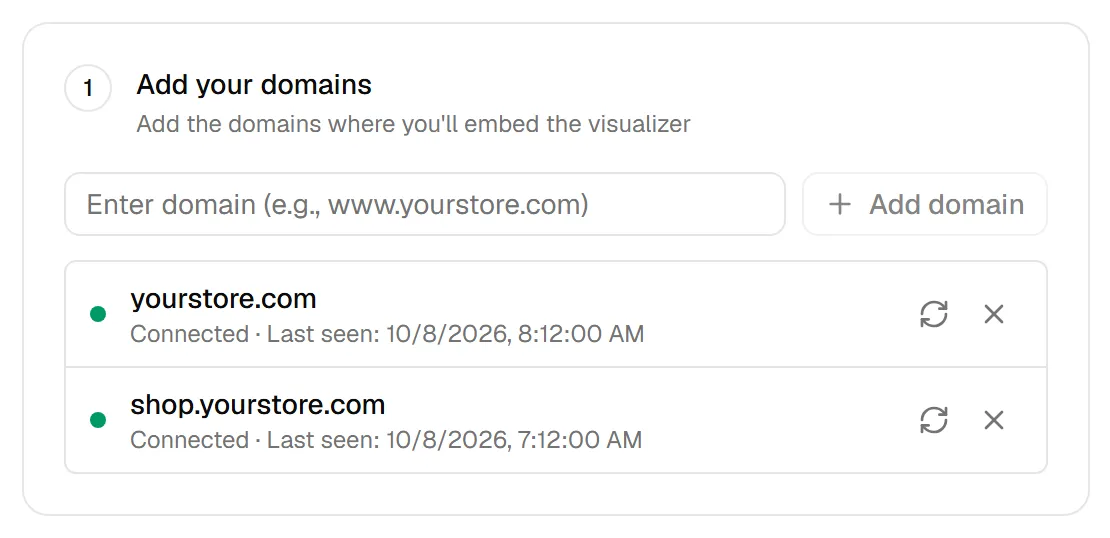
Under 1 Add your domains, type the domain where the visualizer will run into the field marked "Enter domain (e.g., www.yourstore.com)" and click Add domain. Repeat for every domain you use, such as a separate shop subdomain.
You can paste a full address. Ardealy keeps only the domain name and drops the www. at the front, so https://www.yourstore.com/products/oak is saved as yourstore.com.
Step 3: Install the snippet
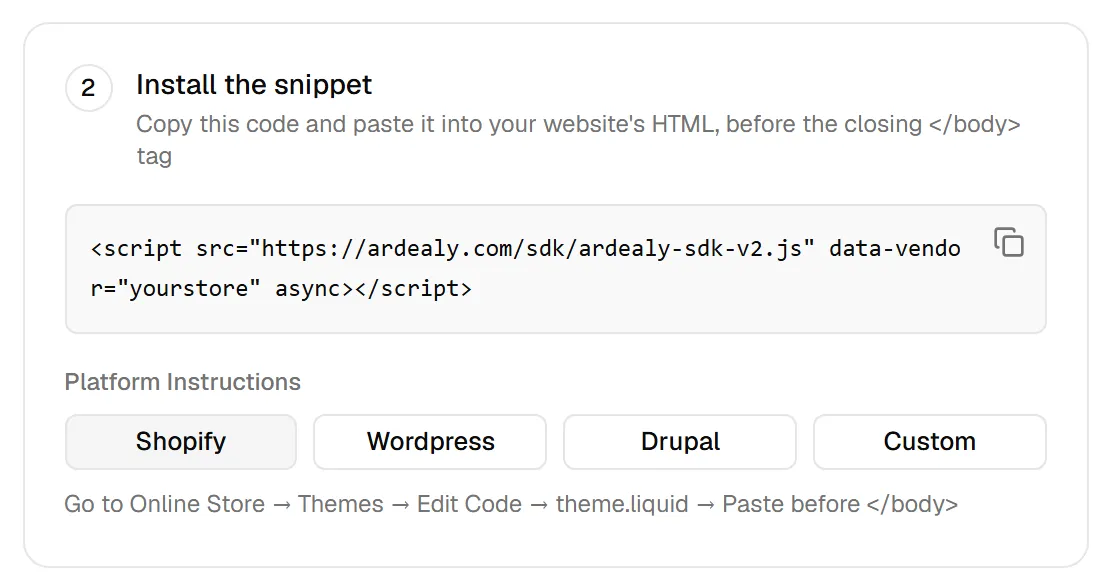
Under 2 Install the snippet, copy the one-line script with the copy icon at the top right of the code box. It looks like this, with your own account name in data-vendor:
<script src="https://ardealy.com/sdk/ardealy-sdk-v2.js" data-vendor="yourstore" async></script>
Paste it into your website's HTML just before the closing </body> tag. The Platform Instructions tabs below the code tell you where that is on common platforms:
- Shopify: Online Store → Themes → Edit Code →
theme.liquid→ paste before</body>. - Wordpress: install the "Insert Headers and Footers" plugin, or add it to your theme's
footer.php. - Drupal: Configuration → Development → Asset Injector → Add JS Injector.
- Custom: add the script tag before the closing
</body>tag in your HTML.
Save and publish the change on your site. Then go back to the Website page. Connection is detected on its own as soon as the snippet loads on one of your listed domains. To check again straight away, click the refresh icon on the domain's row. When it works, the status bar reads "Your website is connected" with the number of connected domains.
Step 4: Set your brand
Switch the workspace to Visualizer. The sidebar group Customization opens the Customization studio, which has its own left rail (Brand, Shopping, Filters, Card under VISUALIZER; Features, Matching and Design & placement under ON SITE) and a live preview on the right. There is no Save button: the header says "Changes save automatically".
Start with Brand: upload your logo, check the Company Name, and set your Primary Color, Secondary Color, Preferred font and Corner Radius. The preview updates as you go.
Step 5: Choose how shoppers open the visualizer
In the sidebar, choose Customization › On your site. This opens Features, "Which experiences run on your product pages." Tick Room Visualizer. AR (iOS + Android) and 3D Model Viewer are the other experiences on this page.
Under How shoppers reach the visualizer, pick one:
- Button: "Shoppers click it to open the visualizer."
- Widget: "Sits in your product gallery. Nothing to click."
Then choose whether it opens as an Overlay (iframe) on top of your page or in a New tab.
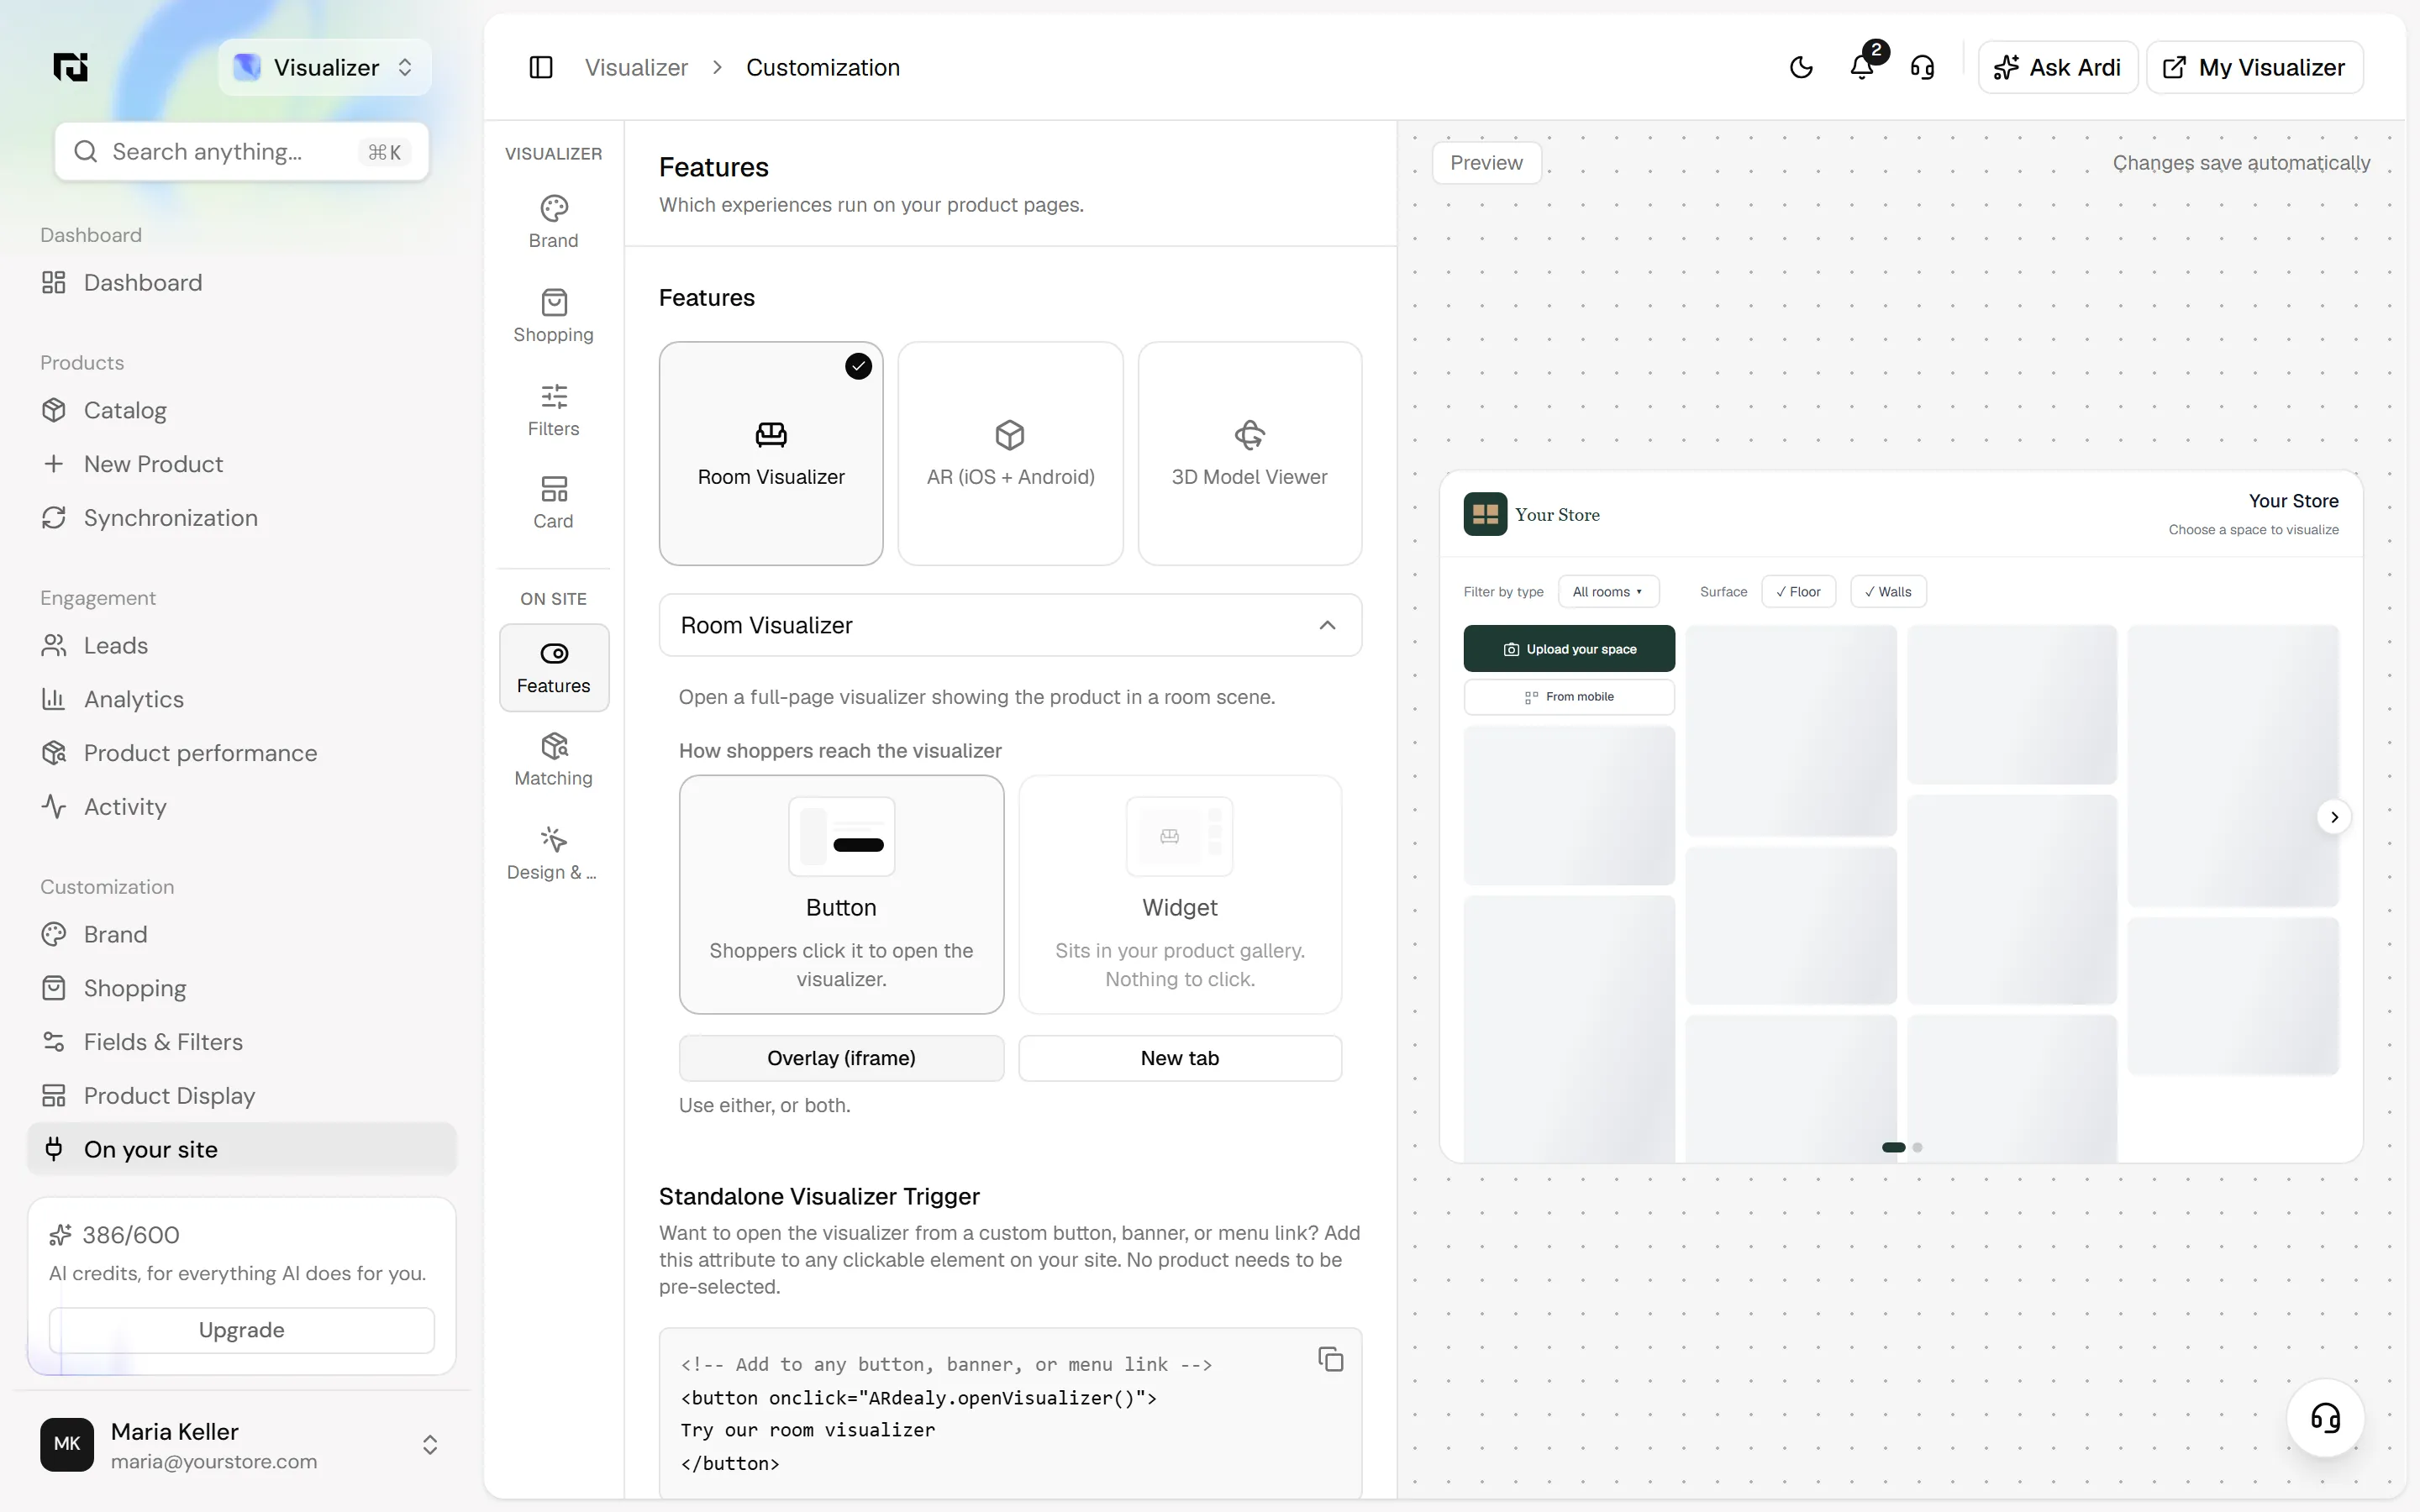
Further down, Standalone Visualizer Trigger gives you a small piece of code, onclick="ARdealy.openVisualizer()", to add to any button, banner or menu link. Use it if you also want a "Try it in your room" link in your main menu, where no product is selected yet.
Step 6: Check product matching
On each product page, the visualizer needs to know which of your products the shopper is looking at. In the rail, open Matching ("Product Matching").
The default Detection Strategy is Auto-detect (JSON-LD), which "Automatically reads product data from structured data on your page. Works with most e-commerce platforms." The JSON-LD Field tells it which value to compare with your catalog, usually sku.
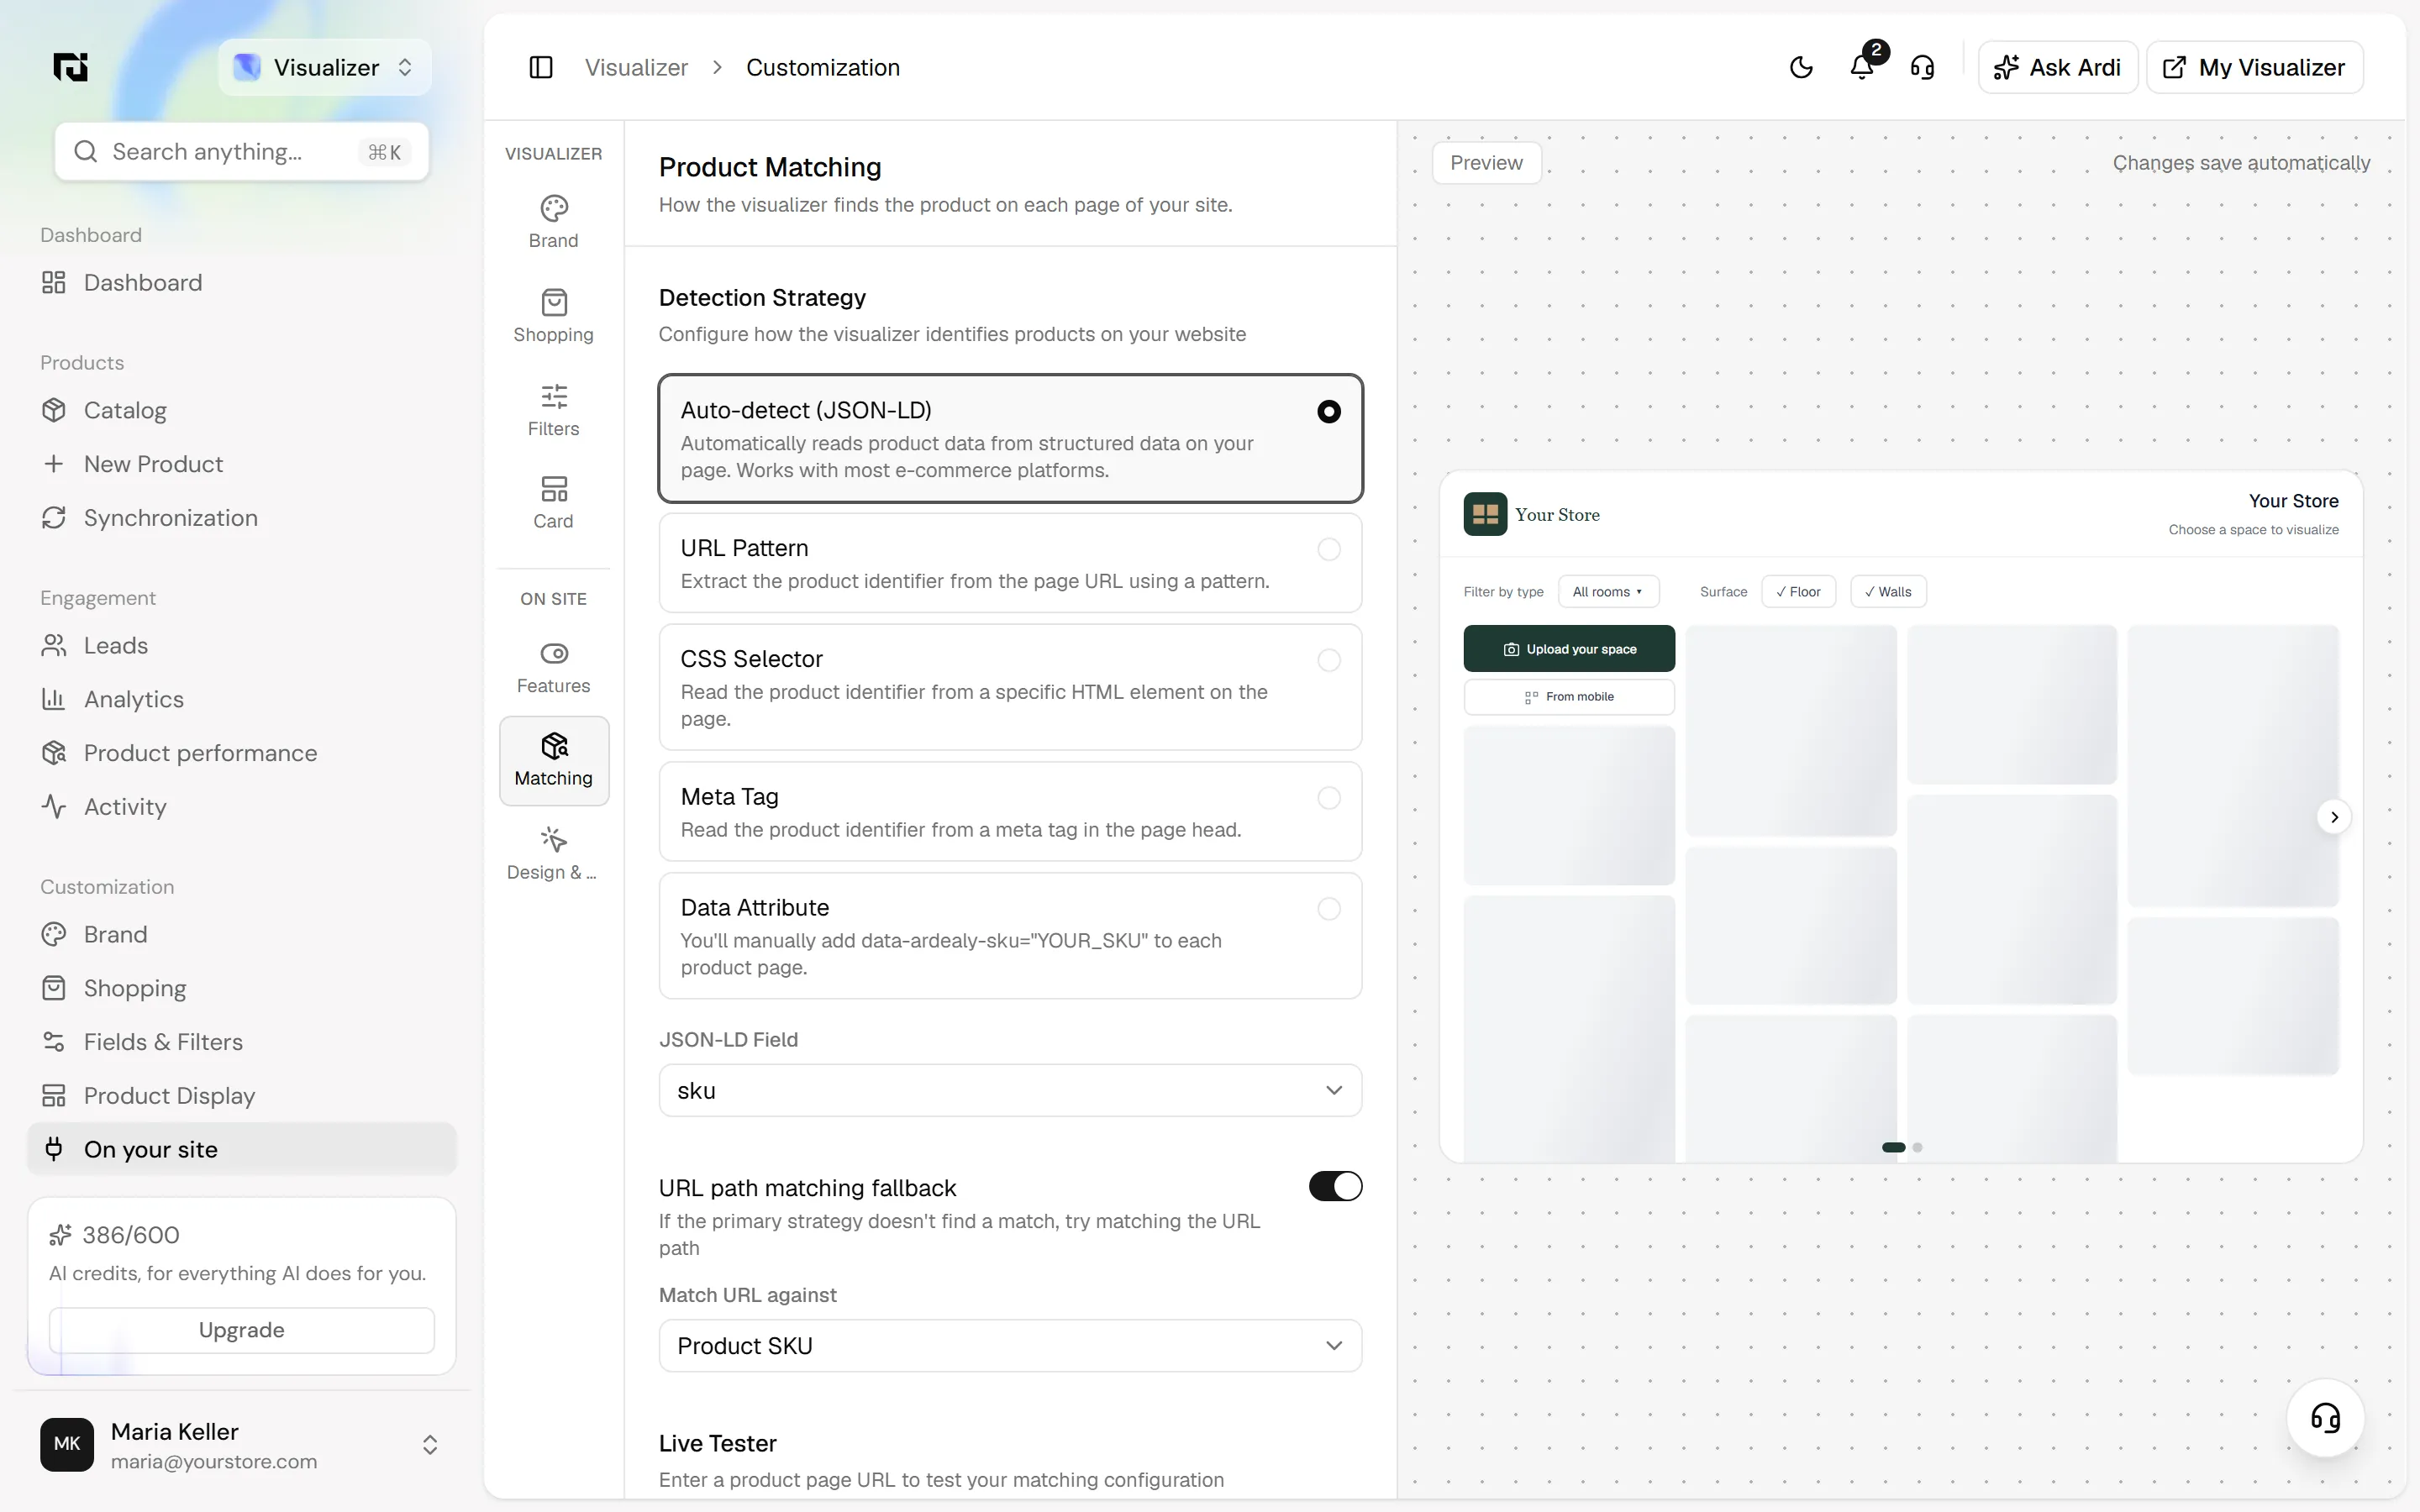
If your pages do not carry structured data, choose another strategy: URL Pattern, CSS Selector, Meta Tag, or Data Attribute (you add data-ardealy-sku="YOUR_SKU" to each product page). Leave URL path matching fallback on so the visualizer can also try the page address.
Then use the Live Tester at the bottom: "Enter a product page URL to test your matching configuration". Test two or three products before moving on.
Step 7: Place and design the button
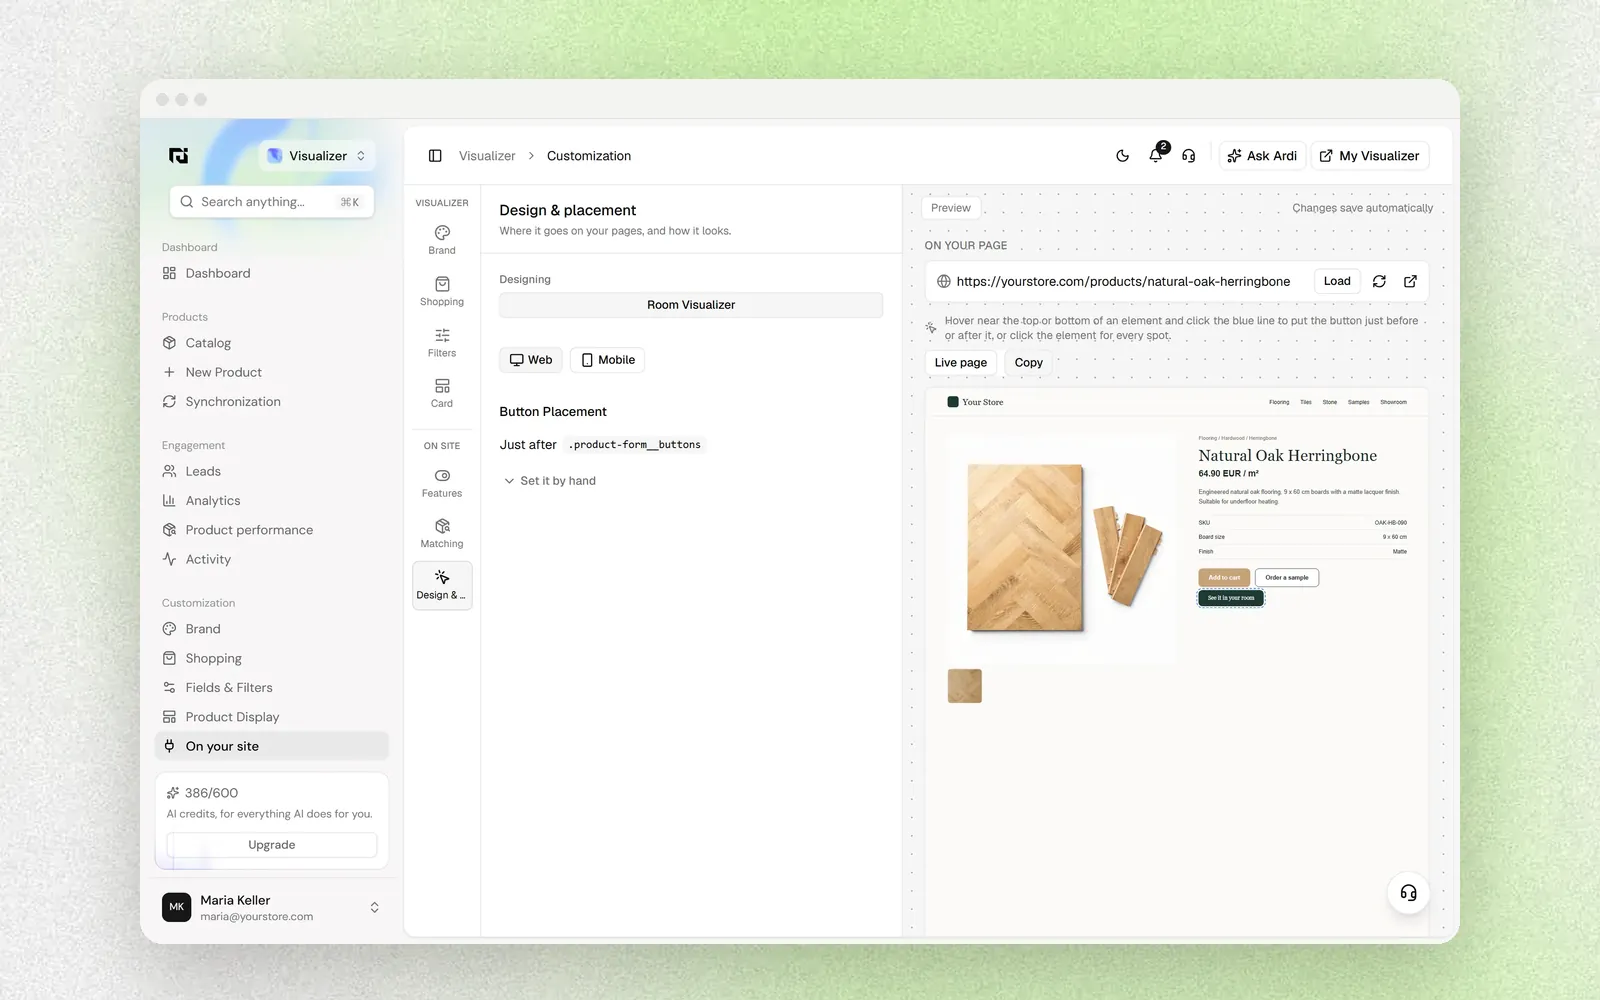
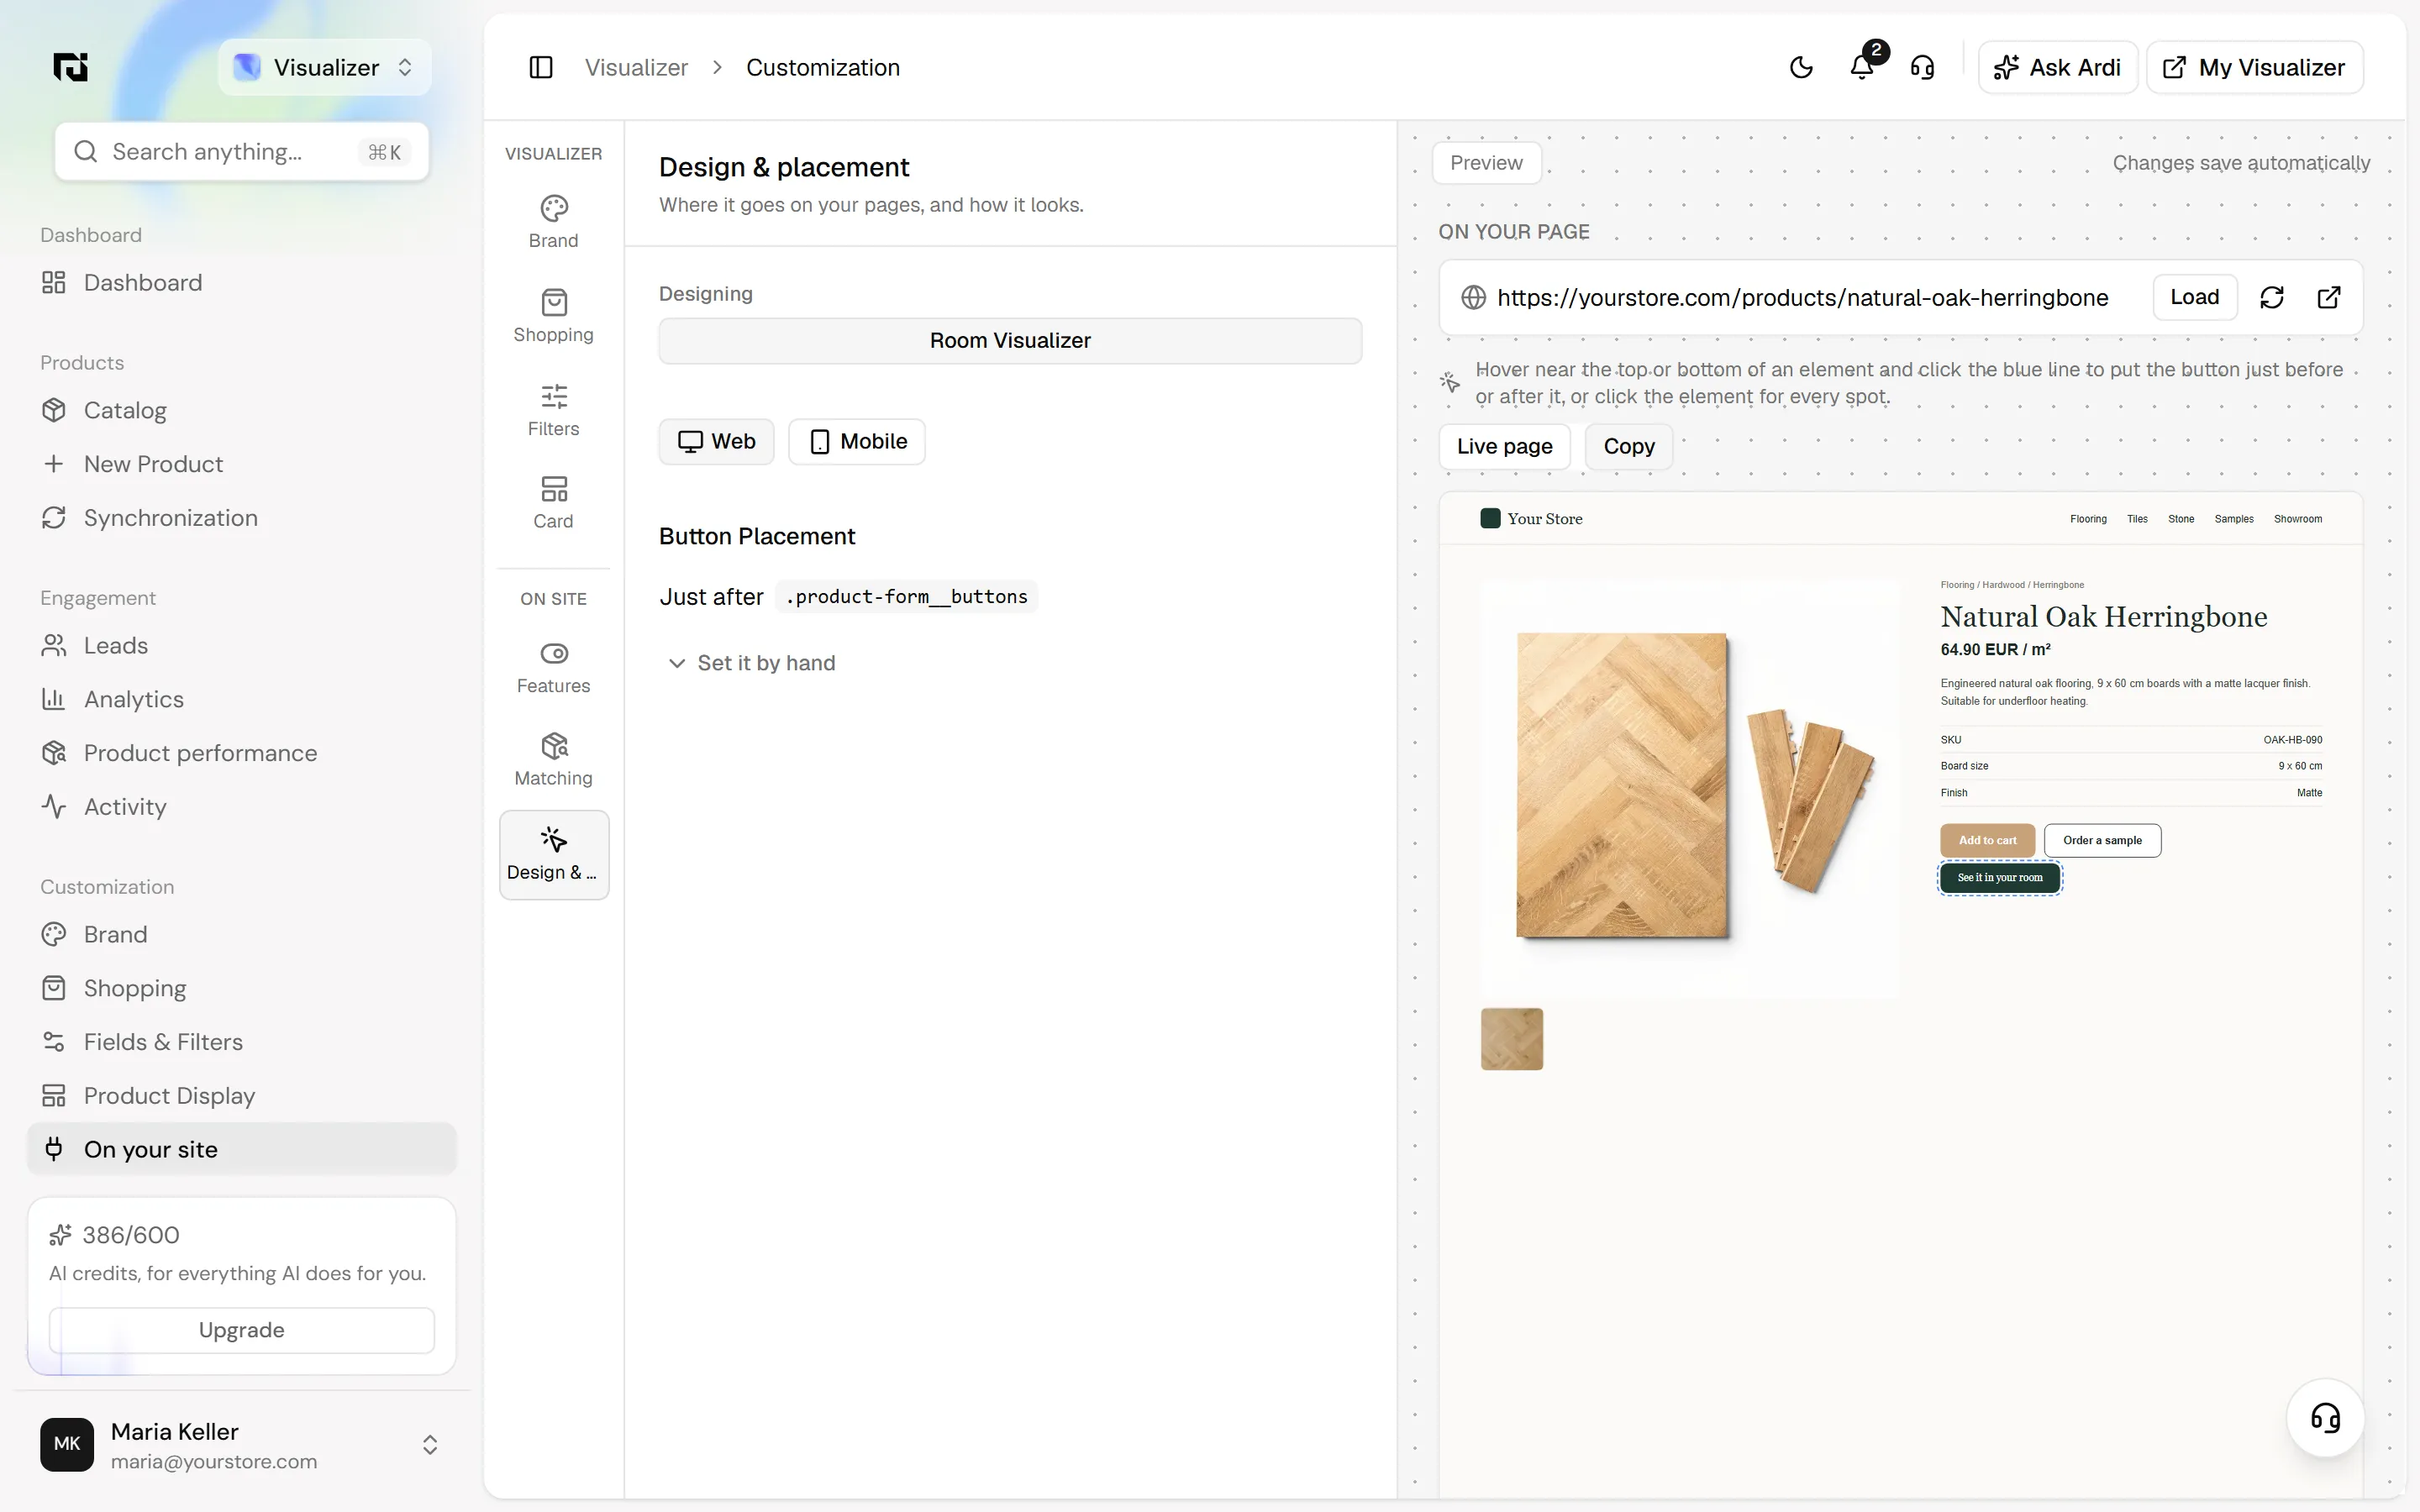
Open Design & placement in the rail: "Where it goes on your pages, and how it looks." Make sure Designing shows Room Visualizer, and pick Web or Mobile to set each layout.
On the right, under ON YOUR PAGE, enter one of your product page addresses and click Load. Then follow the hint: "Hover near the top or bottom of an element and click the blue line to put the button just before or after it, or click the element for every spot." The chosen spot appears under Button Placement, for example "Just after .product-form__buttons". If you know your theme's code, Set it by hand lets you type the container and choose where inside it the button goes.
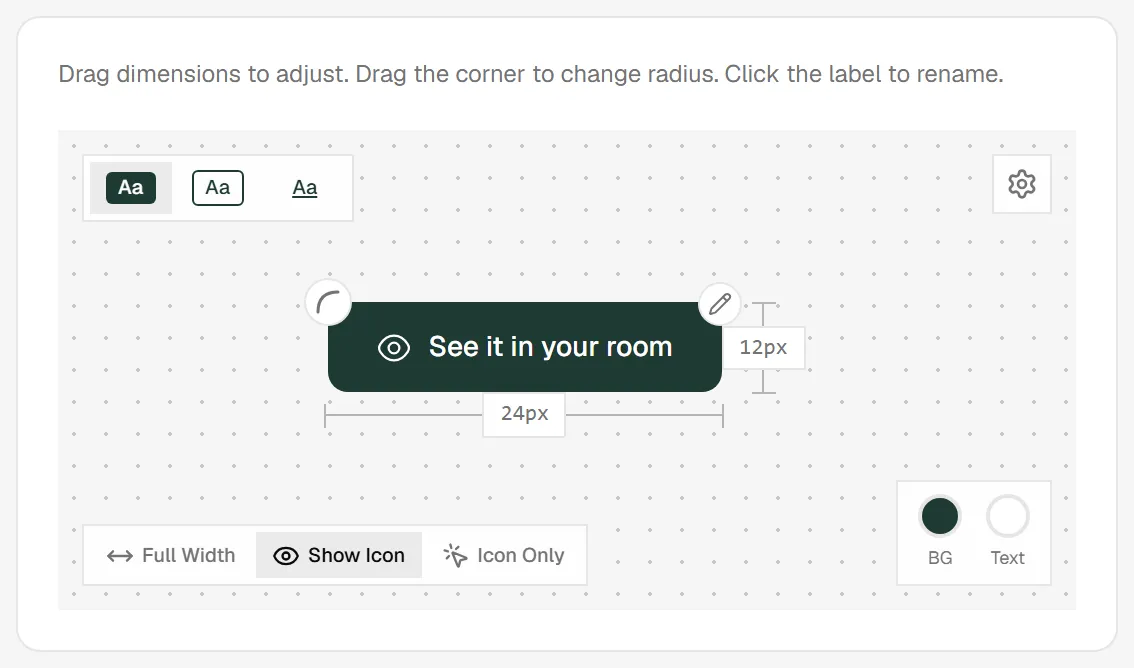
Scroll the canvas down to Button design. Drag the dimensions to change padding, drag the corner to change the radius, and click the label to rename it. Choose filled, outlined or link style, switch Full Width, Show Icon or Icon Only, and set the BG and Text colors.
How to check it worked
- On the Website page, the status bar reads "Your website is connected" and your domains show Connected with a recent last-seen time.
- Open a product page on your live site in a private browser window. The button should appear where you placed it.
- Click it and upload a room photo. The product you were viewing should be the one shown.
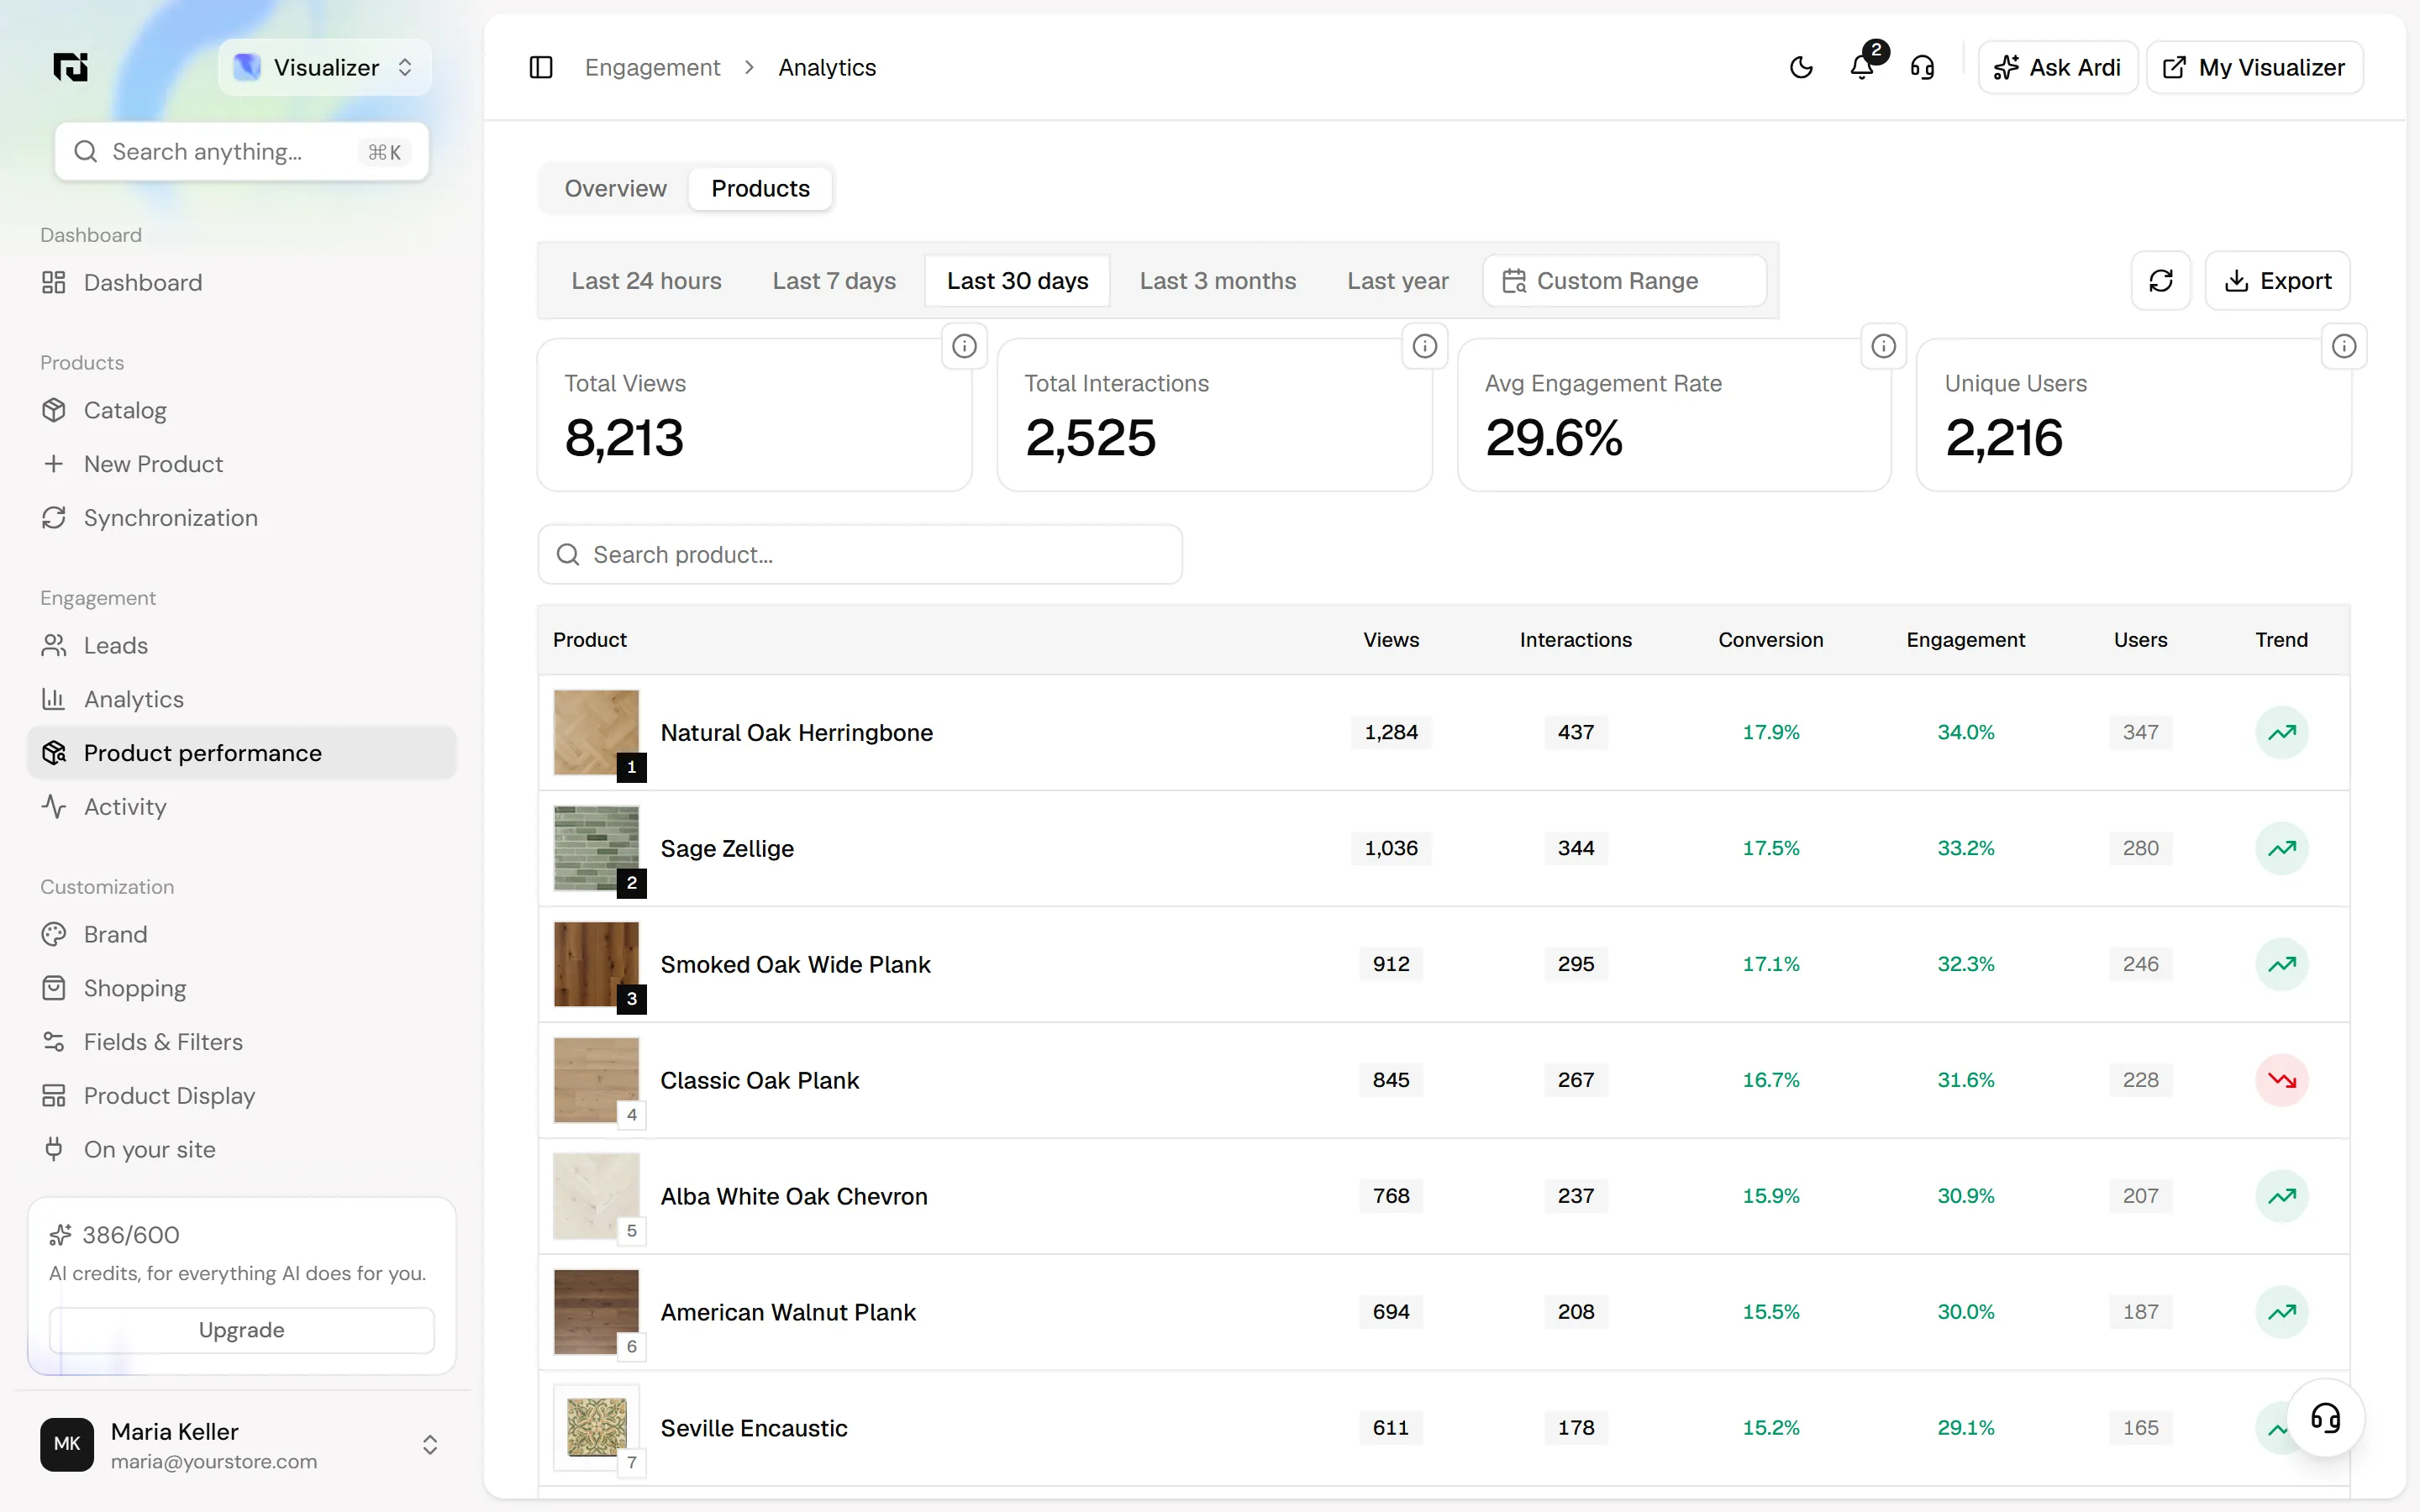
Once shoppers use it, go to Visualizer › Engagement › Product performance. You will see Total Views, Total Interactions, Avg Engagement Rate and Unique Users, plus a ranked table of products, for a period from the last 24 hours to the last year.
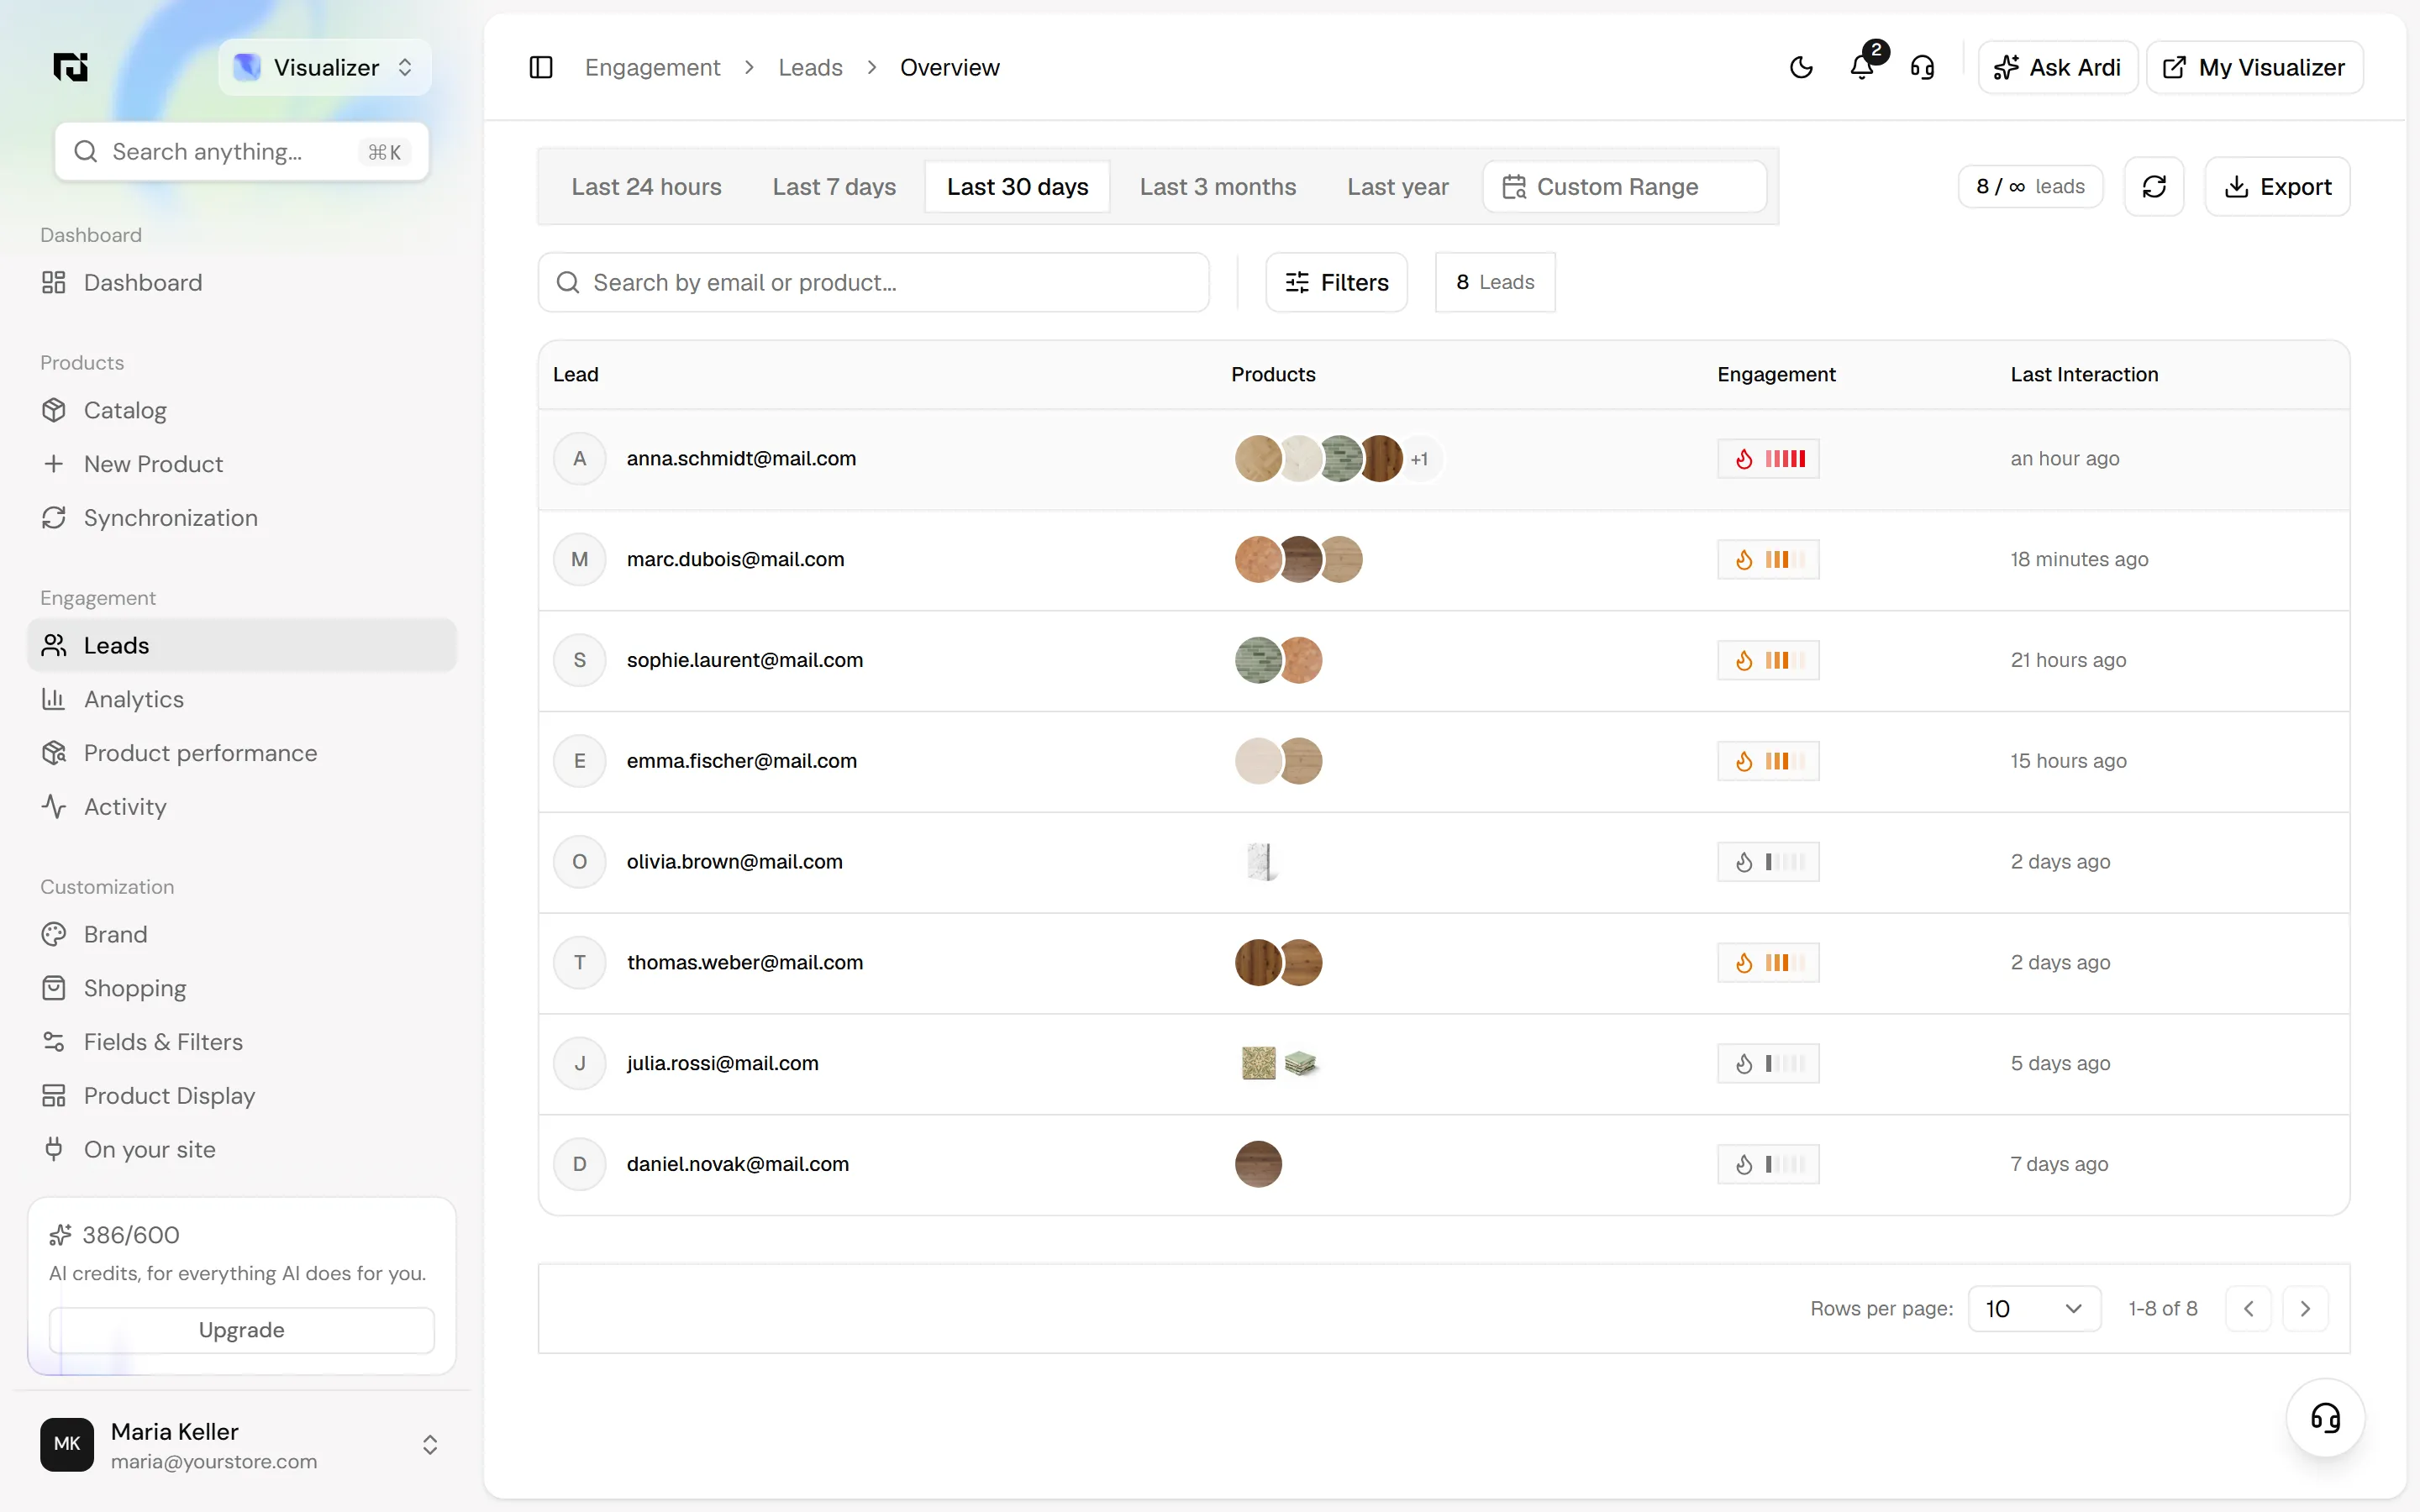
Shoppers who download their visualization with their email appear under Leads, with the products they tried and an engagement level. Click a row for the details.
Common mistakes
- Snippet in the wrong place. It must sit before
</body>, in the shared layout. Pasting it inside a single section or a page builder block often means it does not load everywhere. - Domain not listed. The snippet only connects on domains you added in step 2. Add every domain, including a staging or shop subdomain you want to test on.
- Button appears but shows the wrong product. That is a matching issue. Run the Live Tester and try a different detection strategy.
- Button does not appear on mobile. Placement is set separately for Web and Mobile. Check both.
FAQ
Do I need a developer? Not for most stores. If you can edit your theme or install a plugin, you can paste the snippet. Placement and design are done in the Ardealy workspace, by pointing and clicking.
Will the snippet slow my site down?
The script tag uses async, so the browser keeps loading your page while it fetches it.
Do I need to add the snippet again for the Shopping Assistant? No. The page itself says it: the visualizer, the Shopping Assistant and everything after them run from this one snippet.
Can I open the visualizer from a menu link instead of a product page? Yes. Use the Standalone Visualizer Trigger code from the Features section on any clickable element.
Next steps
With the visualizer live, the next useful step is the Shopping Assistant, which answers shoppers' questions from your own catalog on the same pages. To see what the visualizer can do for your products, visit the visualizer page or, for flooring, the flooring visualizer. If you get stuck on any step, contact us and we will help you set it up.