Everything in Ardealy starts from your catalog. The visualizer shows your products in shoppers' rooms, the Shopping Assistant answers questions from their details, and Content Studio makes images of them. This guide shows the two ways to bring products in: a CSV import for many products at once, and Add using AI for one product from its page on your site.
What you will set up: your products, their variants and their images in the Ardealy catalog.
How long it takes: 10 minutes for a single product with AI. For a CSV import, most of the time goes into preparing the file; the upload itself takes a few minutes.
What you need before you start
- An Ardealy account with access to the workspace.
- For a CSV import: a spreadsheet of your products that you can save as
.csv, and the product images as files on your computer. - For Add using AI: the address of the product's page on your website.
Step 1: Open the catalog
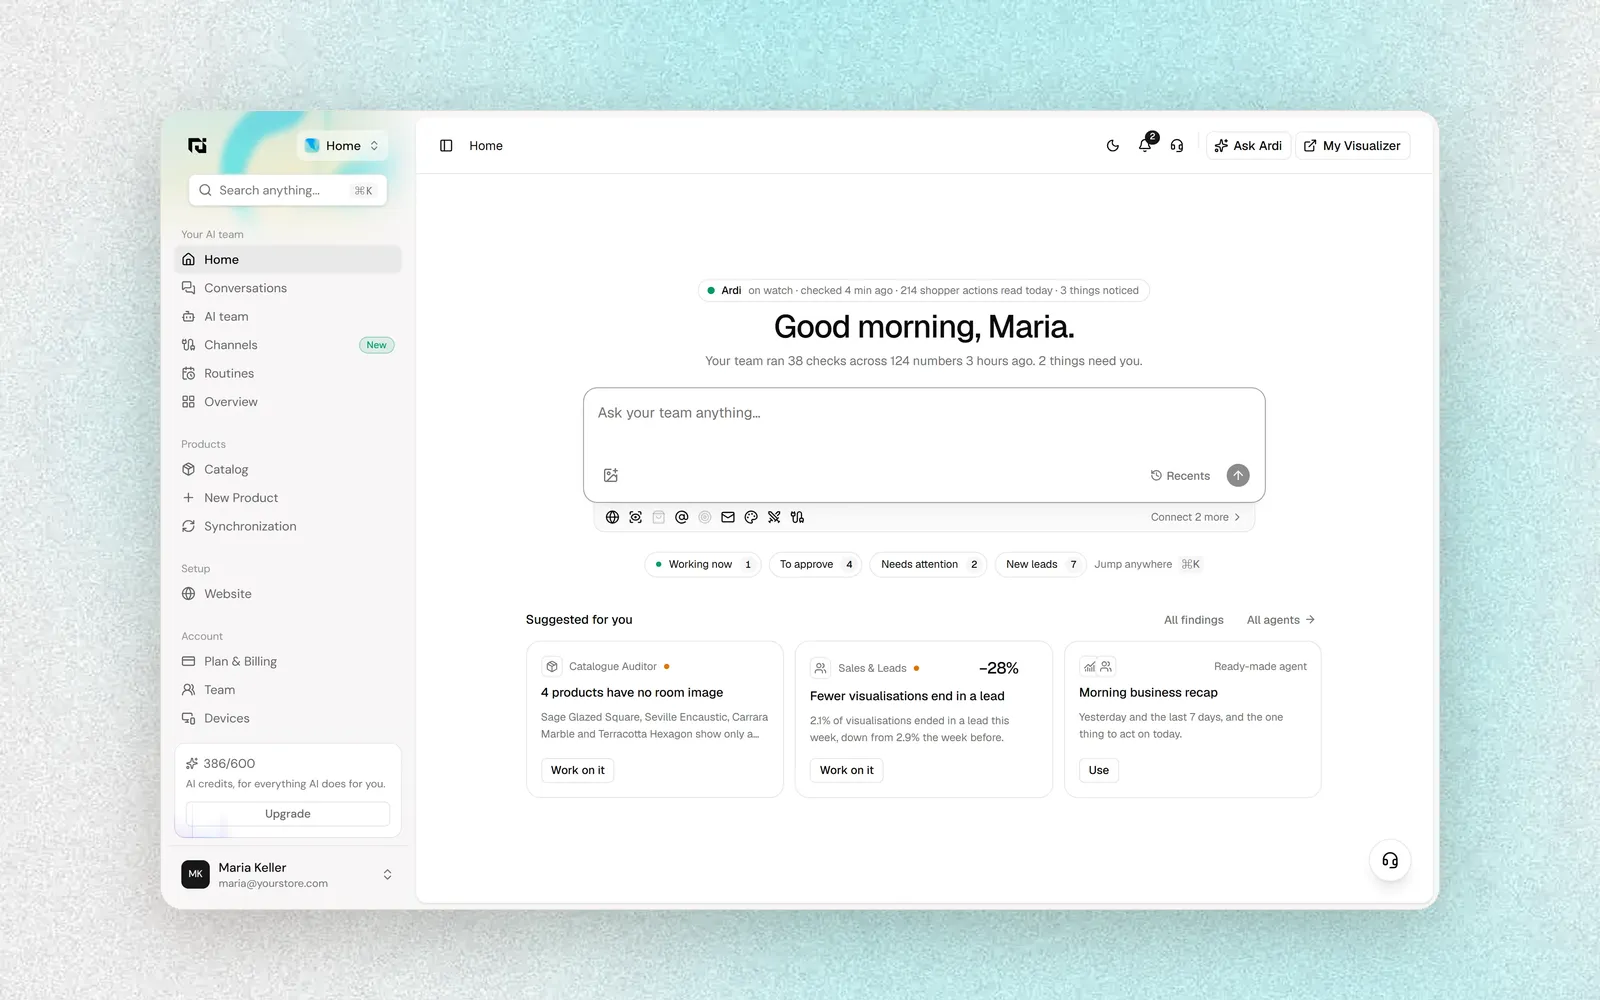
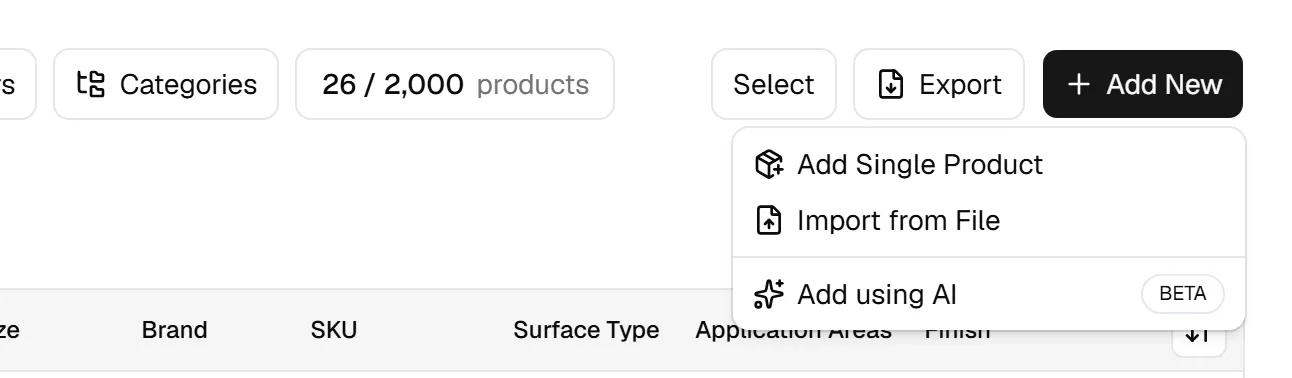
Open the workspace switcher at the top left, choose Home, then go to Products › Catalog. The toolbar shows how many products you have, along with Filters, Categories, Select, Export and the black Add New button.
Click Add New. You get three choices:
- Add Single Product opens a blank product form.
- Import from File opens the CSV importer.
- Add using AI (marked Beta) reads a product page for you.
Import many products from a CSV file
Step 2: Choose the product family and read the guide
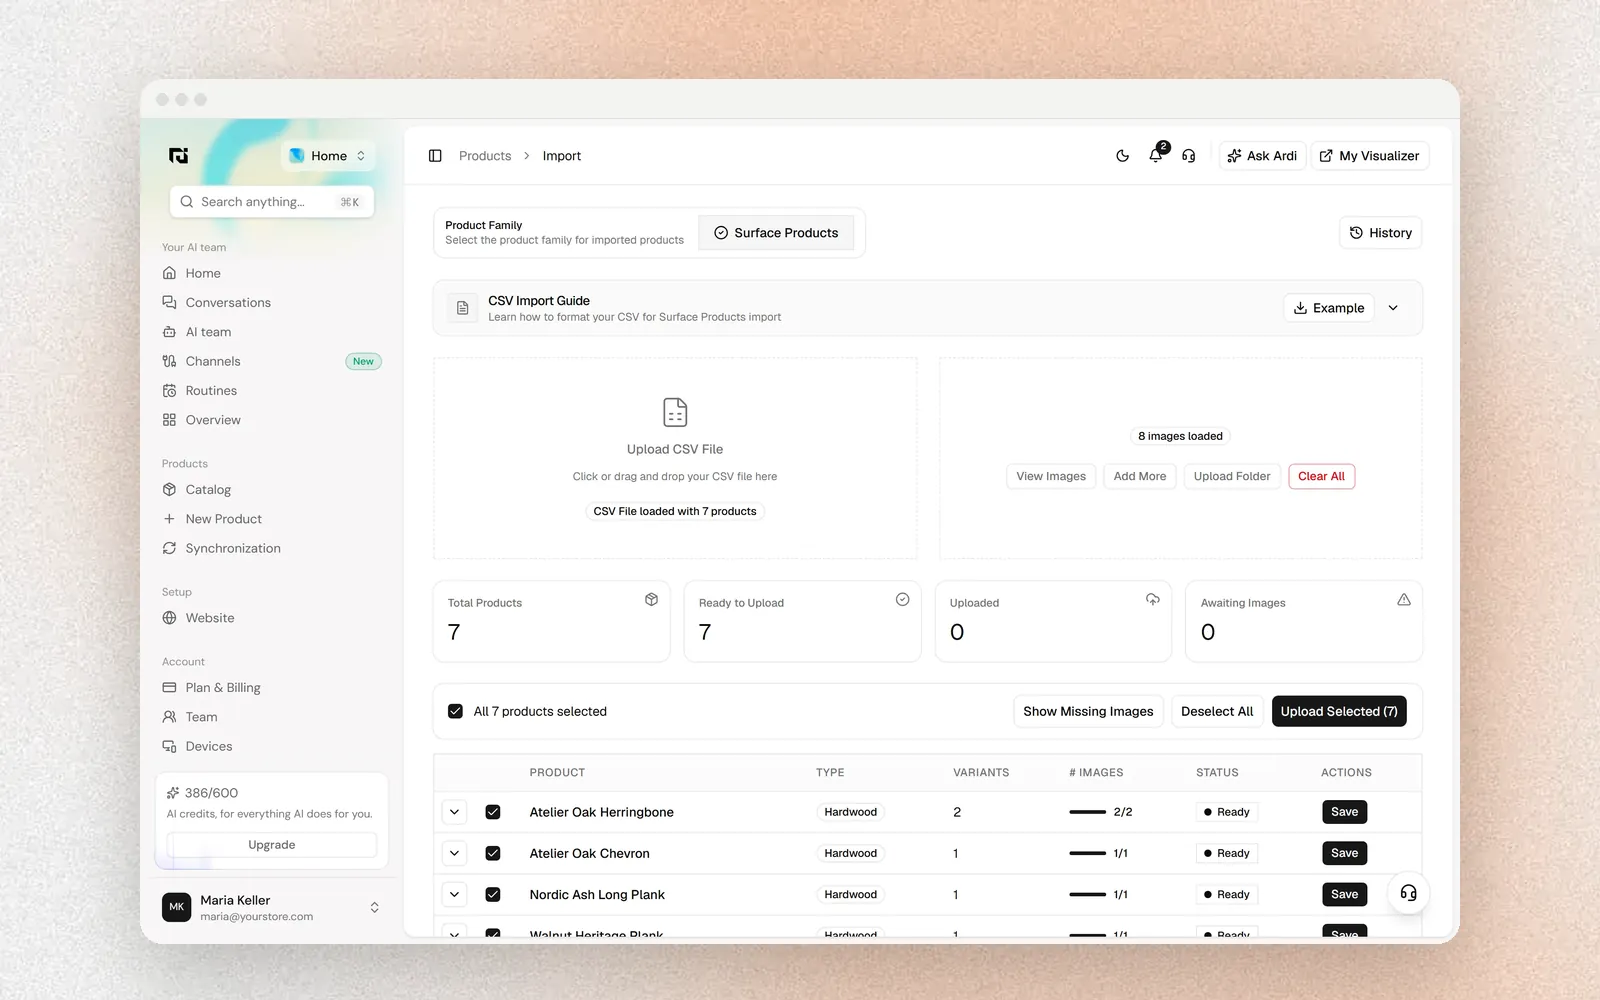
Choose Import from File. The Import page opens with a Product Family card at the top ("Select the product family for imported products"). If you only have one family, such as Surface Products, it is already selected.
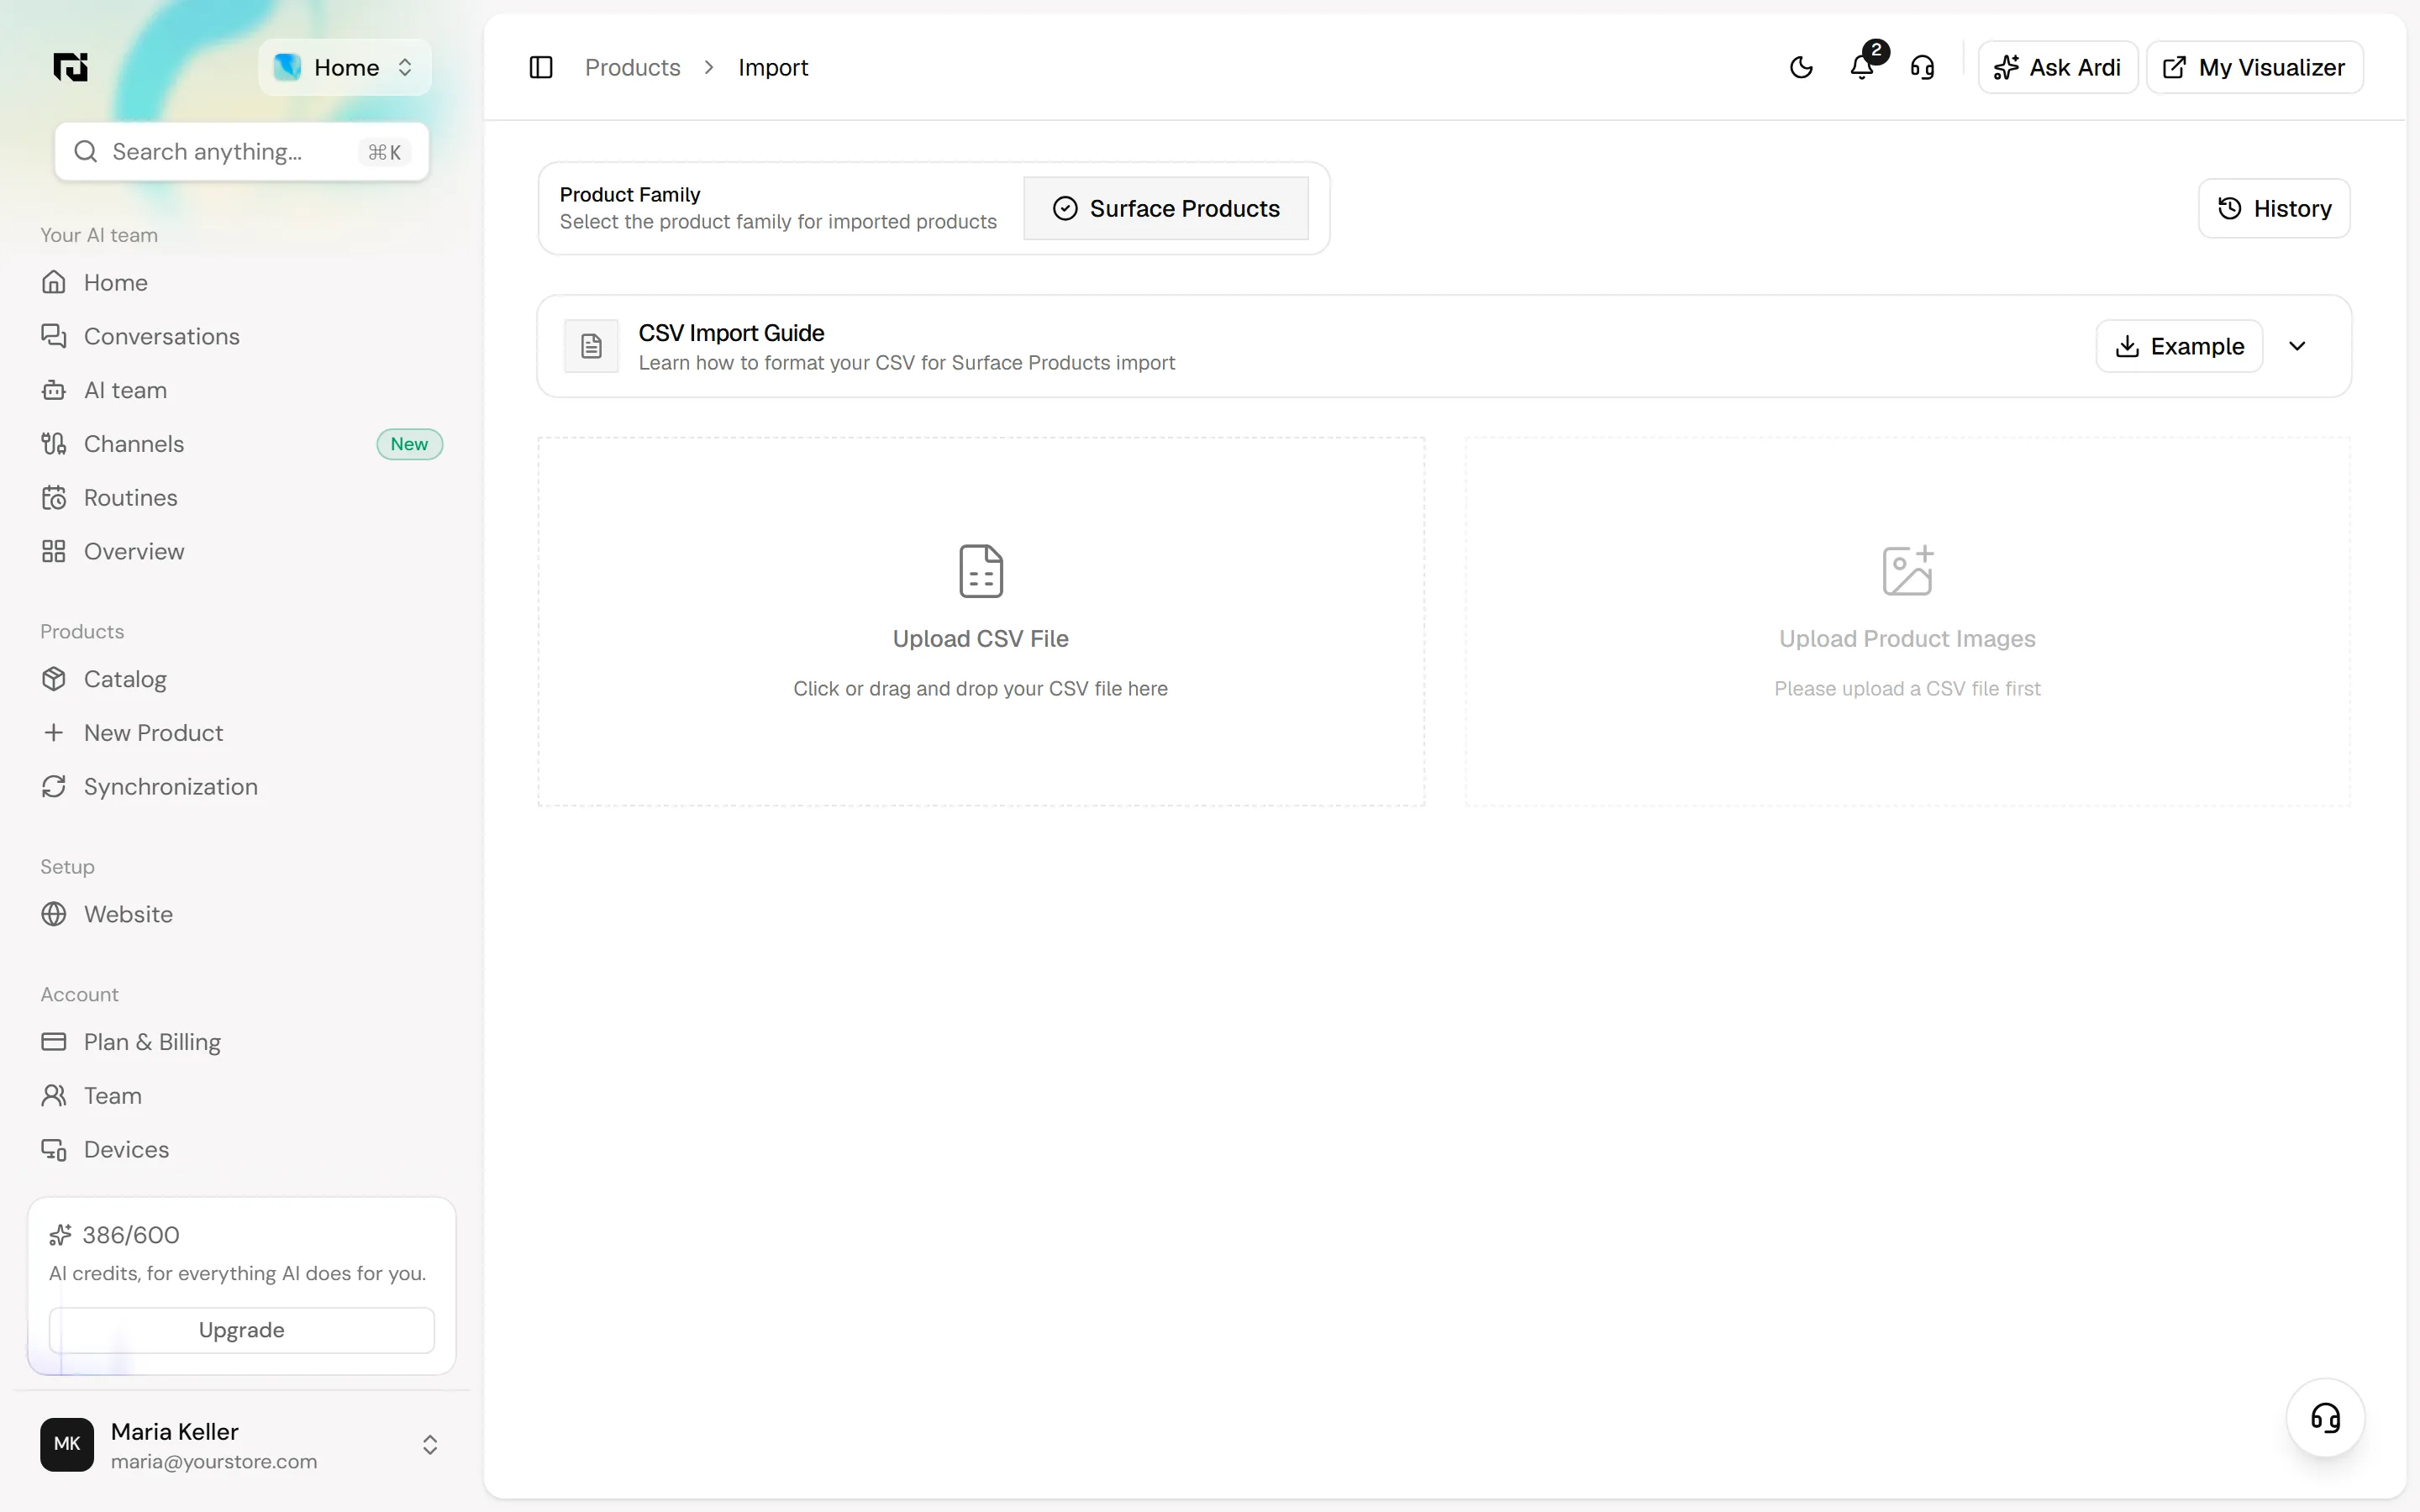
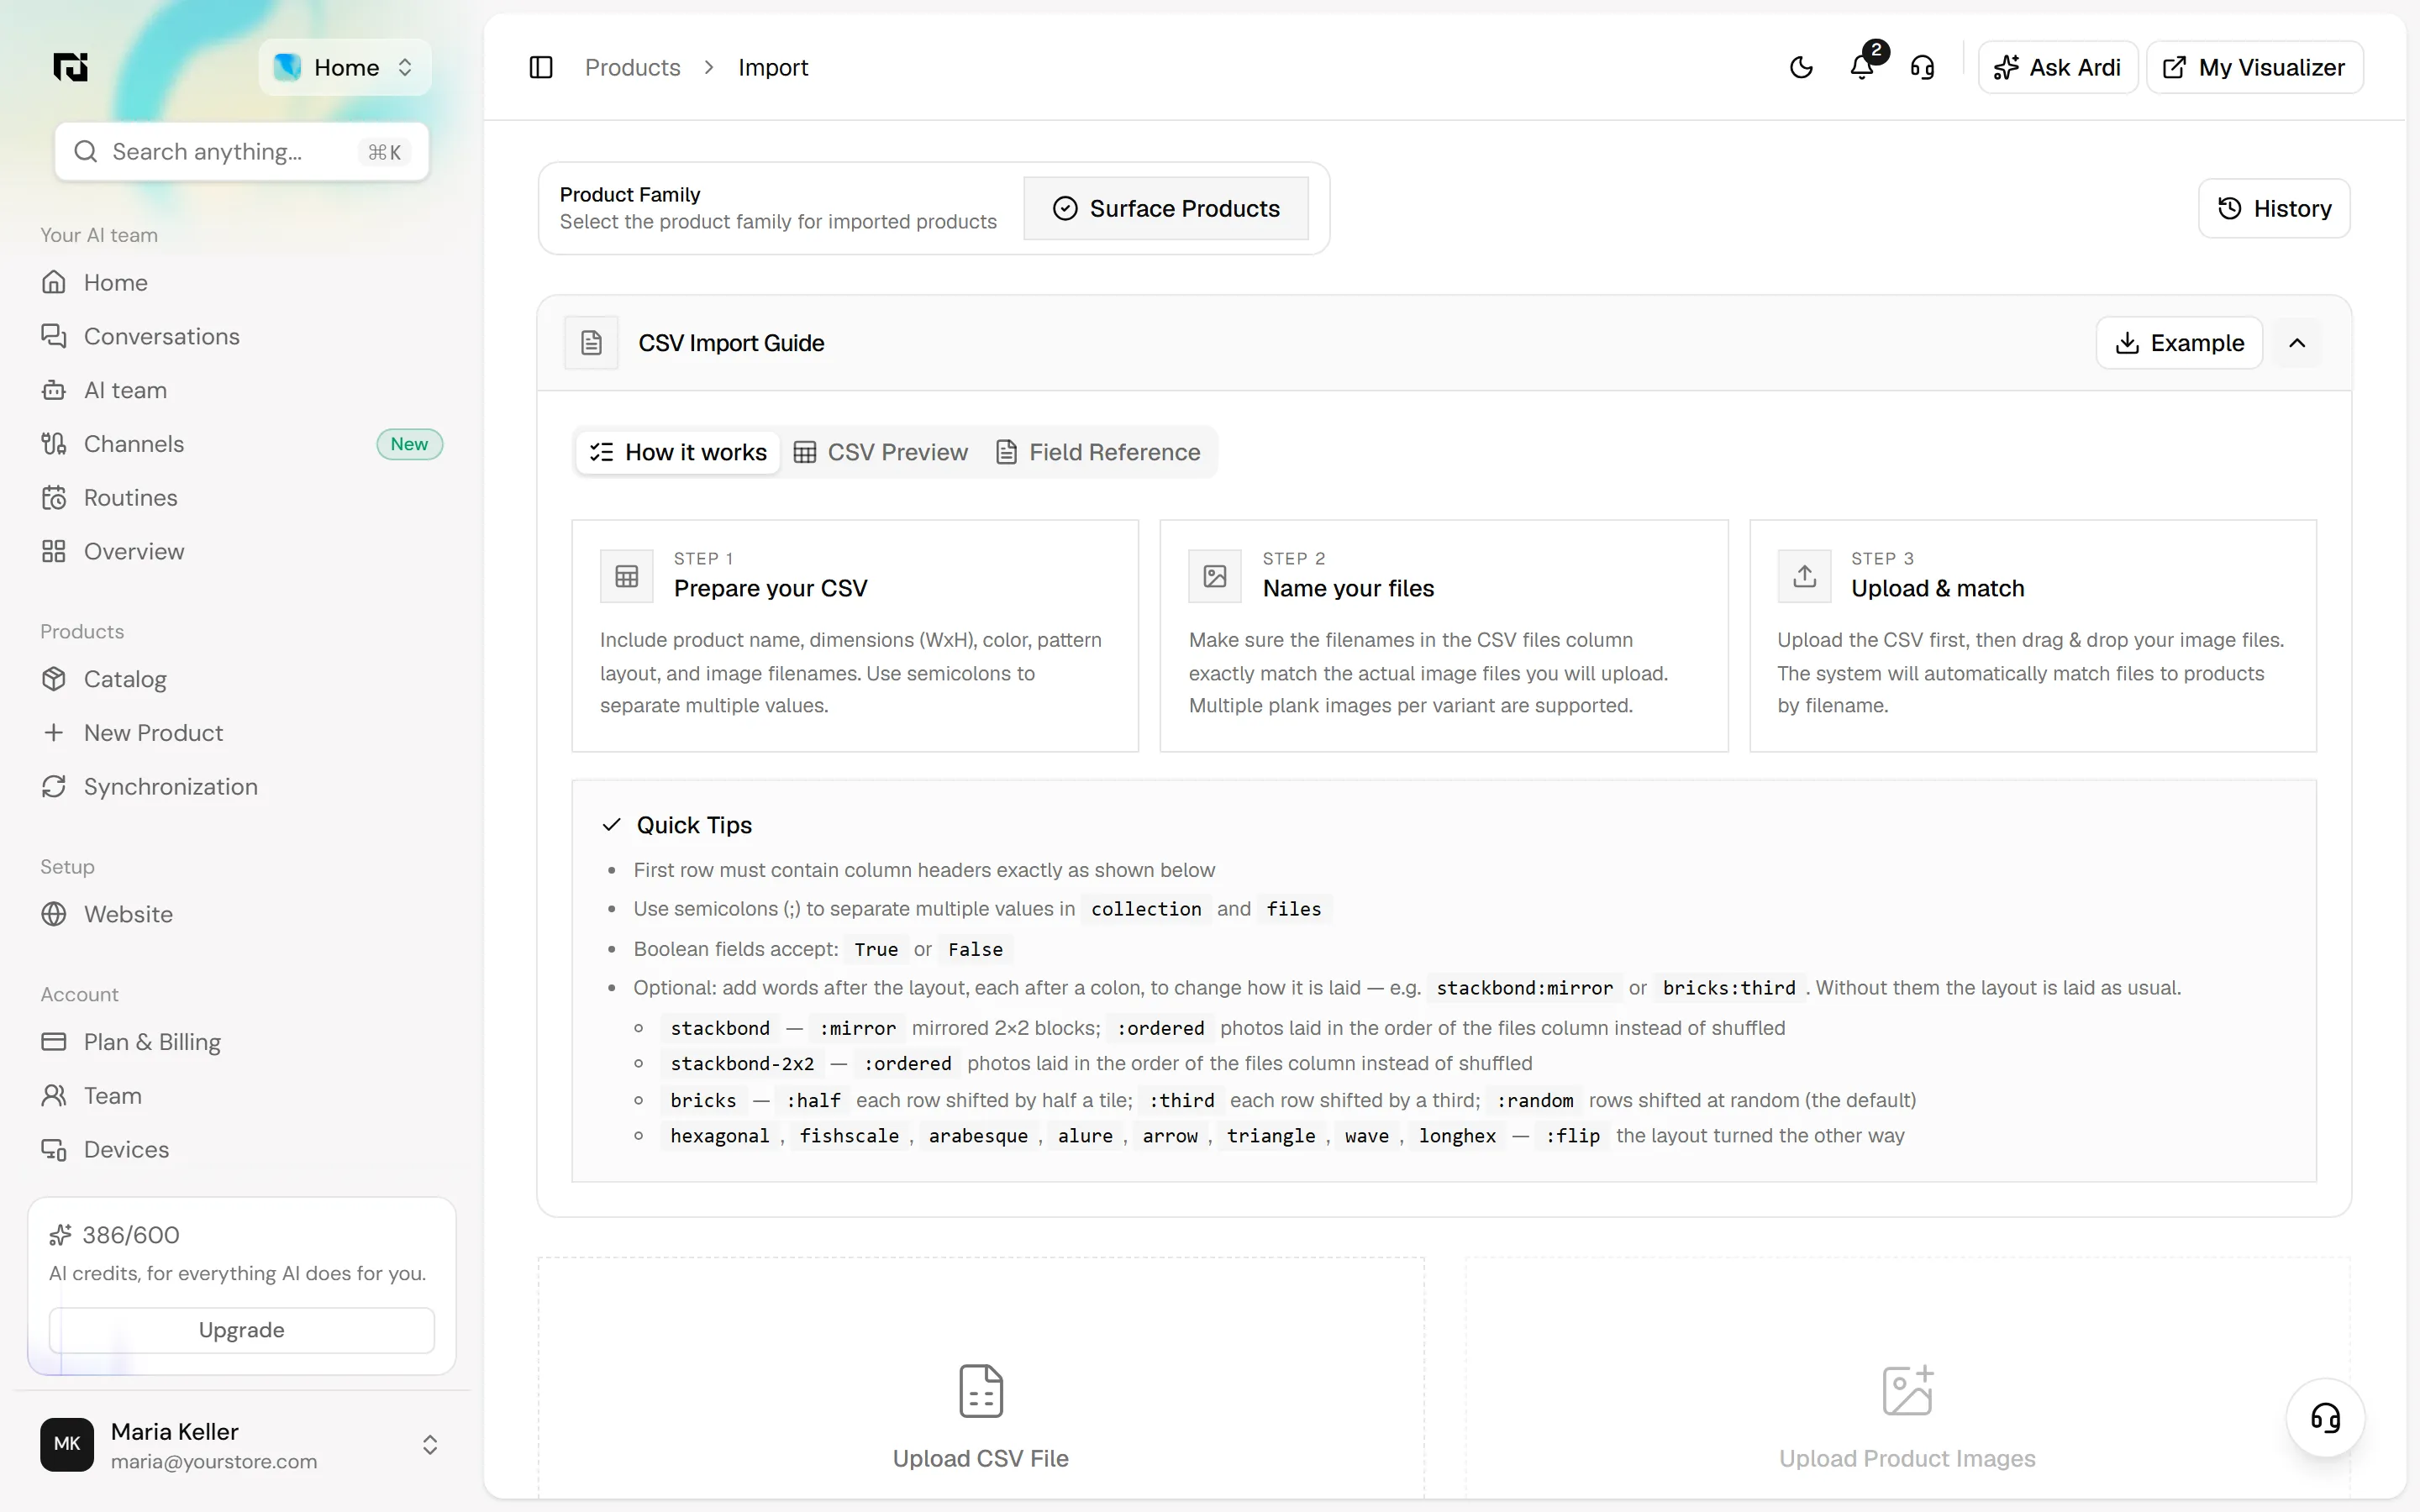
Click the Example button to download a sample CSV. Starting from it is the easiest way to get the columns right. Then open the CSV Import Guide by clicking its header. It has three tabs:
- How it works: Step 1 Prepare your CSV, Step 2 Name your files, Step 3 Upload & match, with Quick Tips below.
- CSV Preview: what a correct file looks like for your product family.
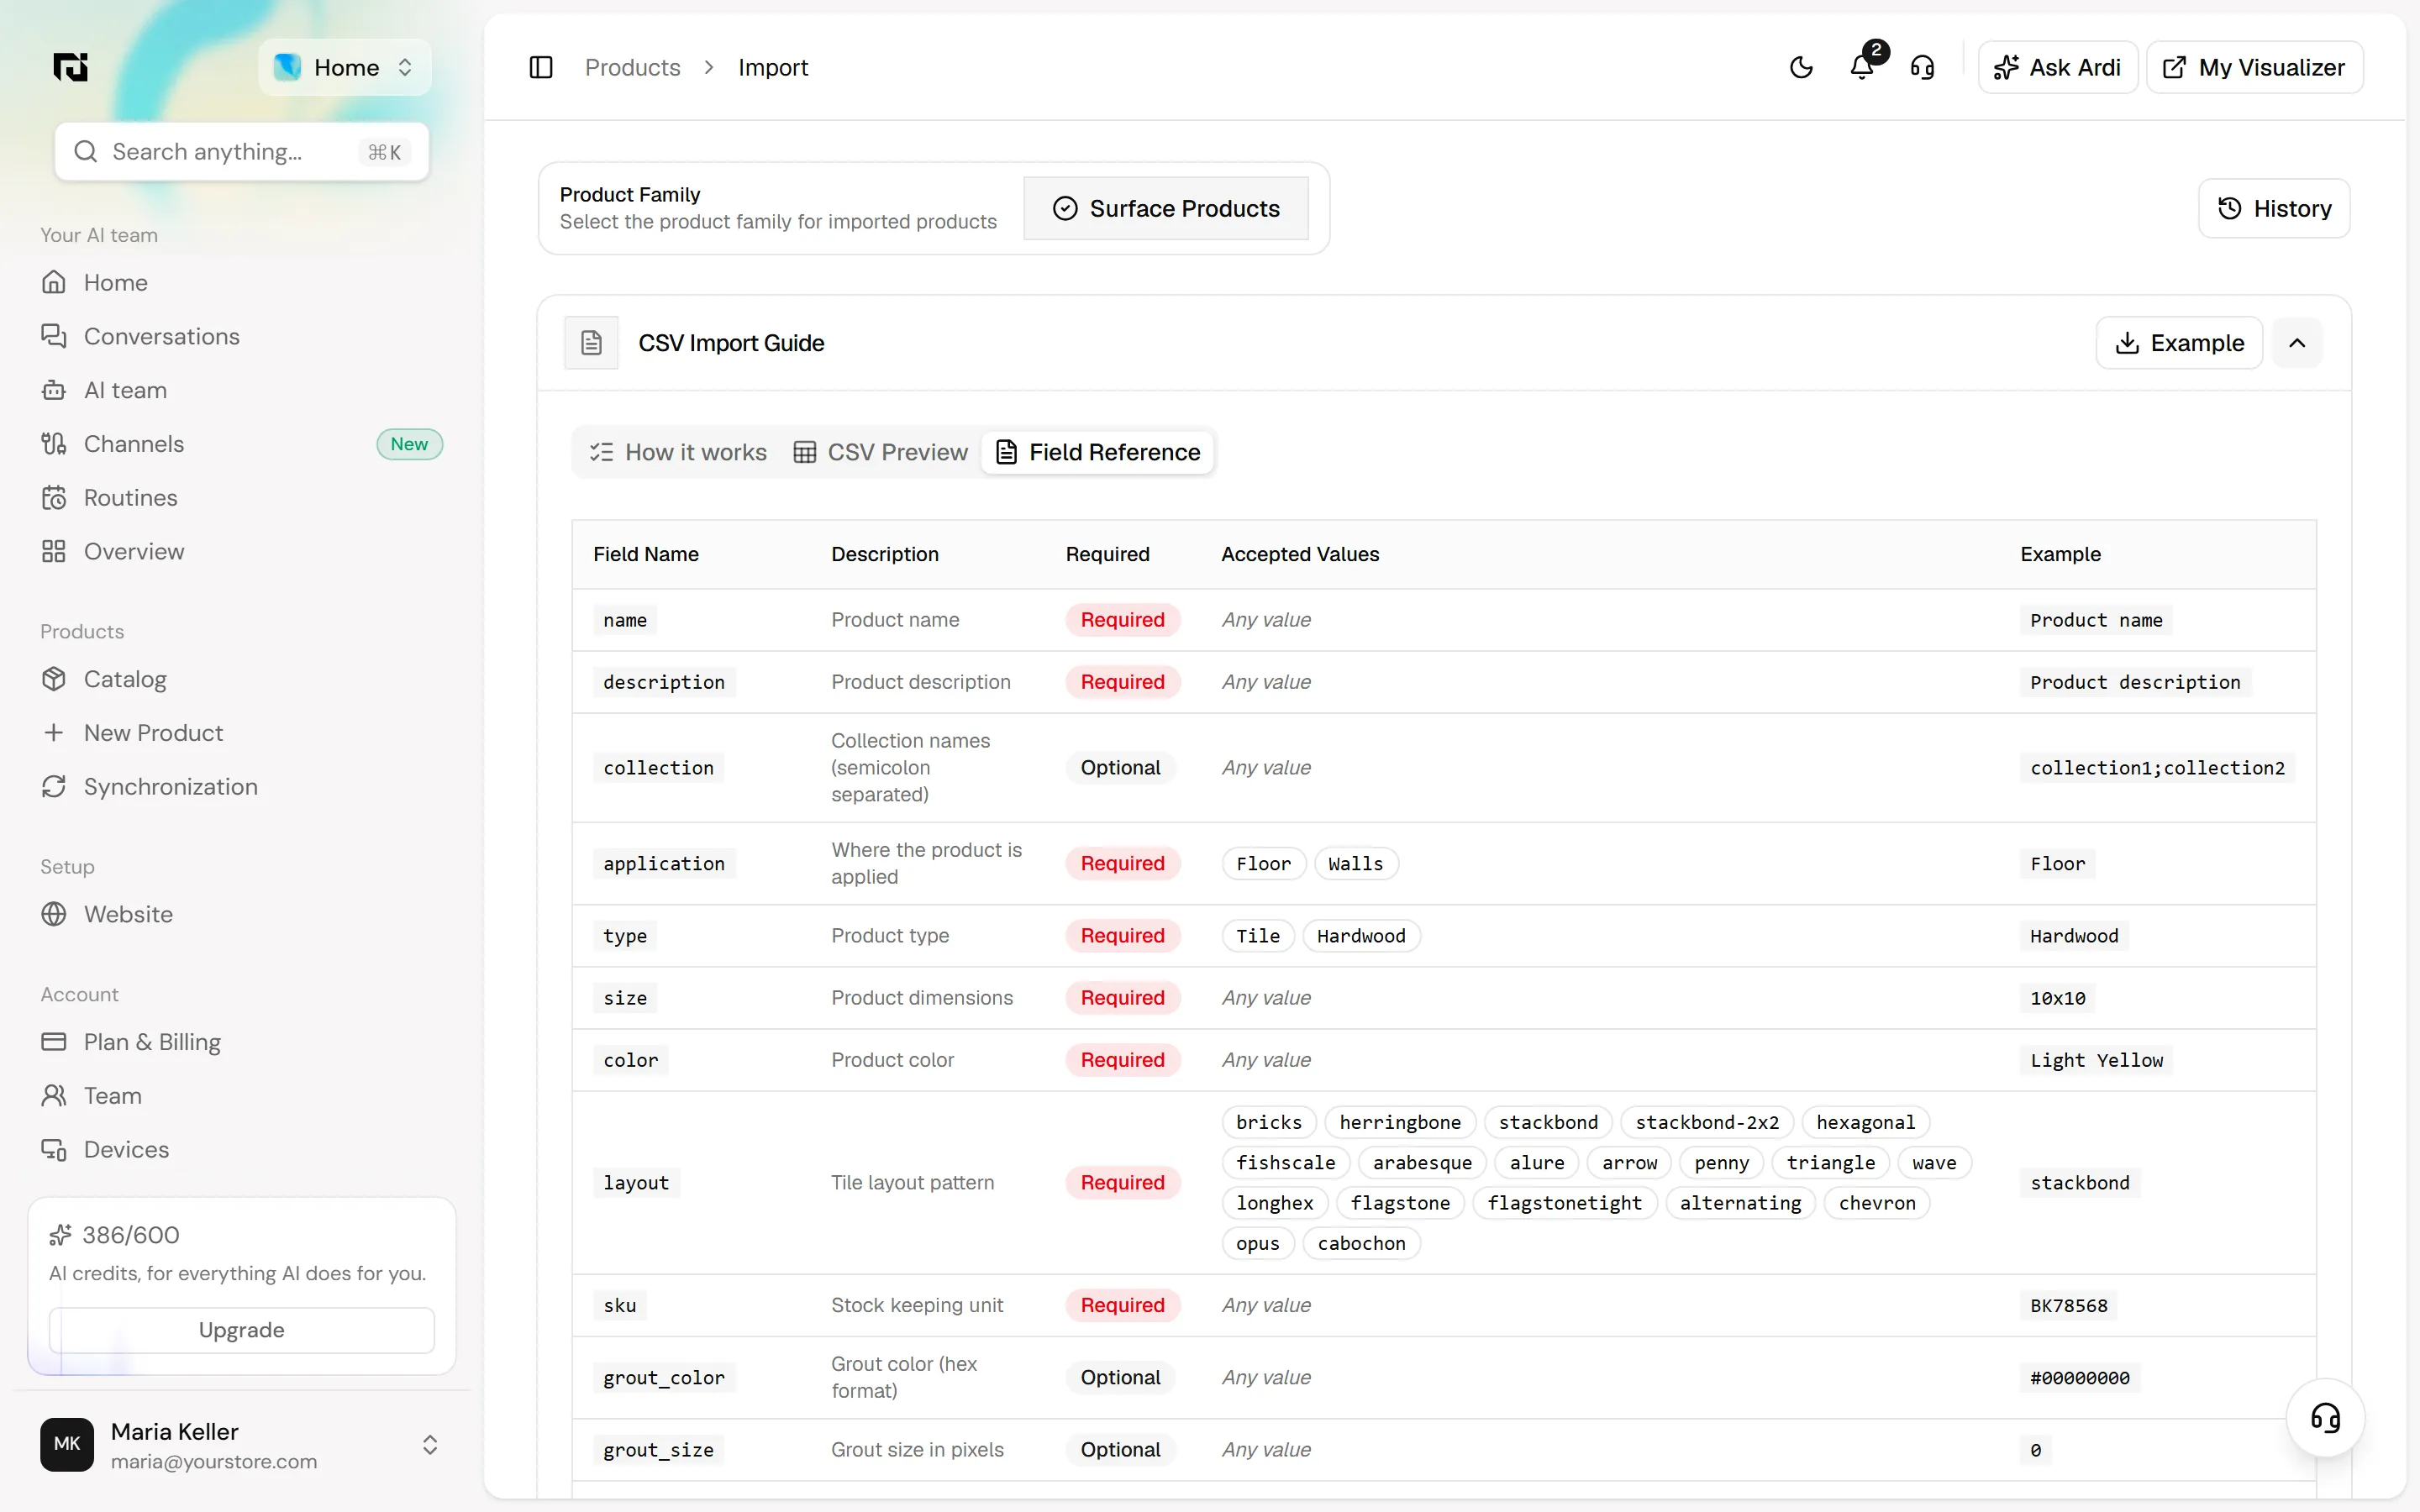
- Field Reference: every column, whether it is required, and the values it accepts.
Step 3: Prepare your CSV
Use the Field Reference tab as your checklist. For Surface Products the columns are name, description, collection, application, type, size, color, layout, sku, grout_color, grout_size, link, add_to_cart_link, is_visible and files.
A few rules matter more than the rest:
- Headers must match exactly. The first row must contain the column names as shown. There is no column-matching screen, so a column called "Product Name" instead of
namewill not be read. - Some columns only accept set values.
applicationtakes Floor or Walls,typetakes Tile or Hardwood, andlayouttakes one of the listed patterns, such asbricks,herringboneorstackbond. - Semicolons separate several values in
collectionandfiles. is_visibletakes True or False.- One row per variant. Rows that share the same
namebecome variants of one product. A herringbone floor in two sizes is two rows with the same name.
Step 4: Name your image files
Each row's files column lists the image file names for that variant. The names must exactly match the files you will upload, because that is how images are matched to products. Put all the images in one folder before you start.
Step 5: Upload the CSV, then the images
Drop your CSV on Upload CSV File, or click it to choose the file. A badge confirms how many products were found, for example "CSV File loaded with 7 products". Stat cards show Total Products, Ready to Upload, Uploaded and Awaiting Images, and the table lists each product as "Awaiting images".
Now drop your images on Upload Product Images. You can add files, Upload Folder for a whole folder, Add More if you missed some, or Clear All to start again. As files are matched, each product's # Images count fills up and its status changes to Ready.
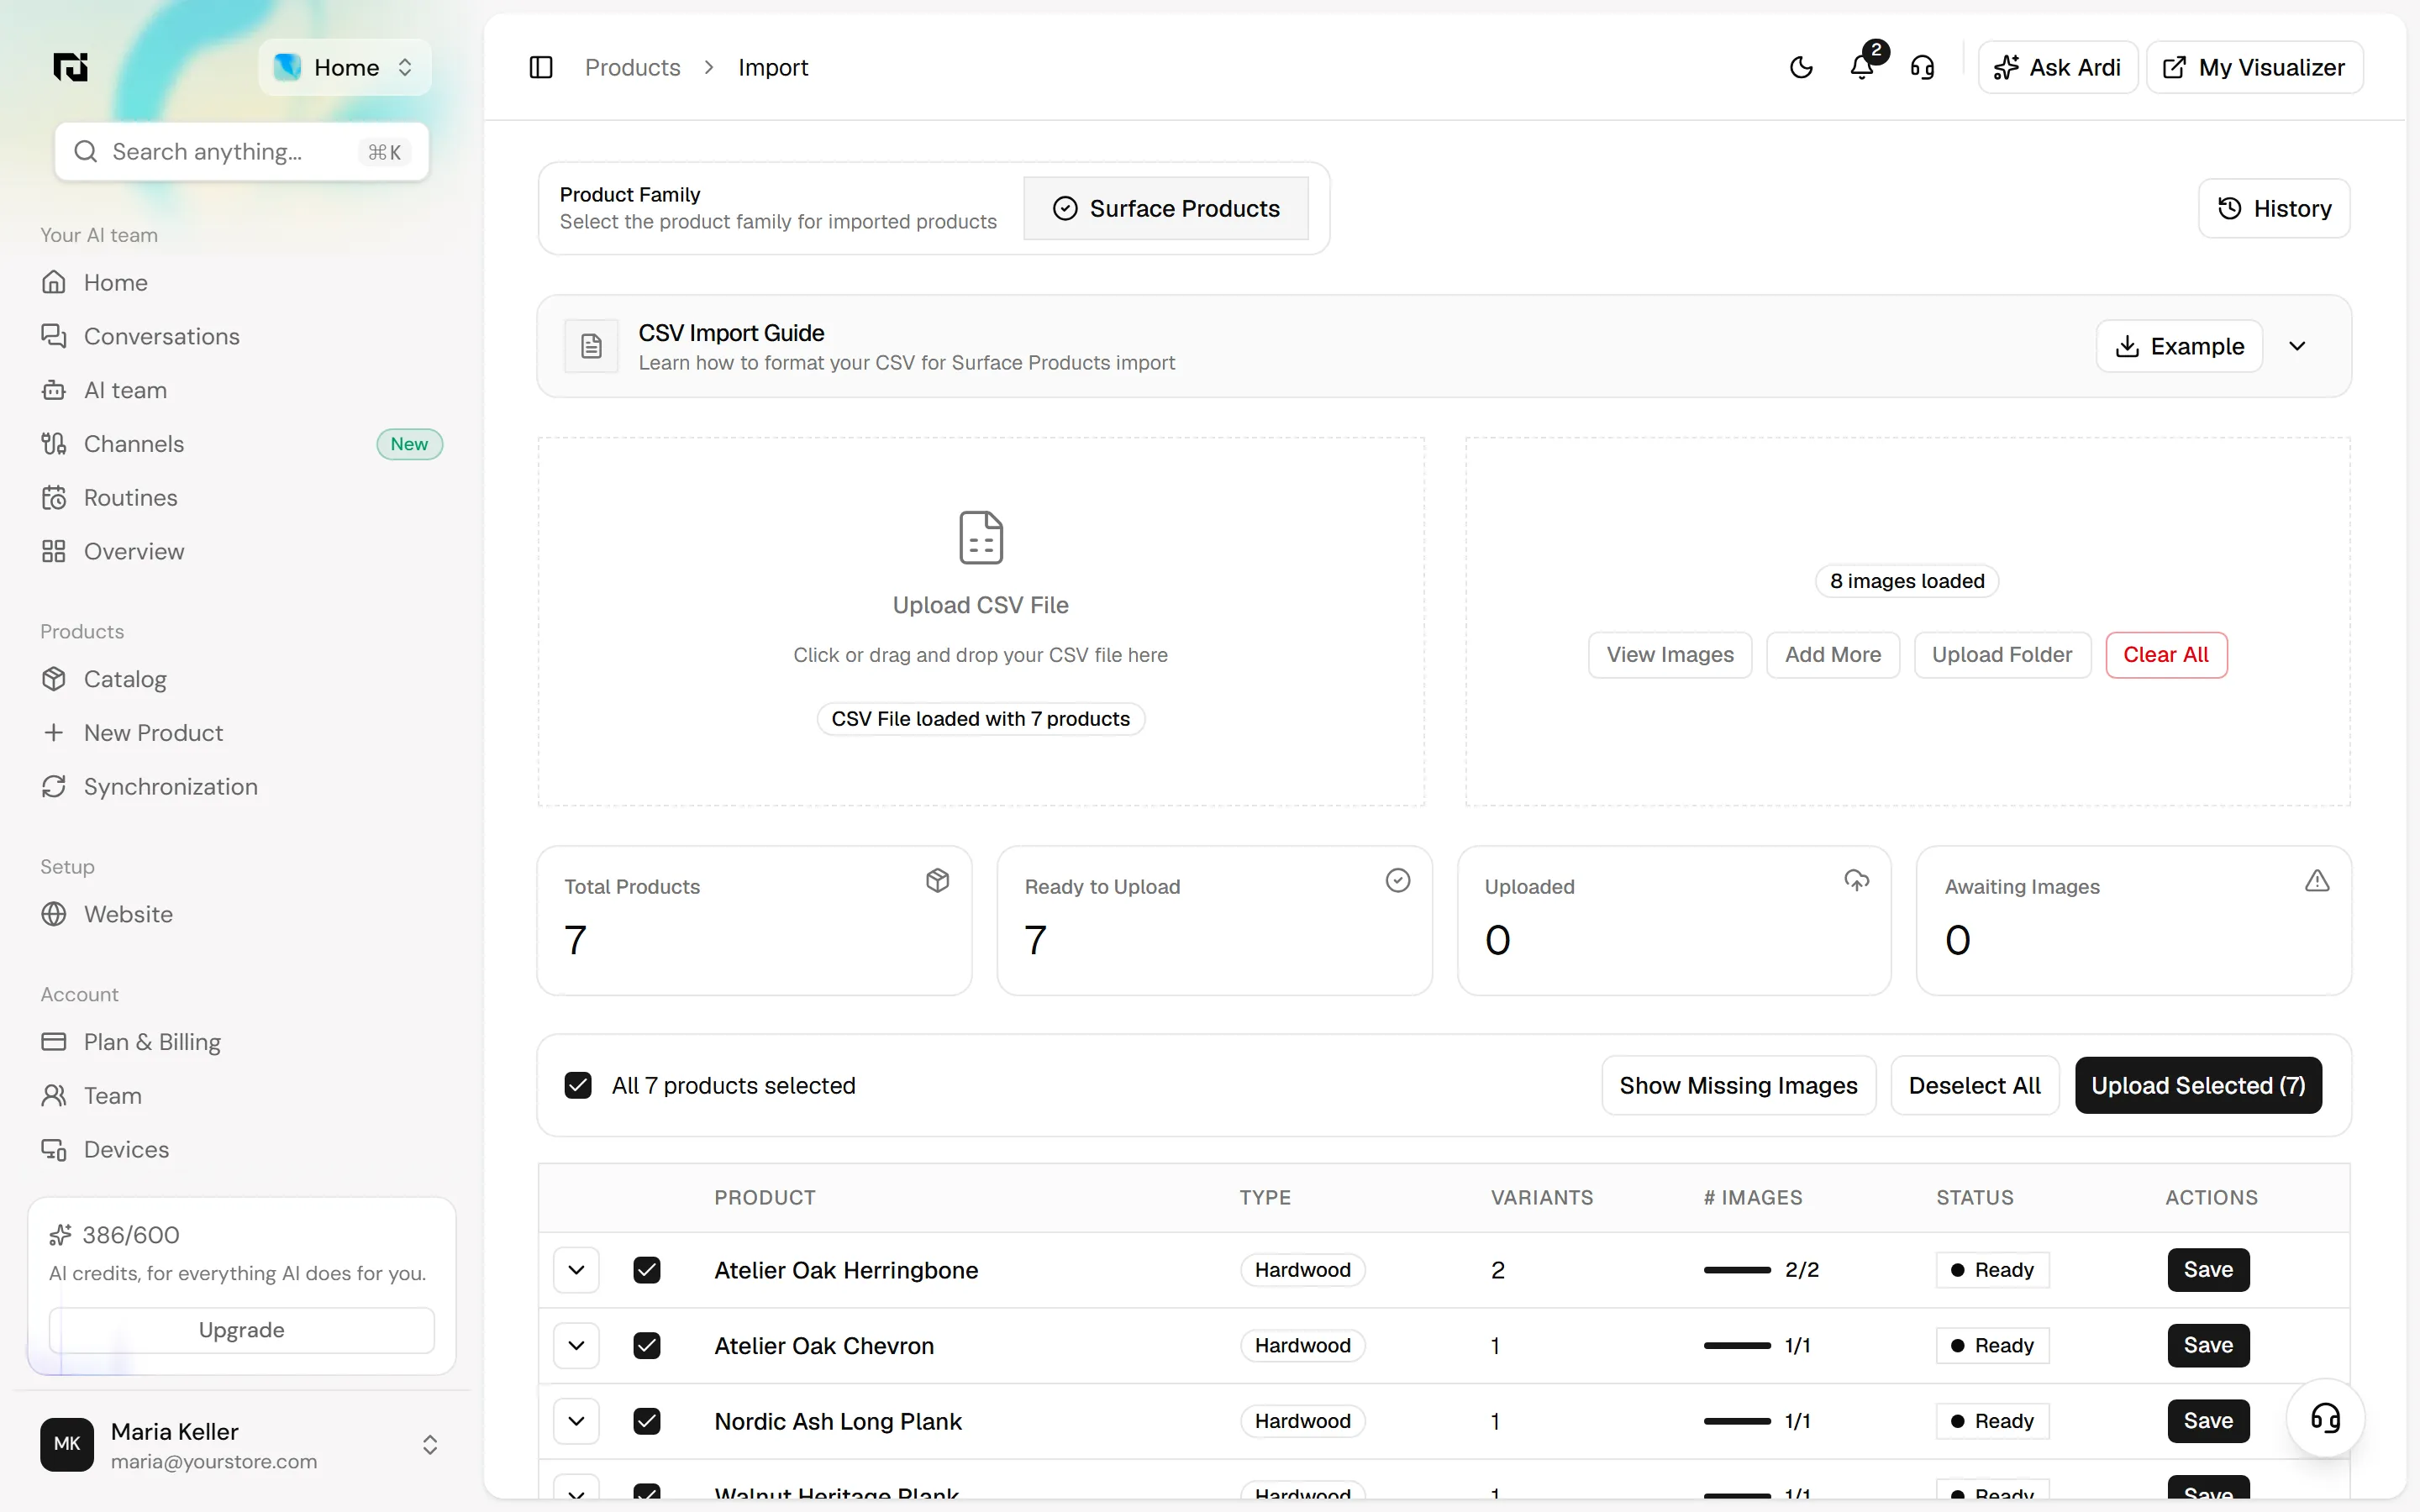
If some products stay on "Awaiting images", click Show Missing Images to list the products still waiting for images. Usually a file name in the CSV does not match the file in your folder. Click the arrow at the start of a row to check its variants (SKU, Color, Size, Pattern and # Images).
Step 6: Upload and check the history
Leave the products you want ticked and click Upload Selected. The products are created in the background, so you can keep working. You can also save one product at a time with its Save button.
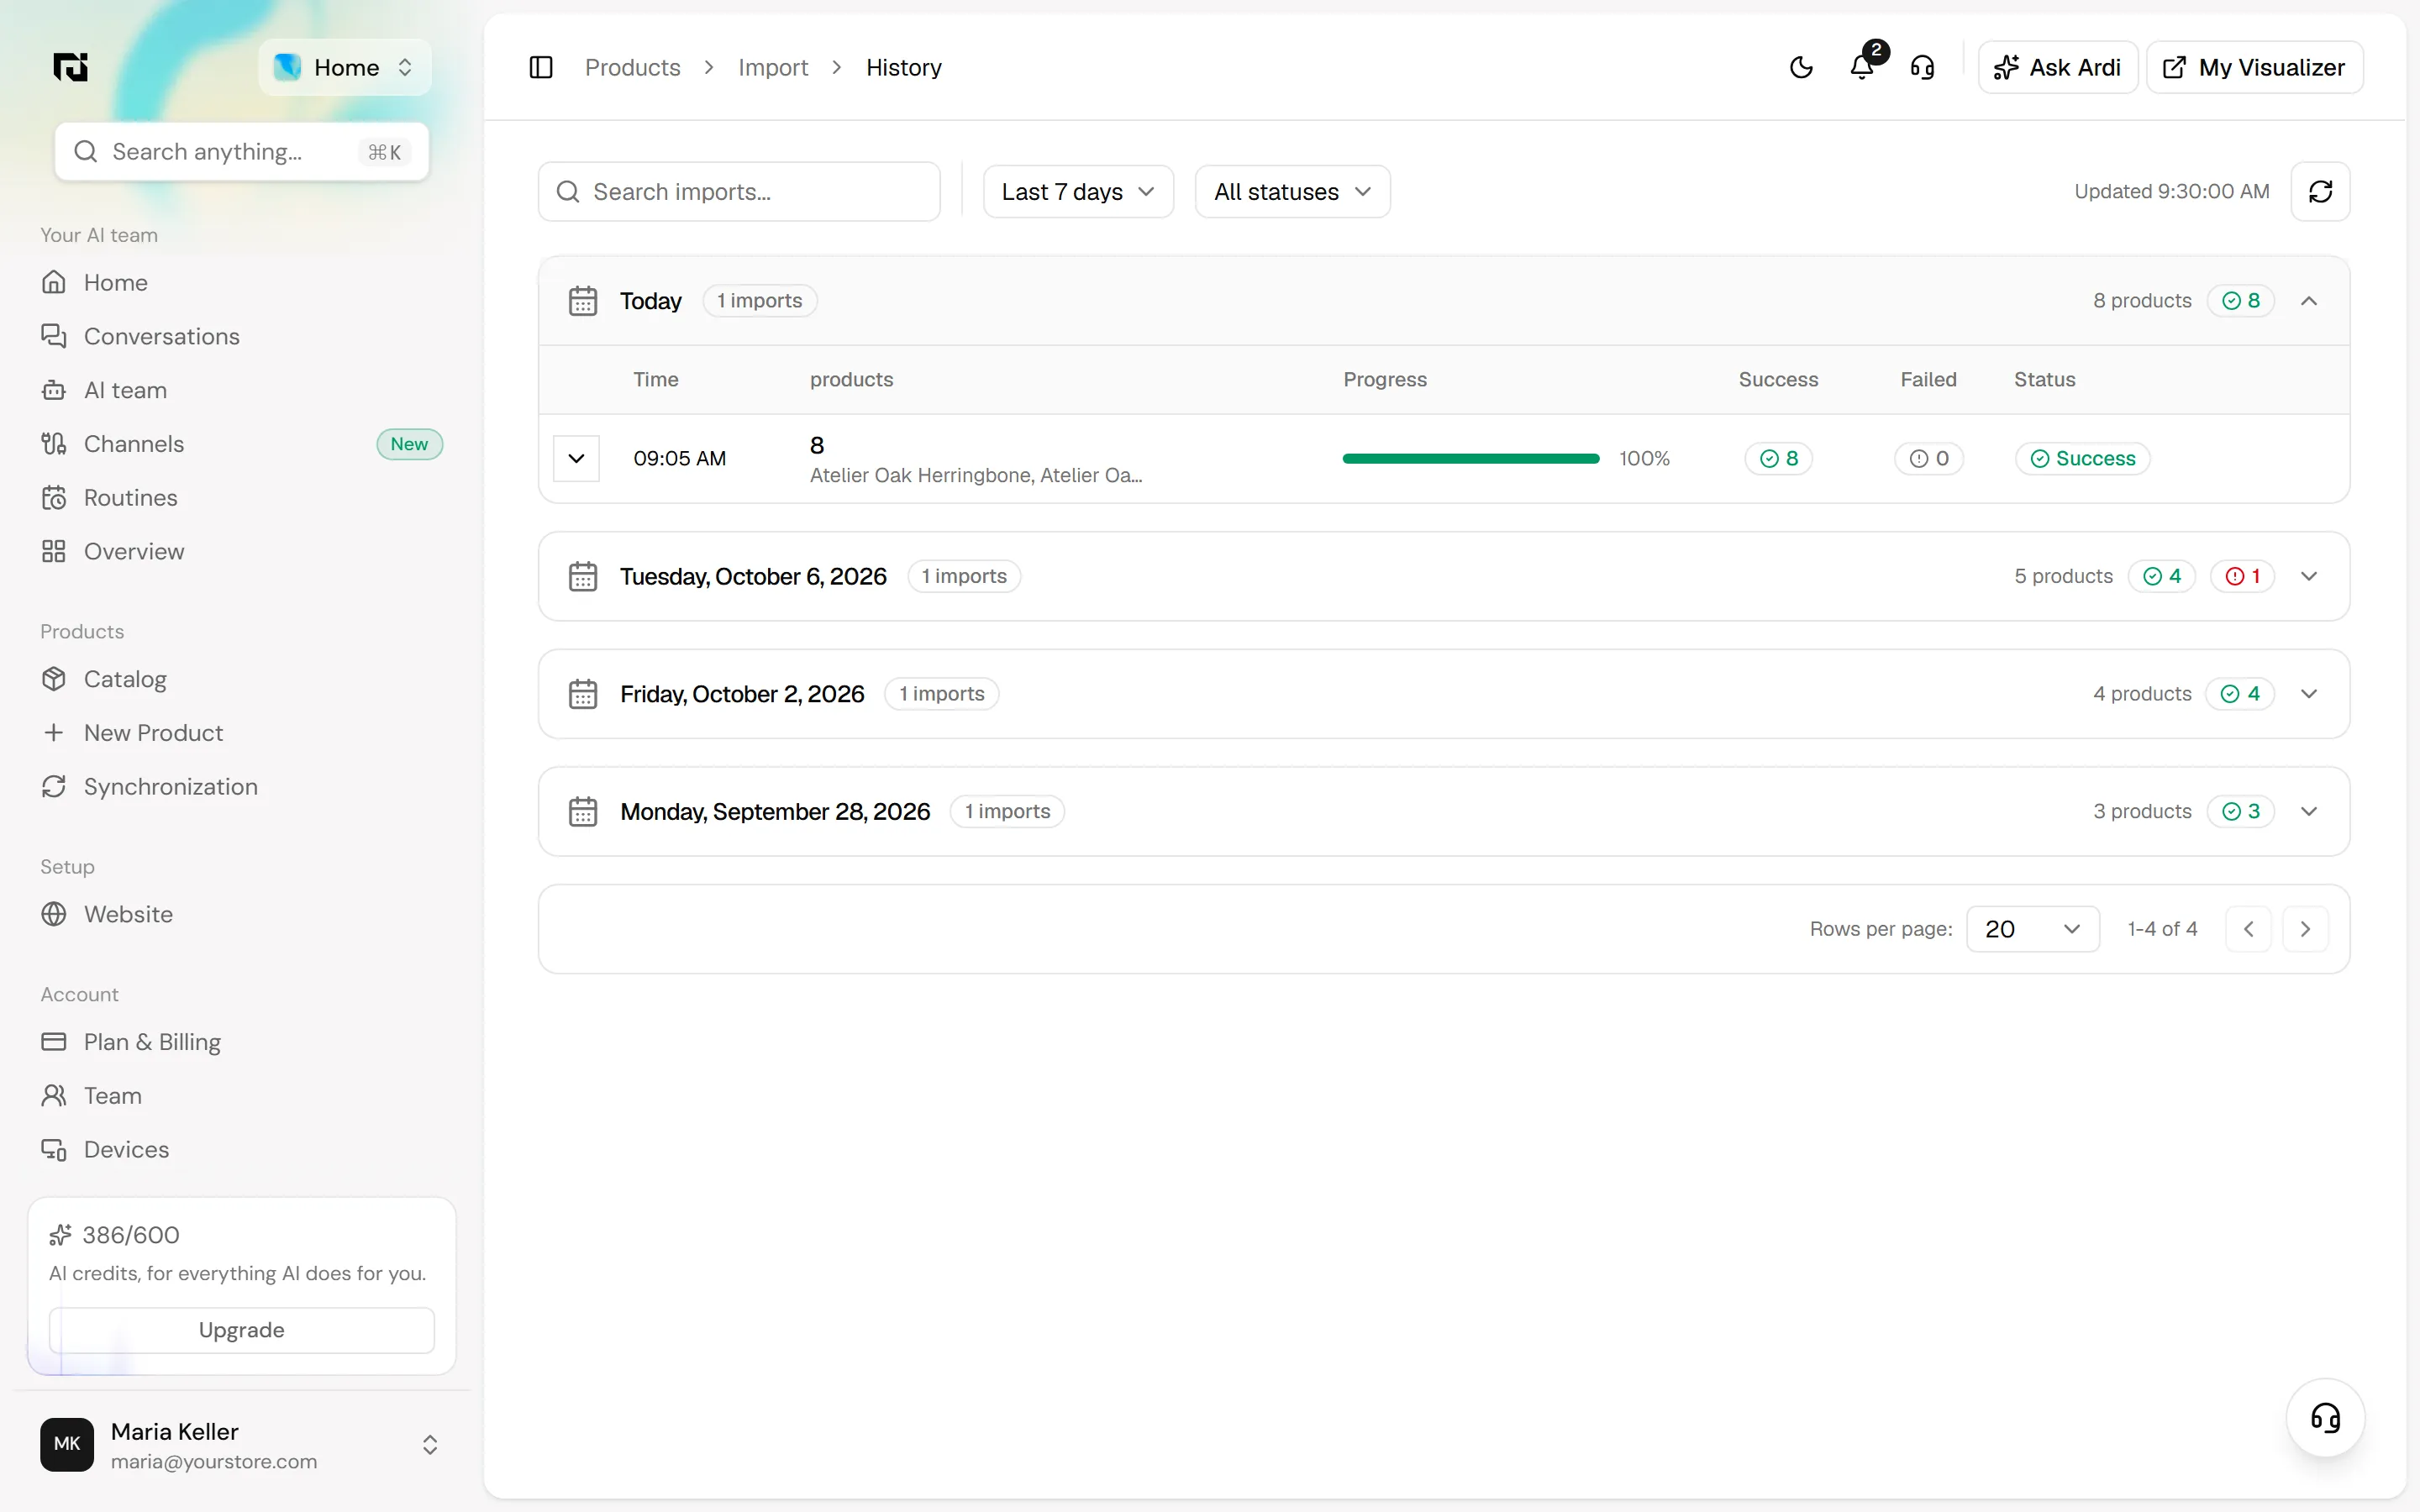
To follow progress, click History at the top right of the Import page. Imports are grouped by day, and each shows its time, number of products, progress, Success and Failed counts and status. Click an import to see each product. Failed products can be retried from there.
Add one product with AI
Step 7: Paste a product page address
From Add New, choose Add using AI. The page has one field, Product Page URL: "Paste a product page URL. We read it as soon as you do." There is no button to press. Reading starts as soon as you paste.
Step 8: Review what was found and create the product
The result, Product Data Extracted, shows the product name, brand, the page it came from and the photos found on it, then the Product Details: Brand, SKU, Size, Color, Material, Pattern and Price, followed by Application and Description. Check them against your page.
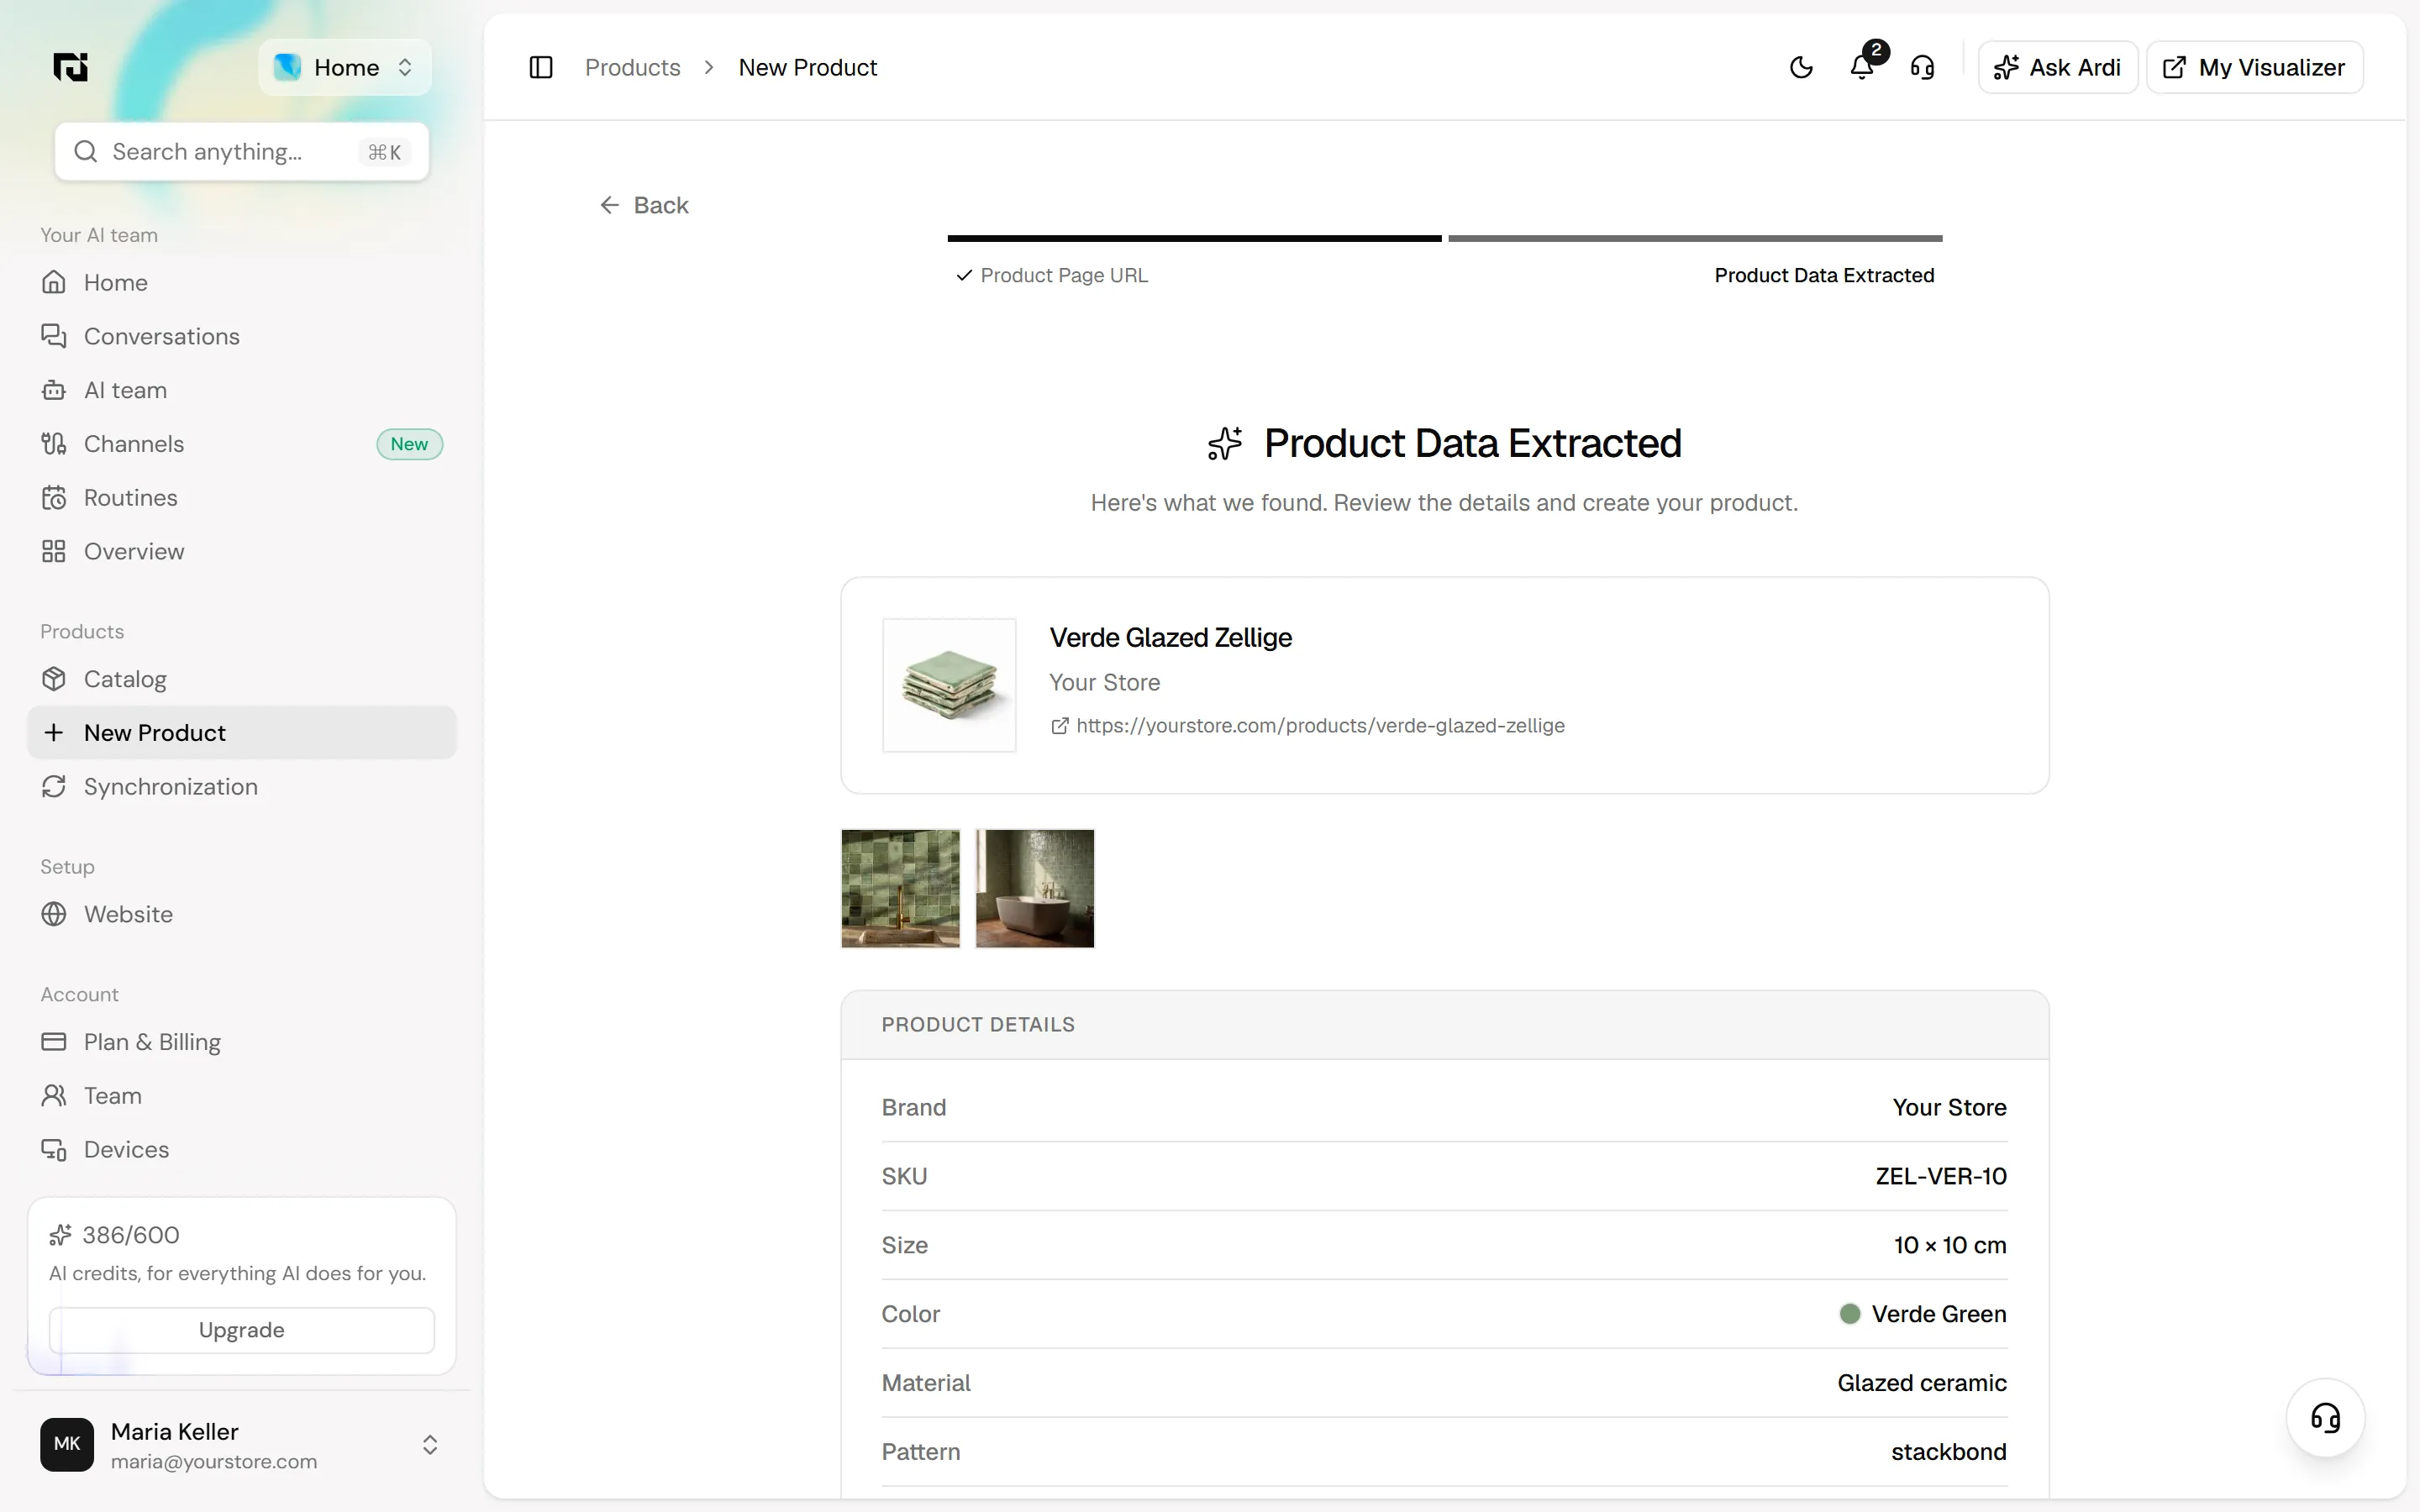
If you sell more than one product family and the AI cannot tell which one fits, it asks you to choose. Otherwise the chosen family is shown with a Change button. Click Create Product in the footer. The product editor opens with the details filled in.
Step 9: Build the tiles from photos
For tile and other surface products, the visualizer needs clean images of the material itself. In the variant, Build from photos does this for you: "A sheet, a single tile or a room: AI cuts the tiles for you." The photos from your page are already ticked, and you can drop up to 12 of your own. The footer shows the credit cost before you click Analyse.
The result shows the pattern it detected, the tile images it cut (click one to untick it), and Photo by photo, which says which photos were used or skipped and why.
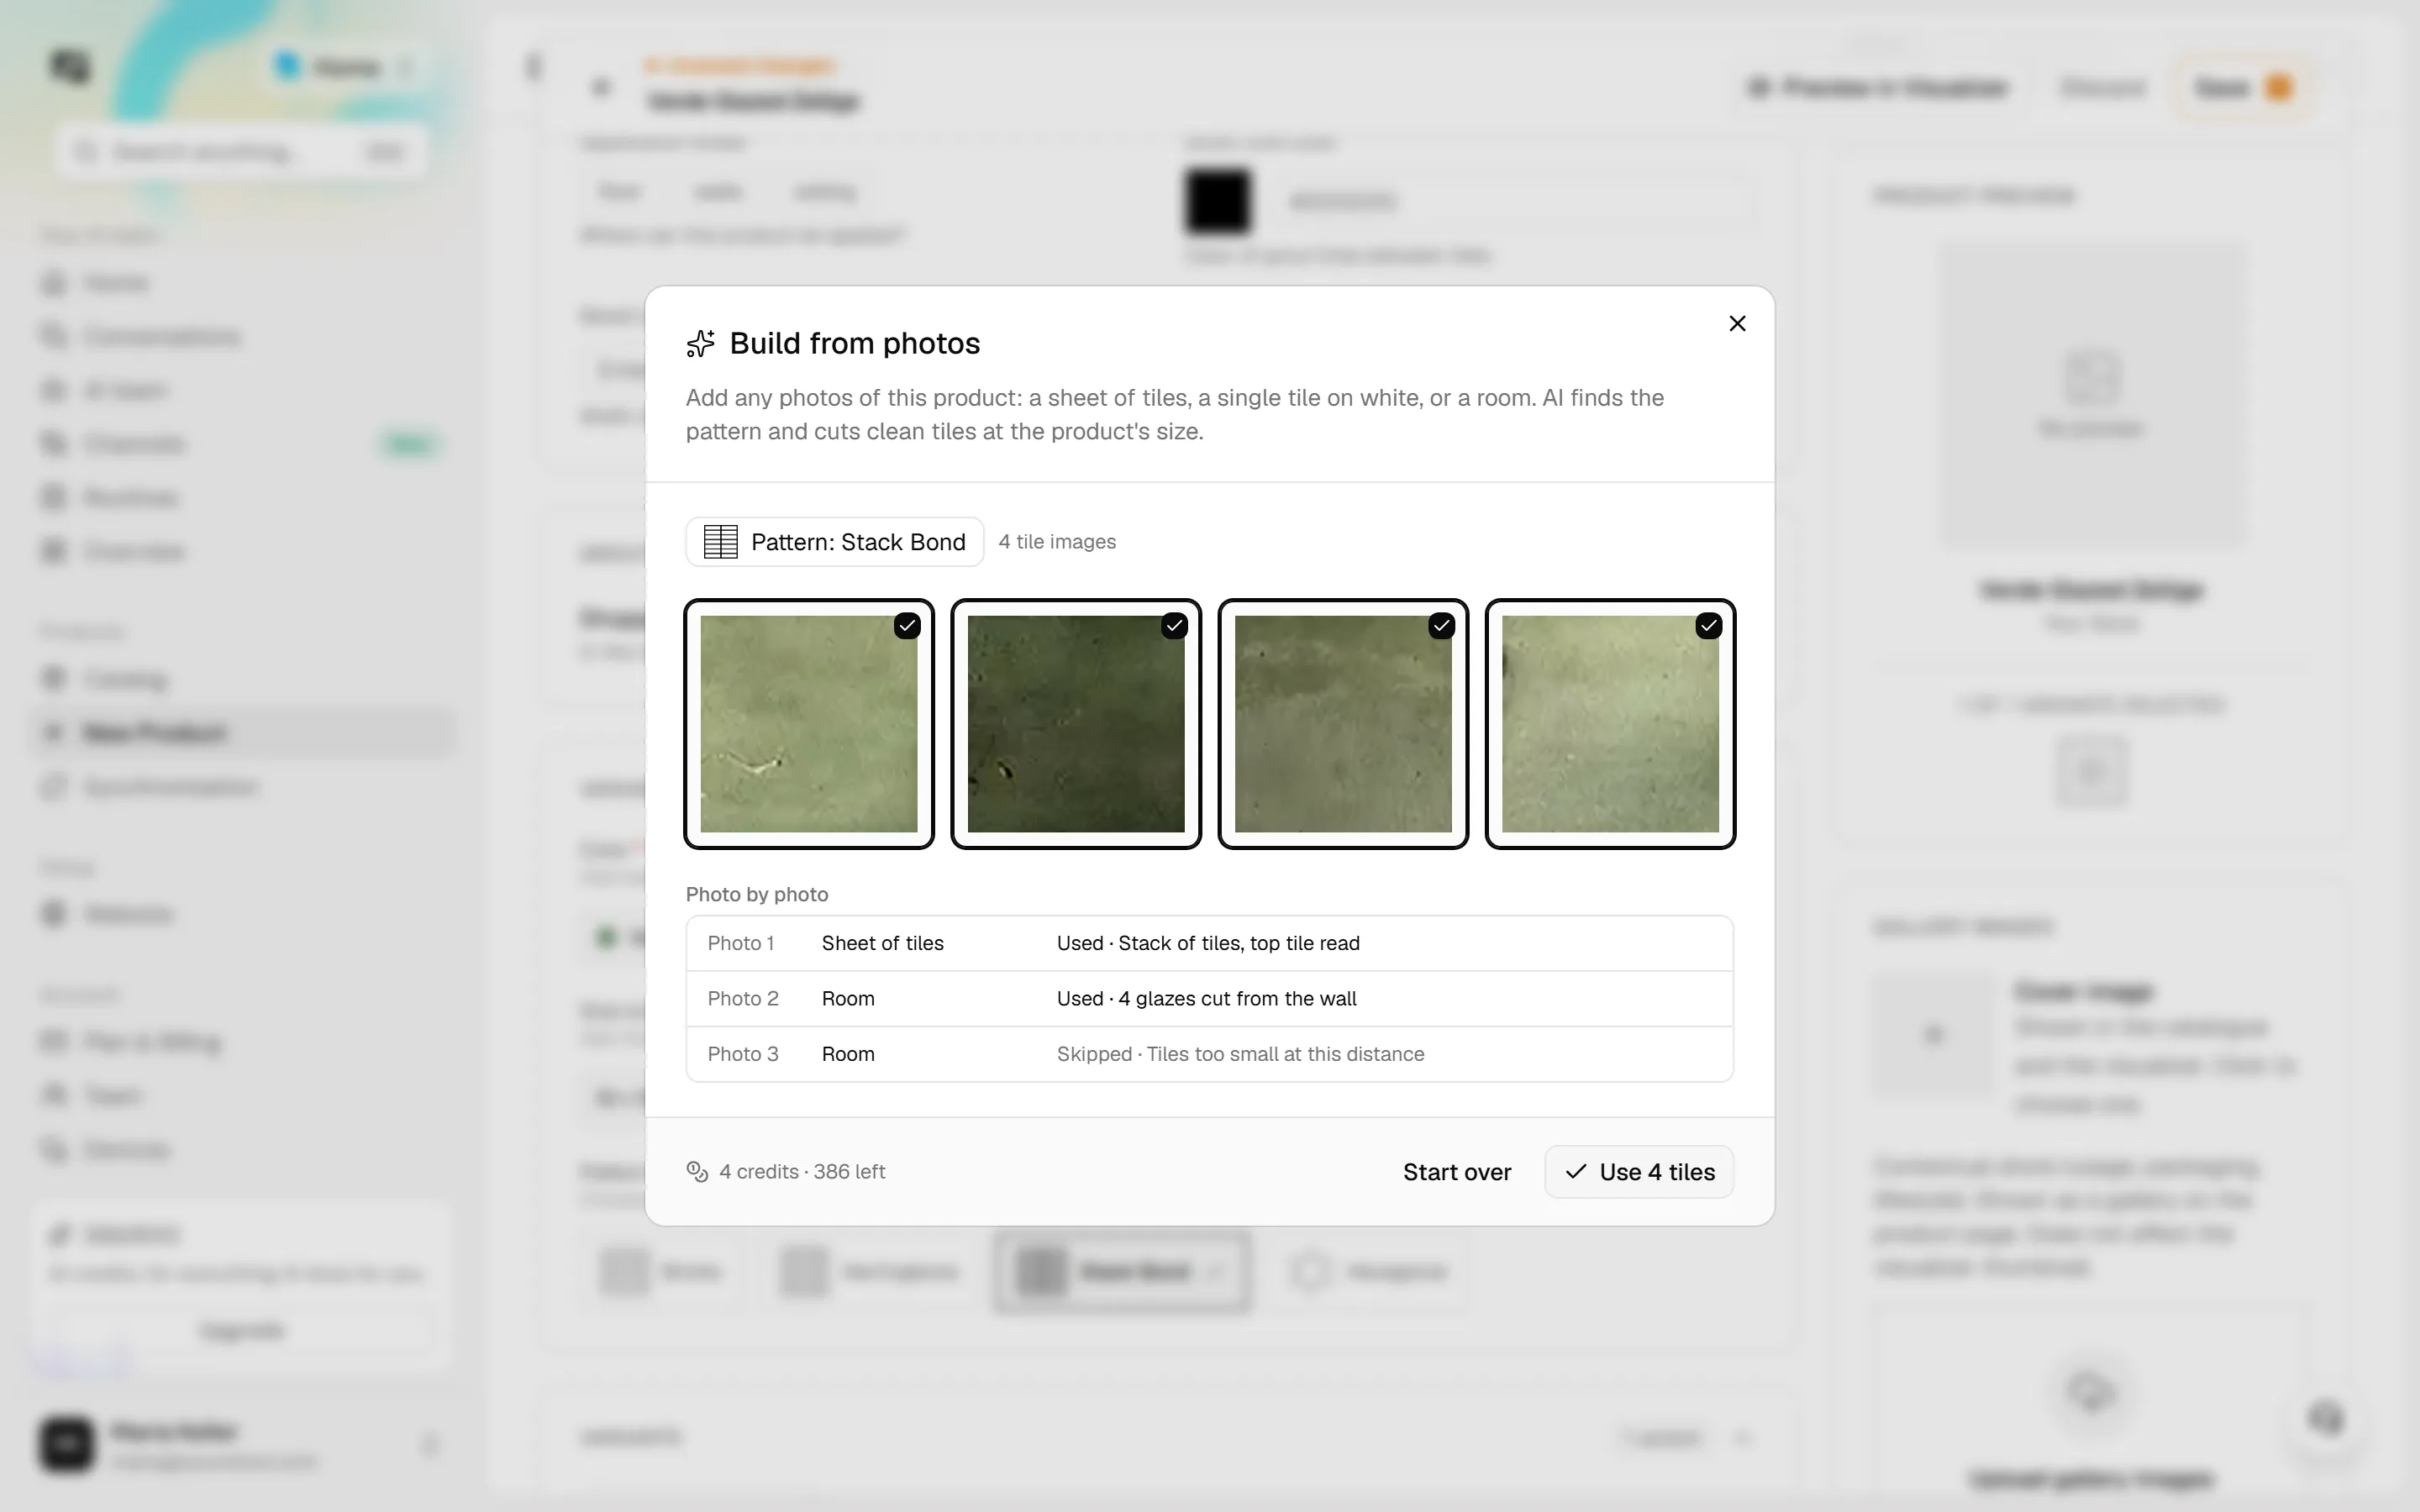
Click Use to add the tiles to the variant, then Generate Texture to build the texture the visualizer uses. Fill in any required fields still empty, such as Application Areas, and click Save at the top right.
How to check it worked
- Go back to Products › Catalog. The product counter has gone up and your new products are in the list.
- Click a product to open it. Check its variants, images and links, and use Preview in Visualizer at the top to see it in a room.
- For a CSV import, open History and confirm the import shows no failed products.
Common mistakes
- Saving from Excel as .xlsx. Only
.csvis accepted. - Renamed headers. Keep the column names exactly as in the Field Reference.
- File names that almost match. A small difference, such as a missing dash or a different extension, stops an image from matching. Copy the names from the folder into the CSV.
- Forgetting the variants. If two rows have slightly different names, they become two products instead of one product with two variants.
FAQ
Can I map my own column names? No. The importer reads fixed column names, so rename your columns to match the Field Reference before uploading.
What happens if some products fail? The import history shows which ones failed and why. Fix the cause and retry them from there.
Does Add using AI need anything from my site? Only the public product page address. It reads the details and photos from that page.
Does Build from photos cost credits? Yes. The cost is shown in the dialog before you click Analyse, along with your remaining credits.
Next steps
With your catalog in place, you can put it on your site with the visualizer and start making images in Content Studio. See how the visualizer shows your catalog to shoppers, or how the tile visualizer handles patterns and grout. If your catalog does not fit the CSV format, contact us and we will help you bring it in.